5 Easy Baking Recipes for Kids That Turn Rainy Days Into Sweet Wins
Kids in the kitchen? Yes, please. These super-simple bakes are designed for tiny hands, short attention spans, and big flavor payoffs. Think quick wins, minimal mess, and maximum fun—plus a warm, sweetly scented kitchen. Let’s get the aprons on and the giggles going.
1. Confetti Sprinkle Cookies That Practically Bake Themselves

These are the joy-sparking, birthday-in-every-bite cookies kids beg to make. They’re buttery, chewy, and packed with rainbow sprinkles—aka instant smiles. No chilling required, no fancy tools, just pure cookie magic.
Disclosure: As Amazon Associates, we earn from qualifying purchases at no extra cost to you.
Ingredients:
- 1/2 cup (113 g) unsalted butter, softened
- 3/4 cup (150 g) granulated sugar
- 1 large egg, room temperature
- 1 teaspoon vanilla extract
- 1 1/2 cups (190 g) all-purpose flour
- 1/2 teaspoon baking soda
- 1/4 teaspoon fine salt
- 1/2 cup rainbow sprinkles (jimmies work best)
Instructions:
- Preheat the oven to 350°F (175°C). Line two baking sheets with parchment paper.
- In a large bowl, cream the butter and sugar together until light and fluffy, about 2 minutes.
- Beat in the egg and vanilla until smooth.
- In a separate bowl, whisk the flour, baking soda, and salt. Add to the wet ingredients and mix just until combined.
- Fold in the sprinkles. Don’t overmix—streaks of color are cute.
- Scoop 1-tablespoon balls of dough onto the sheets, spacing them 2 inches apart.
- Bake 9–11 minutes, until the edges are set and just golden. The centers should look soft—don’t overbake.
- Cool on the sheet for 5 minutes, then transfer to a wire rack to cool completely (or eat warm).
Serve with cold milk, obviously. For variations, swap sprinkles for mini chocolate chips or crush a few freeze-dried strawberries for fruity spots of color. Pro tip: Roll the tops in extra sprinkles before baking for that bakery look.
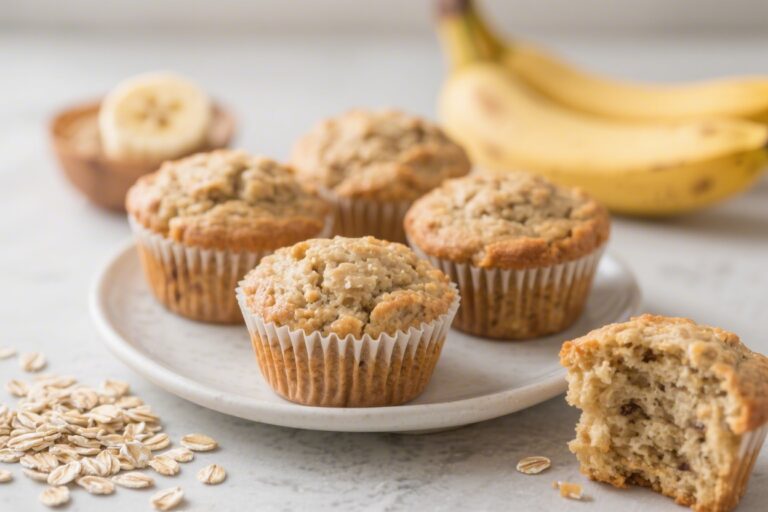
2. One-Bowl Banana Muffins That Save Your Sad Bananas
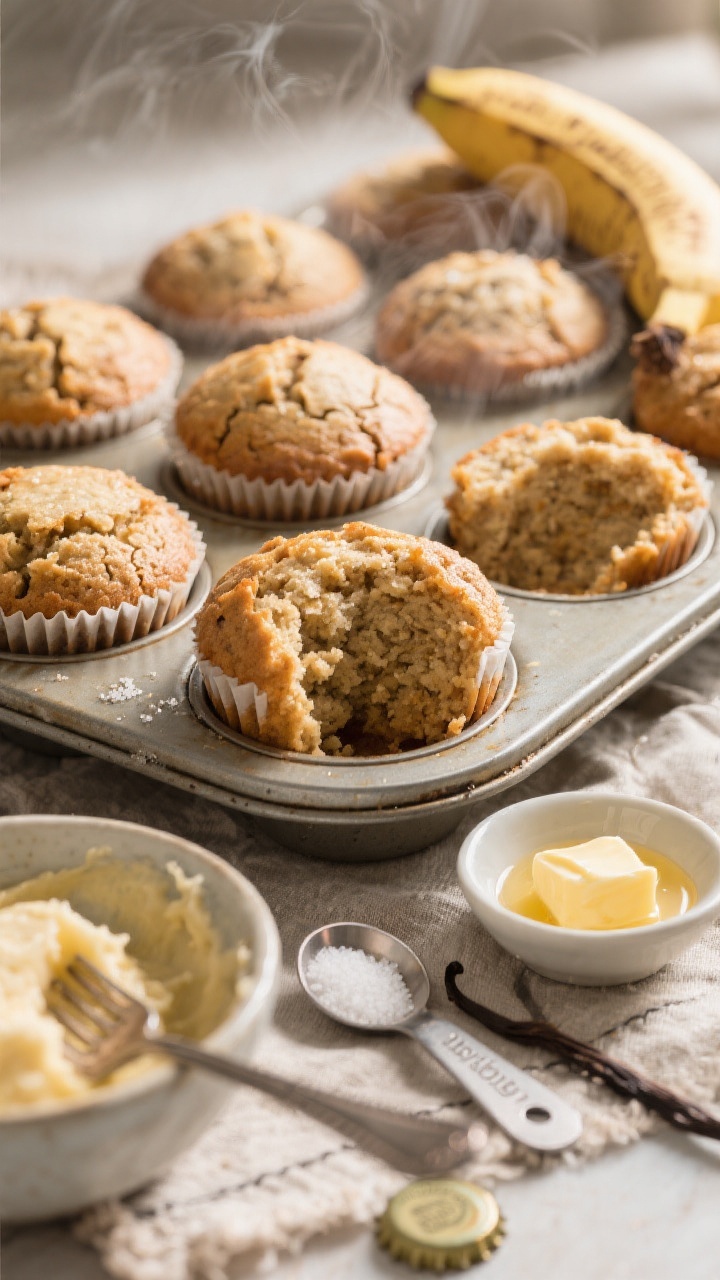
Got spotty bananas? These kid-approved muffins are fluffy, cozy, and not too sweet—perfect for breakfast, lunchboxes, or snack attacks. Best part: it’s a one-bowl situation and comes together in minutes.
Ingredients:
- 3 very ripe bananas (about 1 1/4 cups mashed)
- 1/3 cup (75 g) melted butter or neutral oil
- 1/2 cup (100 g) granulated sugar
- 1 large egg
- 1 teaspoon vanilla extract
- 1 teaspoon baking soda
- 1/2 teaspoon baking powder
- 1/2 teaspoon cinnamon (optional but delicious)
- 1/4 teaspoon salt
- 1 1/2 cups (190 g) all-purpose flour
- 1/2 cup chocolate chips or chopped walnuts (optional)
Instructions:
- Preheat the oven to 350°F (175°C). Line a 12-cup muffin tin with paper liners.
- In a large bowl, mash the bananas with a fork. Stir in the melted butter, sugar, egg, and vanilla until combined.
- Sprinkle the baking soda, baking powder, cinnamon, and salt over the mixture; stir.
- Gently fold in the flour until just combined. Don’t overmix—lumpy batter = tender muffins.
- Fold in chocolate chips or walnuts if using.
- Divide batter evenly among cups. Bake 16–20 minutes, or until a toothpick comes out clean.
- Cool for 5 minutes in the pan, then move to a rack. Try not to eat three at once.
Serve warm with a swipe of butter or a drizzle of honey. Add-ins are endless: blueberries, shredded coconut, or a dollop of peanut butter in the center for a surprise. Bonus: They freeze like a dream—wrap and stash for busy mornings.
3. 10-Minute No-Bake Cereal Bars Kids Can Make Solo
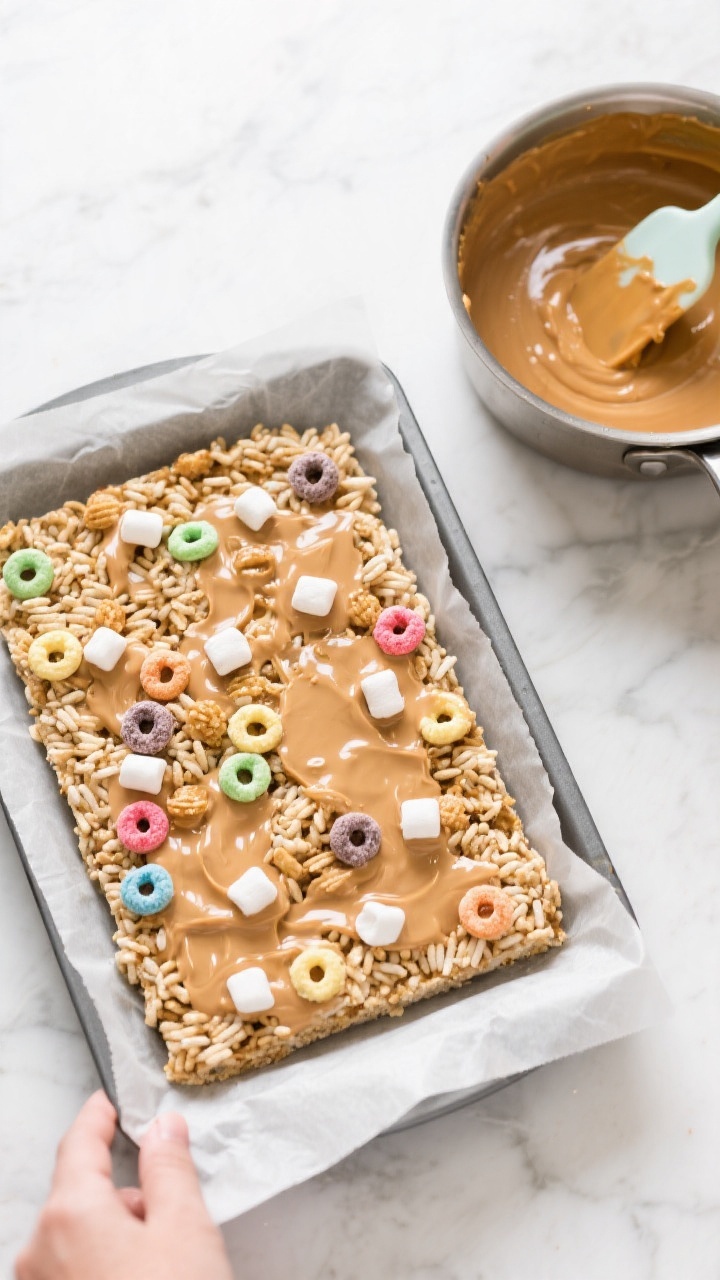
When the oven is off-limits, these crunchy-chewy bars save the day. They’re sticky in the best way, endlessly customizable, and come together so fast it’s almost suspicious. Perfect for after-school treats or weekend movie snacks.
Ingredients:
- 3 cups crispy rice cereal (or a mix of favorite cereals)
- 1/2 cup mini marshmallows (optional, for extra chew)
- 1/2 cup (125 g) creamy peanut butter or sunflower seed butter
- 1/2 cup (170 g) honey or brown rice syrup
- 1/4 teaspoon salt
- 1 teaspoon vanilla extract
- 1/4 cup mini chocolate chips or rainbow sprinkles (optional)
Instructions:
- Line an 8-inch square pan with parchment, leaving overhang for easy lifting.
- In a medium saucepan over low heat, stir together the peanut butter, honey, and salt until smooth and warm, about 2 minutes. Remove from heat and stir in vanilla.
- In a large bowl, combine the cereal and mini marshmallows. Pour the warm mixture over and mix gently until evenly coated.
- Press mixture firmly into the prepared pan using a spatula or lightly oiled hands. Sprinkle with chocolate chips or sprinkles and press again to stick.
- Chill 20–30 minutes to set, then lift out and cut into 12 bars.
Try crushed pretzels, dried cranberries, or chopped apricots for a fun twist. For a chocolate version, replace 2 tablespoons of nut butter with cocoa powder and add a pinch more honey. Pro tip: Press hard—tighter packing keeps bars from crumbling.
4. Rainbow Fruit Hand Pies That Look Like Mini Masterpieces
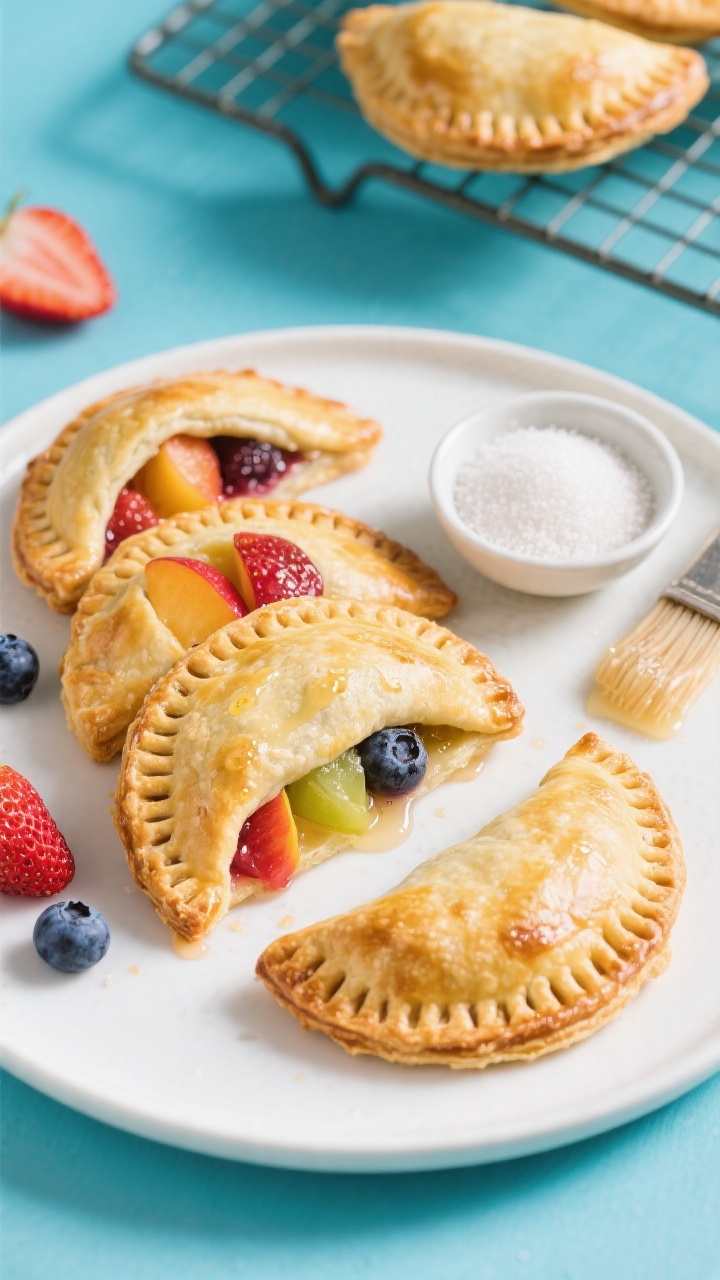
Flaky, fruity, and absolutely adorable—these hand pies are like pocket-sized celebrations. Kids love assembling and crimping the edges, and you’ll love the short ingredient list. Use fresh or frozen fruit and cheat with store-bought dough. No shame, only pie.
Ingredients:
- 2 refrigerated pie crusts (or homemade, if you’re fancy)
- 1 1/2 cups mixed chopped fruit (strawberries, blueberries, peaches, apples)
- 2 tablespoons granulated sugar (adjust to taste)
- 1 tablespoon cornstarch
- 1 teaspoon lemon juice
- 1/2 teaspoon vanilla extract
- 1 pinch salt
- 1 egg, beaten (for egg wash) or milk for brushing
- Coarse sugar for sprinkling (optional)
Instructions:
- Preheat oven to 400°F (200°C). Line a baking sheet with parchment.
- In a bowl, mix the fruit, sugar, cornstarch, lemon juice, vanilla, and salt. Set aside.
- Unroll the pie crusts and cut out 8–10 circles (about 3.5–4 inches) using a cutter or glass.
- Place half the circles on the sheet. Spoon 1–2 tablespoons of fruit filling in the center of each, leaving a 1/2-inch border.
- Top with remaining circles. Crimp edges with a fork to seal. Cut a small slit on top for steam.
- Brush tops with egg wash or milk. Sprinkle with coarse sugar if using.
- Bake 16–20 minutes, until golden and bubbling. Cool 10 minutes before serving—molten fruit alert.
Serve warm with a scoop of vanilla ice cream or a drizzle of glaze (powdered sugar + milk). Swap fillings: cinnamon apples in fall, cherries in summer, even jam in a pinch. For color, brush with a tiny bit of milk tinted with gel food coloring before baking—rainbow pies for the win.
5. Sheet-Pan Pizza Bread Kids Build Like LEGO
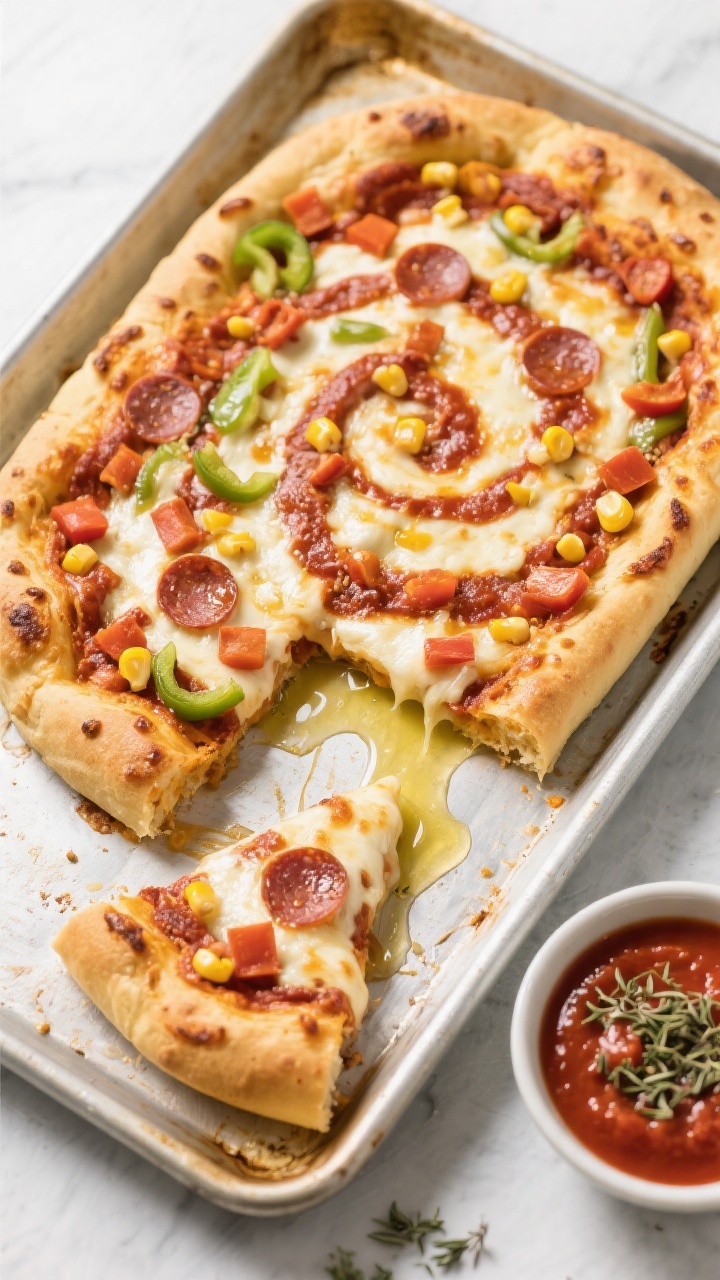
Okay, it’s not dessert—but it’s baking, it’s fun, and it makes dinner magically easy. This pizza bread is soft, cheesy, and endlessly customizable. Plus, kids love the topping “art project.”
Ingredients:
- 1 pound pizza dough (store-bought or homemade), room temperature
- 2 tablespoons olive oil, divided
- 1 cup pizza sauce or marinara
- 2 cups shredded mozzarella cheese
- Favorite toppings: mini pepperoni, sliced olives, diced bell peppers, mushrooms, pineapple—go wild
- 1/2 teaspoon dried oregano
- 1/4 teaspoon garlic powder
- Pinch of salt
Instructions:
- Preheat oven to 450°F (230°C). Lightly oil a sheet pan with 1 tablespoon olive oil.
- On a floured surface, stretch the pizza dough into a rectangle to fit the pan. Transfer and press to the edges. Brush top with remaining olive oil.
- Spread on the pizza sauce. Sprinkle with mozzarella. Add toppings. Dust with oregano, garlic powder, and a pinch of salt.
- Bake 12–15 minutes until the cheese is bubbly and the crust is golden.
- Cool slightly, slice into squares, and watch it disappear.
Make it a “topping bar” night with bowls of veggies and proteins so kids design their own slice. For a cheesy crust, scatter a little shredded cheese around the dough’s edges before baking—hello, crispy frico. Leftovers reheat beautifully in a hot skillet.
Kid Baking Tips That Make Everything Easier
Set up a mini “mise en place” station with pre-measured ingredients in small bowls so kids can just pour and mix. Give each child a job: mixer, measurer, decorator. And keep a damp towel nearby—flour has teleportation skills.
Kitchen Safety, The Fun Way
Teach kids to say “hot corner!” when passing pans, and show them how to use oven mitts properly. Use plastic or silicone tools for younger bakers, and keep knives and graters off the main prep zone unless supervised.
Make It A Memory
Play a “bake-off” soundtrack, put a timer on, and let kids present their creations with dramatic flair. Snap photos and save recipe cards in a binder. You’ll thank yourself later when they’re packing their first dorm snacks.
There you go: five kid-friendly bakes that deliver big flavor with low stress. Whether you’re rescuing bananas, corralling sprinkles, or orchestrating a pizza art party, these recipes keep little hands busy and bellies happy. Ready to pick one and preheat? The oven—and the fun—are calling.
Printable Recipe Card
Want just the essential recipe details without scrolling through the article? Get our printable recipe card with just the ingredients and instructions.