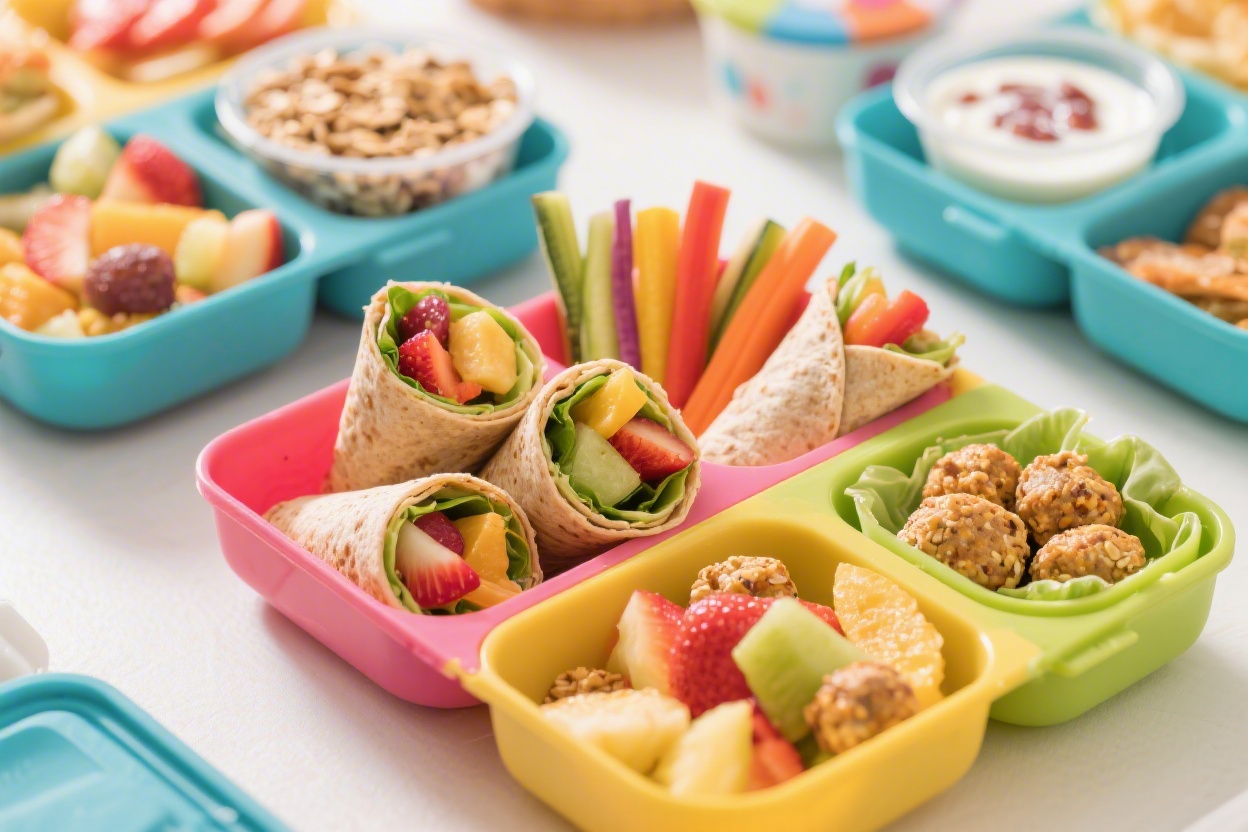
5 Healthy Kids Lunches for School That Disappear by Recess
Lunchboxes don’t have to be sad sandwiches and mystery fruit cups. These five kid-approved recipes are colorful, packable, and loaded with real-deal nutrition—without feeling “healthy” in that boring way. We’re talking foods that hold up till noon, taste great cold, and actually get eaten. Ready to upgrade the lunchbox game?
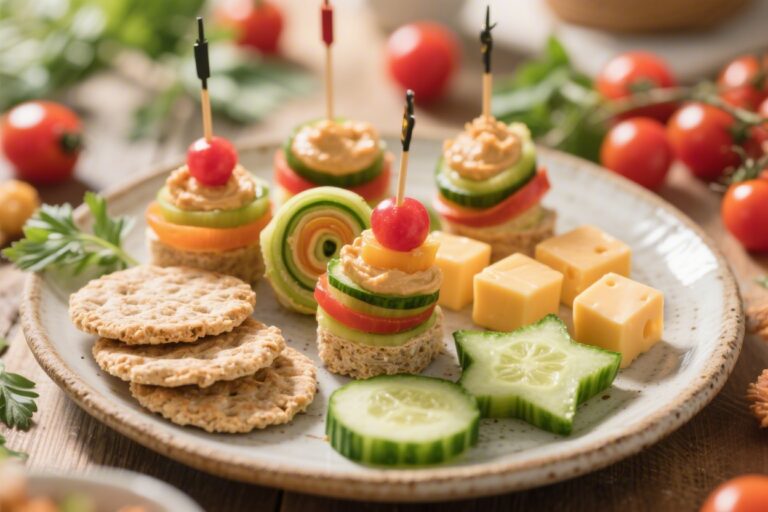
1. Rainbow Turkey Pinwheels With Veggie Ranch Crunch
These pinwheels are like sushi’s fun cousin—easy to hold, bright as a crayon box, and sneakily packed with veggies. They slice into bite-size swirls that kids love, and they stay sturdy in a lunchbox. Bonus: the homemade yogurt ranch gives creamy flavor without the heavy stuff.
Disclosure: As Amazon Associates, we earn from qualifying purchases at no extra cost to you.
Ingredients:
- 2 whole-wheat tortillas (8–10 inches)
- 4 ounces sliced turkey breast (nitrate-free if possible)
- 2 slices of mild cheese (provolone or mozzarella)
- 1/2 cup baby spinach
- 1/3 cup shredded carrots
- 1/3 cup thinly sliced red bell pepper
- 1/4 cup thinly sliced cucumber (seeded)
- 2 tablespoons hummus
- 2 tablespoons plain Greek yogurt
- 1 teaspoon dried dill
- 1/2 teaspoon garlic powder
- 1/2 teaspoon onion powder
- Pinch of salt and black pepper
Instructions:
- Make the dip: In a small bowl, stir together Greek yogurt, dill, garlic powder, onion powder, salt, and pepper. Set aside.
- Lay out the tortillas. Spread a thin layer of hummus over each, going right to the edges to act as tasty “glue.”
- Layer turkey and cheese evenly over the tortillas, then add spinach, carrots, bell pepper, and cucumber in a thin, even layer.
- Tightly roll each tortilla from one side to the other. Press gently to seal.
- Slice into 1-inch pinwheels with a sharp knife, wiping the blade between cuts for neat swirls.
- Pack with a small container of the yogurt ranch for dipping.
Pro tip: To keep the pinwheels from unraveling, roll them in parchment for a minute before slicing. Swap turkey for roasted chicken or mashed chickpeas, and use a spinach wrap for extra color. Add apple slices and a handful of pretzels on the side and you’ve got a high-fiber, high-fun lunch.
2. Cheesy Broccoli Quinoa Bites Kids Won’t Trade Away
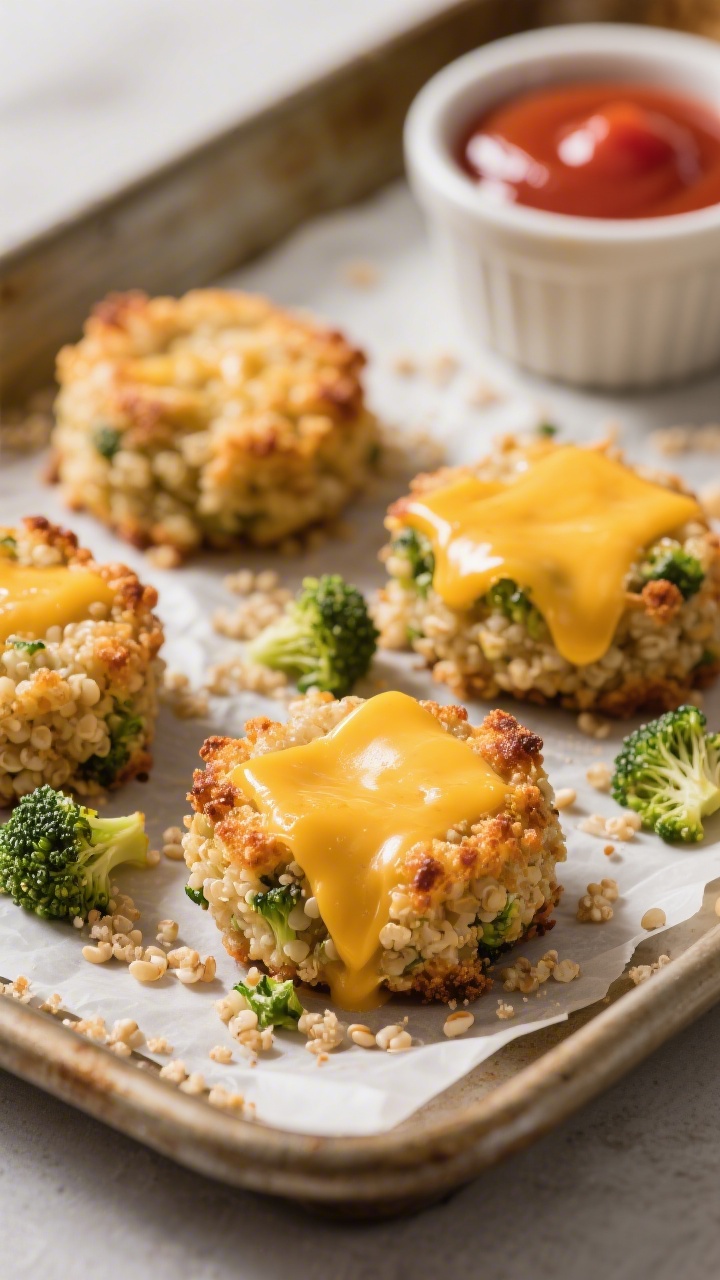
These warm-and-serve bites are the crispy-edged, cheesy answer to “I’m not eating broccoli.” They’re protein-packed from quinoa and eggs, travel like champs, and taste great at room temp. Think mini tater tots—only smarter.
Ingredients:
- 1 cup cooked quinoa (well-fluffed and cooled)
- 1 cup finely chopped steamed broccoli (patted dry)
- 3/4 cup shredded cheddar cheese
- 2 large eggs
- 1/4 cup whole-wheat breadcrumbs
- 1/2 teaspoon garlic powder
- 1/4 teaspoon salt
- 1/8 teaspoon black pepper
- Olive oil spray (for the pan)
Instructions:
- Preheat oven to 375°F (190°C). Lightly spray a 24-cup mini muffin tin.
- In a bowl, mix quinoa, broccoli, cheddar, eggs, breadcrumbs, garlic powder, salt, and pepper until evenly combined.
- Scoop heaping tablespoons into the muffin cups and press firmly so they hold together.
- Bake 15–18 minutes, until the edges are golden and the centers are set.
- Cool in the pan 5 minutes, then loosen with a butter knife and transfer to a rack to cool completely.
Pro tip: Dry broccoli = crispy bites. Press it with a paper towel before mixing. Pack with a little ketchup or marinara for dipping and some grapes on the side. Want variety? Swap cheddar for mozzarella and add a pinch of Italian seasoning. These also freeze beautifully—reheat in a toaster oven for crunch.
3. Bento-Style DIY Sushi Sandwich Squares
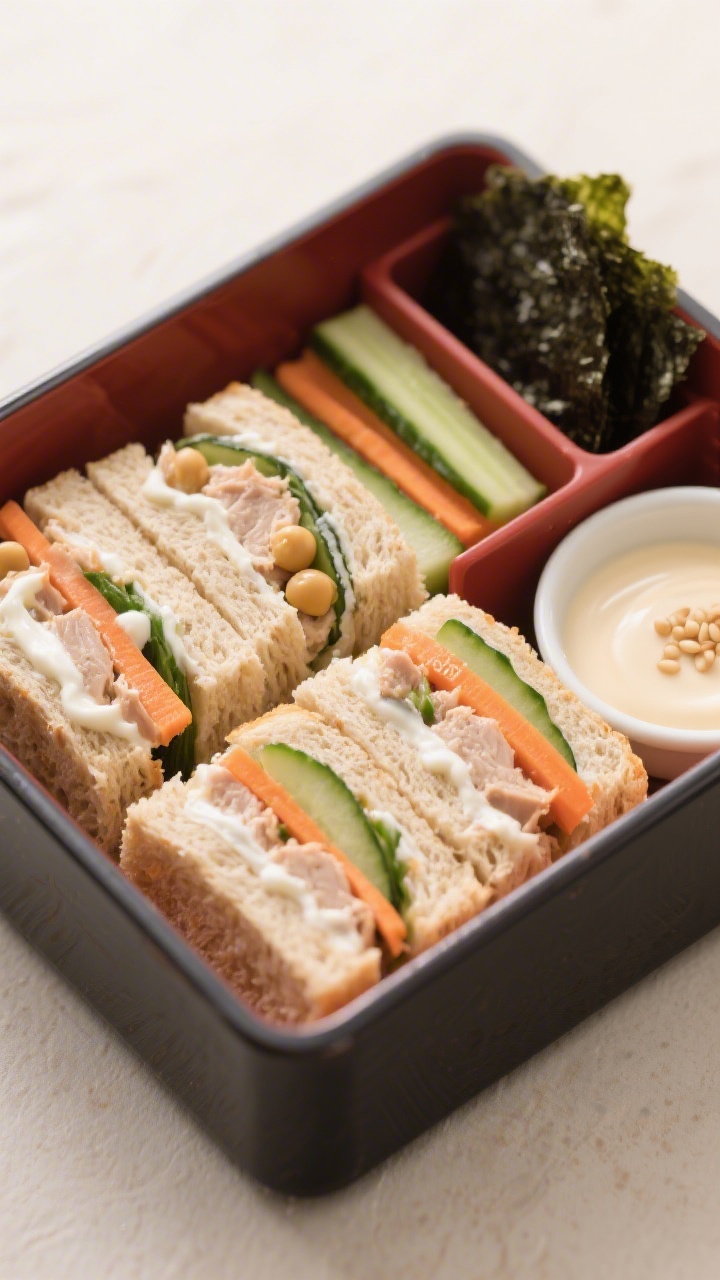
No seaweed, no rolling mat, just all the sushi vibes. These tidy little squares use soft bread and a savory tuna or chickpea mash for protein, plus crunchy cukes. They’re playful to assemble, cut cleanly, and fit perfectly into a bento box.
Ingredients:
- 4 slices soft whole-wheat sandwich bread (crusts on or off)
- 1 (5-ounce) can tuna in water, drained well (or 1 cup smashed chickpeas for vegetarian)
- 2 tablespoons plain Greek yogurt
- 1 teaspoon mayo (optional, for creaminess)
- 1/2 teaspoon lemon juice
- 1/2 teaspoon low-sodium soy sauce or coconut aminos
- 1/4 teaspoon sesame oil (optional but yummy)
- 1/4 cup very thin cucumber matchsticks (patted dry)
- 1/4 cup shredded carrot
- 1 tablespoon toasted sesame seeds (optional)
- Pinch of salt and pepper
Instructions:
- In a bowl, mix tuna (or chickpeas) with yogurt, mayo, lemon juice, soy sauce, sesame oil, salt, and pepper until creamy.
- Lightly flatten the bread slices with a rolling pin to make them more pliable.
- Spread the tuna mixture thinly over two slices. Sprinkle with cucumber, carrot, and sesame seeds.
- Top with the remaining bread slices to make two sandwiches. Press gently to seal.
- Slice each sandwich into 9 neat squares (3×3 grid). Wipe the knife between cuts for clean edges.
Pro tip: Pack with edamame, orange segments, and a tiny container of soy sauce for dipping if your kid likes it. Not a tuna fan? Try rotisserie chicken mashed with yogurt and a dash of teriyaki. For extra “sushi” flair, wrap each square in a thin cucumber ribbon.
4. Creamy Pesto Pasta Salad With Hidden Peas And Mozzarella Pearls
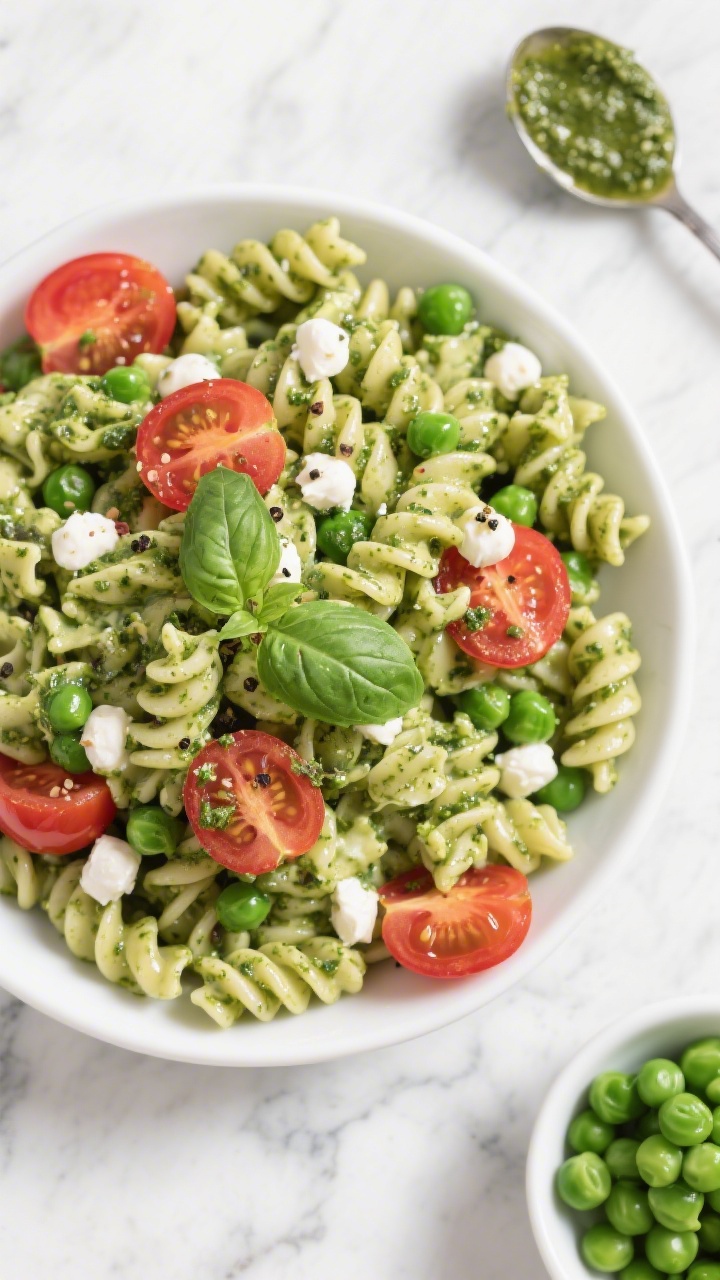
This pasta salad is fresh, herby, and creamy—but still light, thanks to a yogurt pesto situation. It’s perfect for kids who love noodles and parents who love sneaking in veggies. It holds up beautifully in the fridge and doesn’t turn into a clump by lunchtime.
Ingredients:
- 2 cups dry short pasta (rotini or mini shells)
- 1/2 cup frozen peas, thawed
- 1/2 cup halved cherry tomatoes (optional for picky eaters)
- 1/2 cup mozzarella pearls (or diced string cheese)
- 2 tablespoons prepared pesto
- 3 tablespoons plain Greek yogurt
- 1 tablespoon olive oil
- 1 tablespoon grated Parmesan
- 1 teaspoon lemon juice
- Pinch of salt and black pepper
Instructions:
- Cook pasta in salted water until just al dente. In the last minute, toss in the peas to blanch. Drain and rinse with cool water to stop the cooking.
- In a large bowl, whisk together pesto, Greek yogurt, olive oil, Parmesan, lemon juice, salt, and pepper.
- Add cooled pasta, peas, mozzarella pearls, and tomatoes (if using). Toss until evenly coated.
- Chill 20–30 minutes to let flavors settle. Taste and adjust seasoning as needed.
Pro tip: Use mini shapes so little forks can catch the noodles easily. Stir in diced cucumbers or swap peas for sweet corn if that’s the vibe. Pack with apple slices and a small treat—you’ll get clean lunchboxes back, trust me.
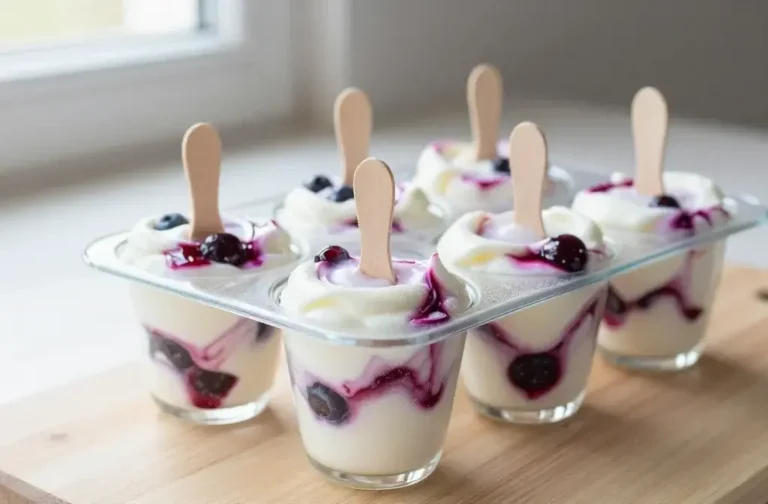
5. Apple Pie Yogurt Parfaits With Cinnamon Granola Crunch
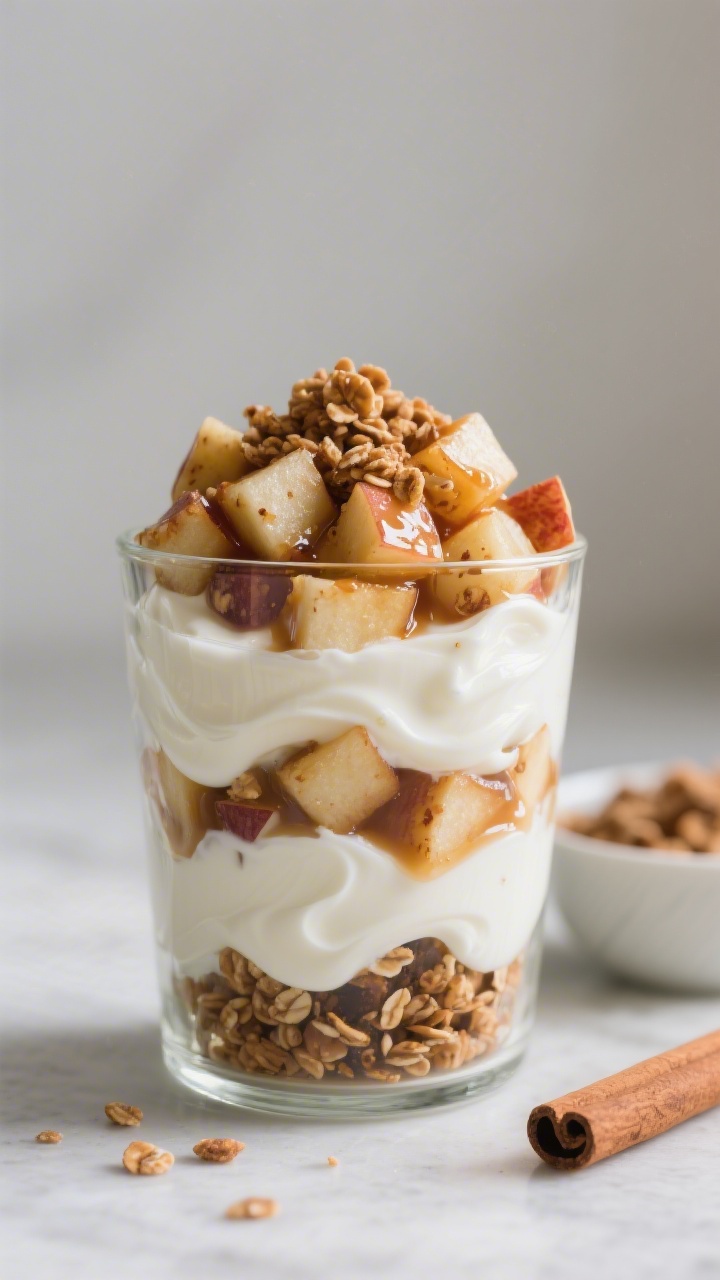
Breakfast for lunch? Absolutely. These parfaits are layered with protein-rich yogurt, warm cinnamon apples, and a crunchy granola topper. They taste like dessert but keep sugar reasonable and energy steady till the last bell.
Ingredients:
- 1 cup plain or vanilla Greek yogurt (choose lower sugar if using vanilla)
- 1 medium apple, peeled and diced small
- 1 teaspoon butter or coconut oil
- 1 teaspoon maple syrup or honey
- 1/2 teaspoon ground cinnamon
- 1 tablespoon water
- 1/2 cup low-sugar granola
- 1 tablespoon raisins or chopped dried cranberries (optional)
- Pinch of nutmeg (optional)
Instructions:
- In a small pan over medium heat, melt butter. Add apples, cinnamon, nutmeg (if using), maple syrup, and water. Cook 3–4 minutes until just tender and glossy. Cool completely.
- Layer in a leakproof container: half the yogurt, half the apples, a spoon of granola; repeat. Keep extra granola in a separate snack bag if you want it super crunchy at lunch.
- Top with raisins or cranberries if your kid likes a little sweet chew.
Pro tip: For dairy-free, use a thick coconut yogurt. Stir in chia seeds for extra fiber, or add a sprinkle of ground flax. Round out the box with cheese cubes or a boiled egg for extra protein and some cucumber coins for crunch.
Smart Packing Tips
Want these lunches to look as good at noon as they did at 7 a.m.? A few quick wins make all the difference.
- Keep it crisp: Pat veggies dry and let hot foods cool before packing to avoid sogginess.
- Compartment power: Use silicone cups or bento dividers so flavors don’t mingle.
- Temperature matters: An ice pack keeps dairy and proteins safe—and textures on point.
- Balance is key: Aim for a carb, protein, fruit/veg, and fun crunch in every box.
- Kid buy-in: Let them pick a veggie dip or a “sprinkle” add-on (sesame seeds, mini croutons) to make it theirs.
Allergy-Savvy Swaps
- Gluten-free: Use GF tortillas, GF breadcrumbs, and GF pasta. Check granola labels.
- Dairy-free: Sub plant-based yogurt and cheese; use nutritional yeast for cheesy notes.
- Egg-free: For quinoa bites, swap eggs for 2 tablespoons ground flax mixed with 5 tablespoons water.
- Nut-free: Choose nut-free granola and check pesto ingredients (use seed-based pesto if needed).
Ready to make lunch the best subject of the day? These five recipes are quick to prep, sturdy to pack, and kid-tested. Pick one, batch it on Sunday, and watch how fast those lunchboxes come home empty. Seriously—your future self will thank you at 7 a.m.
Printable Recipe Card
Want just the essential recipe details without scrolling through the article? Get our printable recipe card with just the ingredients and instructions.