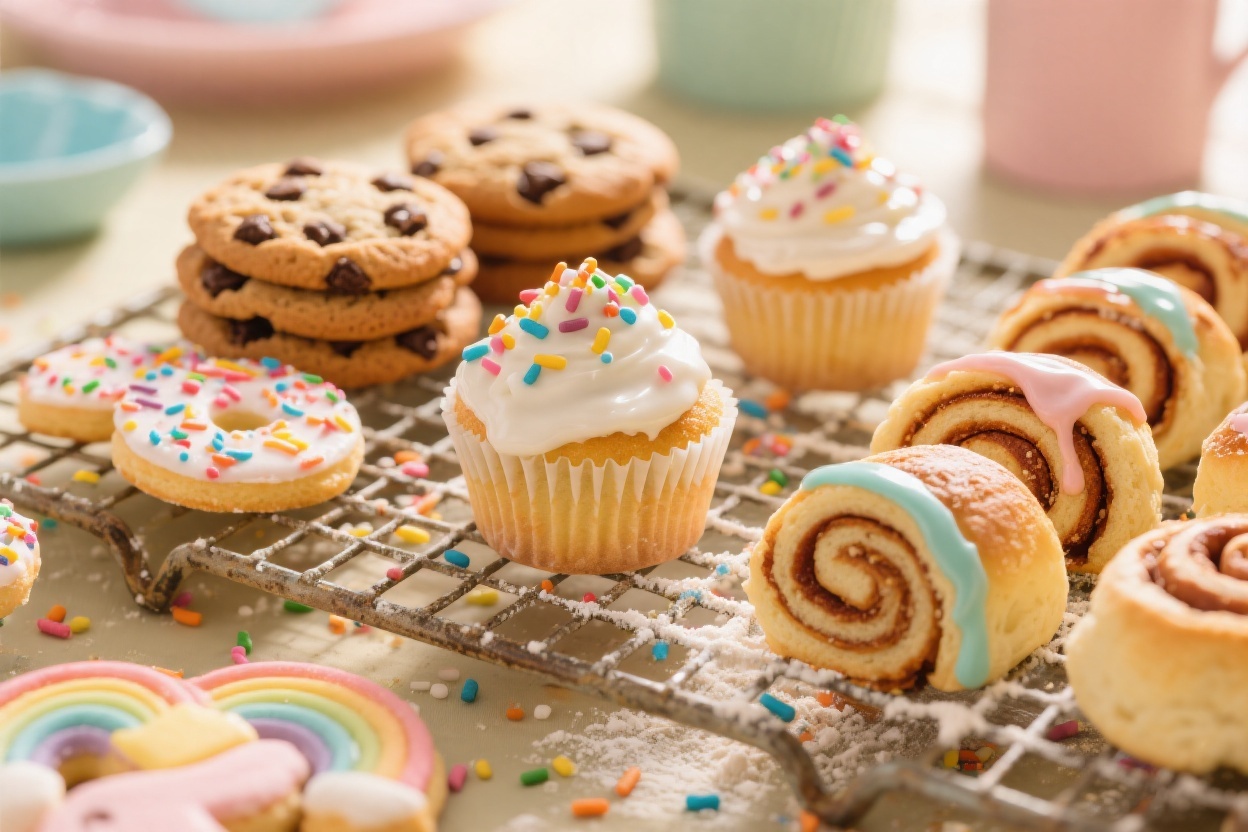
5 Fun Baking Recipes for Kids That Make Sweet Memories Fast
Want to turn a rainy afternoon into a full-on kitchen adventure? These kid-friendly bakes are low-stress, big on fun, and totally delicious. Think colorful sprinkles, gooey chocolate, and cute shapes that make little bakers feel like total pros.
Every recipe is built for tiny hands and short attention spans—simple steps, quick wins, and plenty of chances to stir, sprinkle, and taste. Ready to bake up some memories? Let’s do this.
Disclosure: As Amazon Associates, we earn from qualifying purchases at no extra cost to you.
1. Confetti Mug Cakes That Beat Any Store-Bought Cupcake
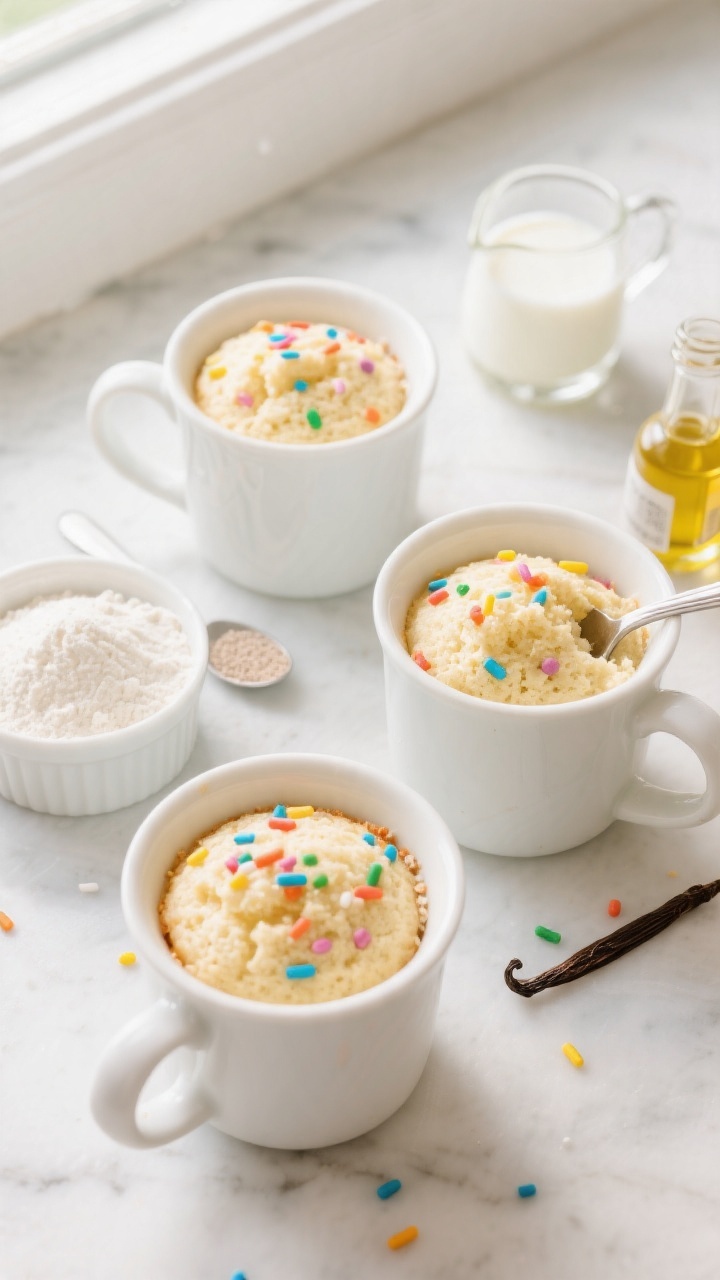
When the sweet tooth strikes and patience is MIA, these microwave mug cakes save the day. They’re fluffy, festive, and done in under five minutes—no oven drama required. Kids love the rainbow sprinkles; grown-ups love the minimal cleanup.
Ingredients:
- 4 tablespoons all-purpose flour
- 2 tablespoons granulated sugar
- 1/4 teaspoon baking powder
- Pinch of salt
- 3 tablespoons milk
- 1 tablespoon vegetable oil (or melted butter)
- 1/4 teaspoon vanilla extract
- 1 tablespoon rainbow sprinkles, plus extra for topping
- Optional: 1 tablespoon mini chocolate chips
Instructions:
- In a microwave-safe mug (10–12 oz), whisk together the flour, sugar, baking powder, and salt with a fork.
- Stir in the milk, oil, and vanilla until smooth. Fold in sprinkles (and chocolate chips if using).
- Microwave on High for 60–90 seconds, until the top is set and springs back. Don’t overcook—carryover heat finishes the job.
- Cool for 1–2 minutes, then add a few extra sprinkles on top. Serve warm.
Pro tip: Make it a “decorate-your-own” station with mini marshmallows, whipped cream, or sliced strawberries. Want a chocolate version? Swap 1 tablespoon flour for 1 tablespoon cocoa powder and add a pinch more sugar.
2. No-Roll Sugar Cookie Shapes Kids Can Decorate Like Pros
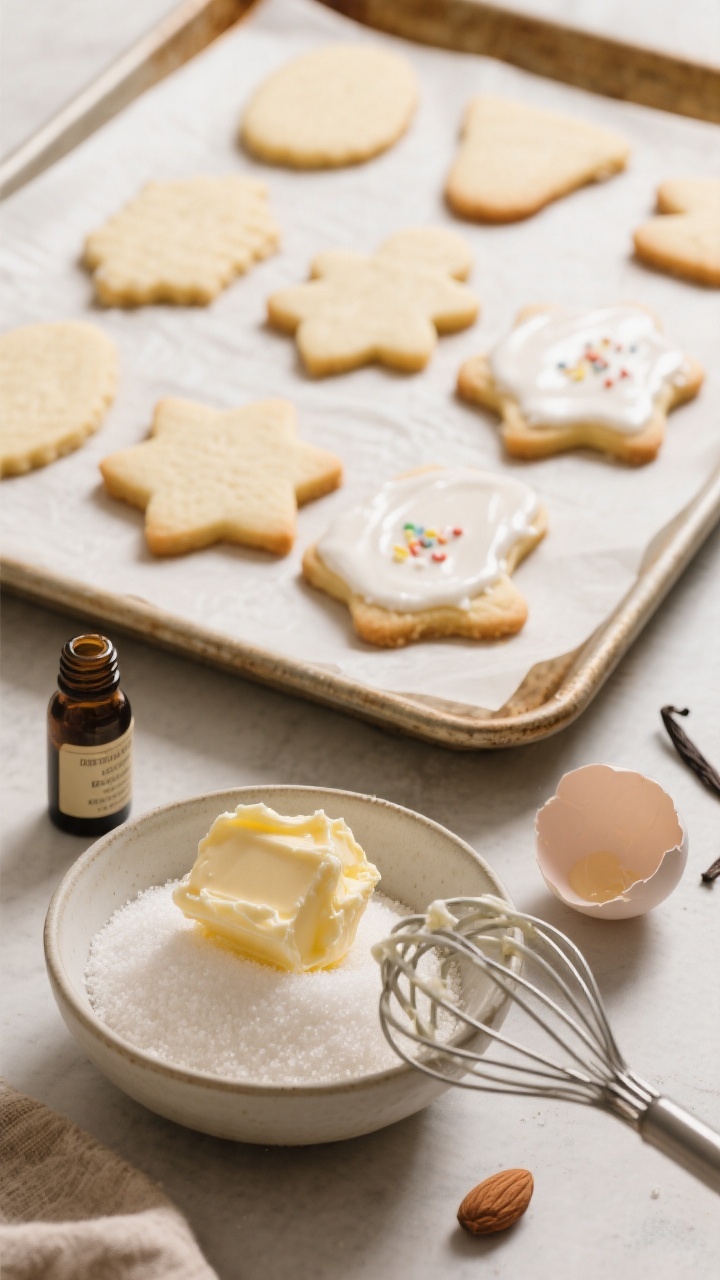
Cookie cutters + icing + sprinkles = instant party. This dough is soft, forgiving, and holds shapes beautifully—no chilling, no rolling pin wrestling. Perfect for birthdays, holidays, or “just because” afternoons.
Ingredients:
- 1/2 cup unsalted butter, softened
- 3/4 cup granulated sugar
- 1 large egg
- 1 teaspoon vanilla extract
- 1/4 teaspoon almond extract (optional but delicious)
- 1 3/4 cups all-purpose flour
- 1/2 teaspoon baking powder
- 1/4 teaspoon salt
- For simple icing: 1 cup powdered sugar, 1–2 tablespoons milk, 1/4 teaspoon vanilla, food coloring
- Sprinkles, sanding sugar, mini candies for decorating
Instructions:
- Preheat oven to 350°F (175°C). Line two baking sheets with parchment.
- Cream butter and sugar until light and fluffy (2–3 minutes). Beat in the egg, vanilla, and almond extract.
- Whisk the flour, baking powder, and salt. Add to the bowl and mix until a soft dough forms.
- Pinch off tablespoon-sized portions, roll into balls, and flatten to 1/4-inch thick. Let kids press cookie cutters straight down to cut shapes right on the sheet—peel away excess dough and re-shape scraps.
- Bake 8–10 minutes, until edges are just set and tops look matte. Cool completely.
- For icing, whisk powdered sugar with just enough milk to reach a thick drizzle. Tint with food coloring. Spoon or pipe onto cookies and decorate.
Serving ideas: Turn them into edible place cards by writing names with a piping bag. For a lemon twist, add 1 teaspoon lemon zest to the dough and 1 teaspoon lemon juice to the icing—so bright and happy.
3. Peanut-Butter-Free Monster Bars With Gooey Chocolate
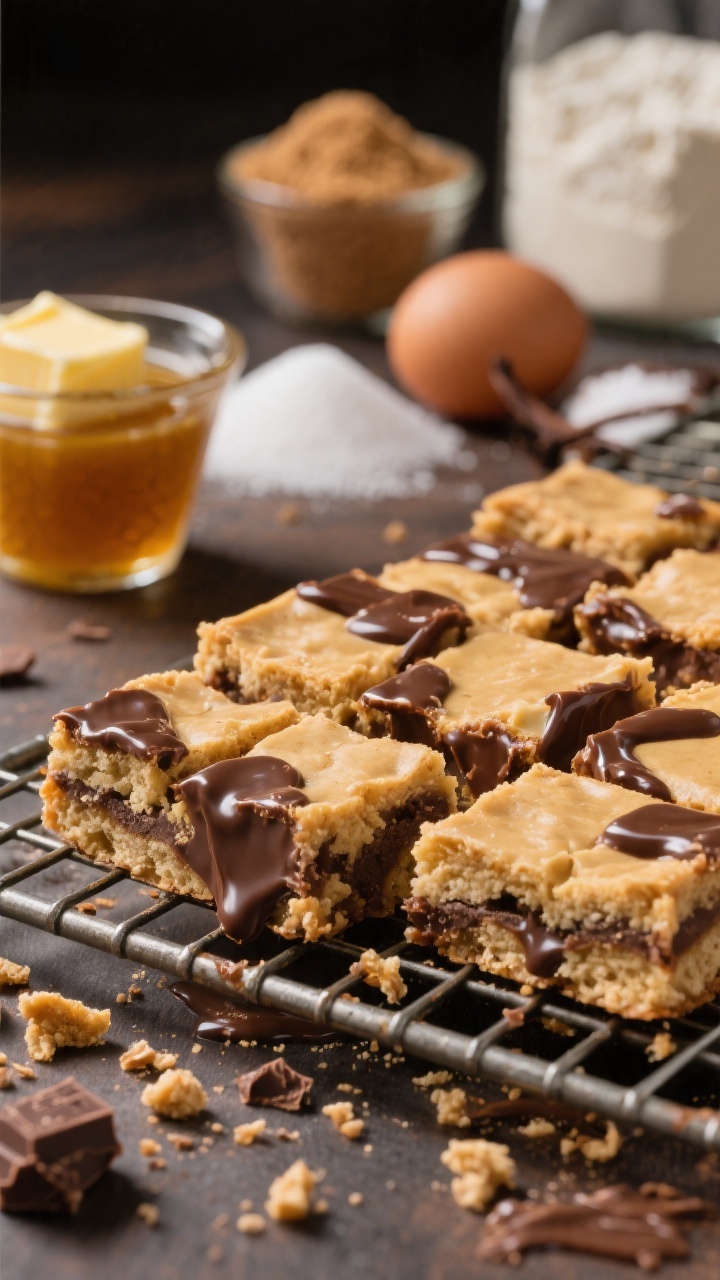
All the monster-cookie vibes, none of the peanut butter. These chewy bars are loaded with oats, chocolate chips, and candy-coated chocolates. They slice beautifully and travel well—perfect for lunchboxes or bake sales.
Ingredients:
- 1/2 cup unsalted butter, melted and cooled slightly
- 3/4 cup light brown sugar, packed
- 1/4 cup granulated sugar
- 1 large egg
- 1 teaspoon vanilla extract
- 1 cup all-purpose flour
- 1/2 teaspoon baking soda
- 1/2 teaspoon salt
- 1 cup old-fashioned rolled oats
- 1/2 cup mini chocolate chips
- 3/4 cup candy-coated chocolates (like M&M’s), plus extra for topping
Instructions:
- Preheat oven to 350°F (175°C). Line an 8×8-inch pan with parchment, leaving overhang.
- In a bowl, whisk melted butter, brown sugar, and granulated sugar until smooth. Mix in the egg and vanilla.
- Stir in flour, baking soda, and salt just until combined. Fold in oats, chocolate chips, and candies.
- Spread batter evenly in the pan. Press a few extra candies on top for maximum color.
- Bake 18–22 minutes, until the center is just set and the edges are golden. Cool completely before slicing into bars.
Variations: Swap in butterscotch chips or chopped pretzels for a sweet-salty twist. Need it gluten-free? Use a 1:1 gluten-free flour blend and certified GF oats—texture stays spot-on.
4. Banana Buddy Muffins With Hidden Chocolate Centers
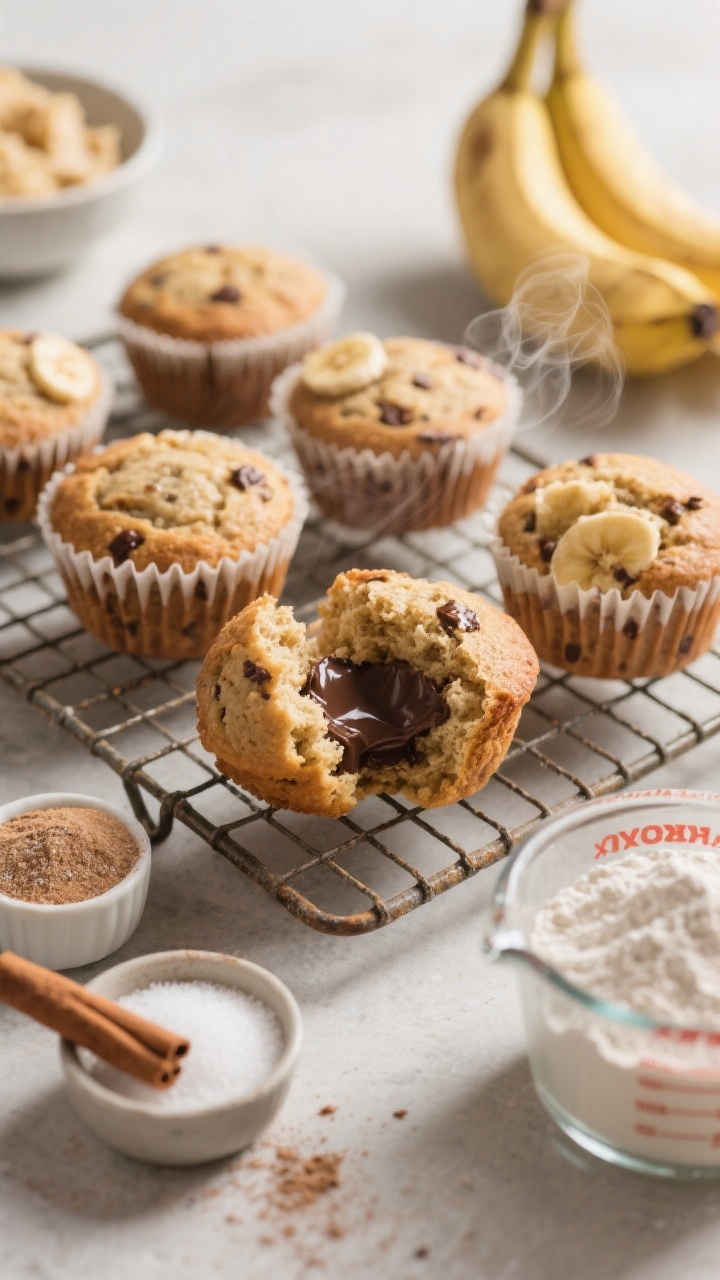
These muffins are light, cozy, and just sweet enough, with a melty chocolate surprise inside. They’re a fantastic way to use up spotty bananas and get kids mashing, scooping, and proudly taste-testing. Breakfast? Snack time? Dessert? Yes to all.
Ingredients:
- 1 1/2 cups all-purpose flour
- 1 teaspoon baking powder
- 1/2 teaspoon baking soda
- 1/2 teaspoon cinnamon
- 1/4 teaspoon salt
- 3 ripe bananas, mashed (about 1 1/4 cups)
- 1/3 cup granulated sugar
- 1/4 cup light brown sugar
- 1/3 cup neutral oil (or melted coconut oil)
- 1 large egg
- 1 teaspoon vanilla extract
- 12 chocolate chunks or squares (milk or dark)
- Optional: 1/3 cup mini chocolate chips or chopped walnuts
Instructions:
- Preheat oven to 375°F (190°C). Line a 12-cup muffin tin with liners.
- In a bowl, whisk flour, baking powder, baking soda, cinnamon, and salt.
- In another bowl, mix mashed bananas, sugars, oil, egg, and vanilla until smooth.
- Fold the dry ingredients into the wet just until combined. Stir in mini chips or nuts if using—don’t overmix.
- Fill each liner halfway. Press a chocolate chunk in the center, then top with more batter to cover (about 3/4 full total).
- Bake 15–18 minutes, until the tops spring back and a tester near the edge comes out clean.
Tips: For bakery-style domes, rest the filled pan for 10 minutes before baking. Want a nut-free crumble topping? Mix 2 tablespoons brown sugar with 2 tablespoons oats and 1 tablespoon melted butter; sprinkle before baking for crunch.
5. Rainbow Swirl Cheesecake Bites With Zero Fuss
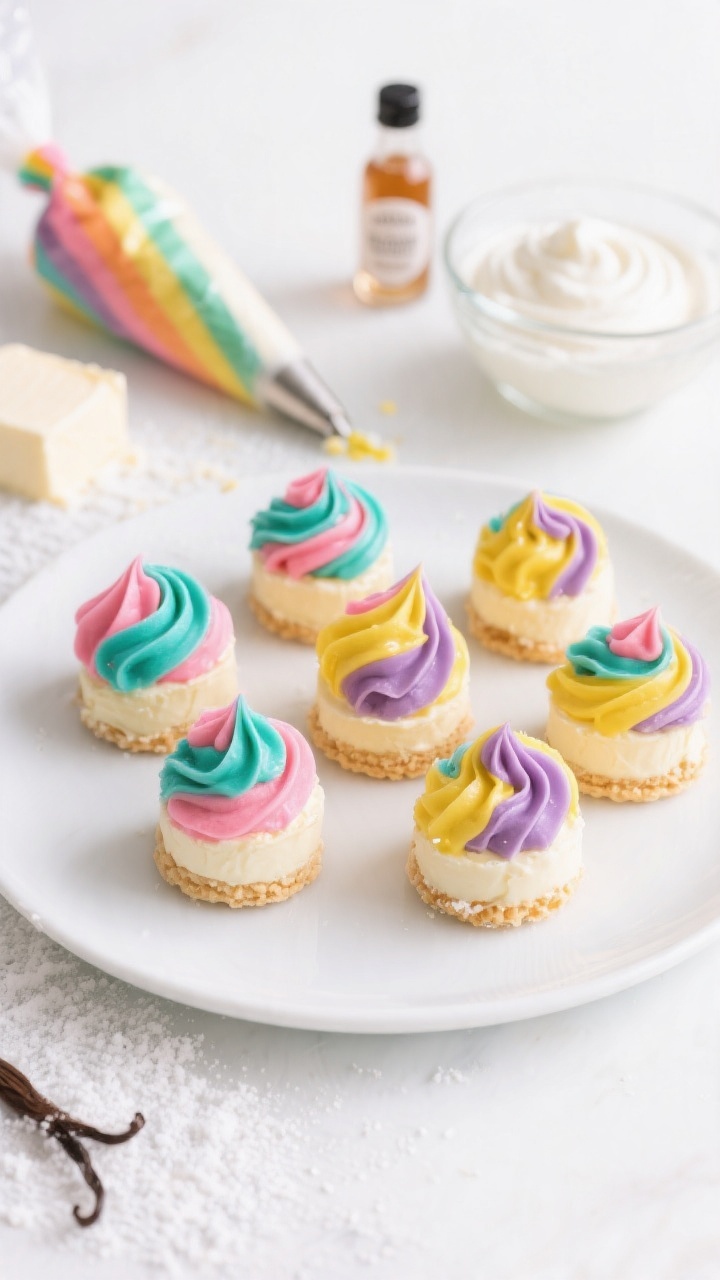
These no-bake cheesecake cups look like a magic trick and taste like a slice of party. Creamy, colorful swirls sit on a buttery cookie crust—no oven, no stress. Kids get to swirl the colors, which is 90% of the fun.
Ingredients:
- 8 ounces cream cheese, softened
- 1/3 cup powdered sugar
- 1 teaspoon vanilla extract
- 1 cup cold heavy whipping cream
- Gel food coloring (3–4 colors)
- 12 vanilla wafer cookies (or mini graham crackers)
- 1 tablespoon melted butter (optional, for extra crust hold)
- Sprinkles for topping
- 12-cup muffin pan + paper liners
Instructions:
- Line a muffin pan with paper liners. Place a vanilla wafer in each cup. If you want a sturdier crust, crush the wafers with 1 tablespoon melted butter and press 1 tablespoon of crumbs into each liner.
- Beat cream cheese, powdered sugar, and vanilla until smooth and fluffy.
- In a separate bowl, whip the cold cream to stiff peaks. Gently fold into the cream cheese mixture until silky.
- Divide the filling into 3–4 bowls and tint each with a drop of gel food coloring. Spoon random blobs of each color into the liners, then swirl lightly with a toothpick.
- Chill for 2–3 hours until set. Top with sprinkles before serving.
Make-ahead magic: These keep in the fridge for 3 days or freeze (covered) for up to 1 month. Want a chocolate version? Add 2 tablespoons cocoa powder to the base filling and swirl with pink and white—gorgeous.
Kid Baker Success Tips
- Set up a mise en place tray: pre-measure ingredients into small bowls so kids can dump-and-stir with confidence.
- Use big mixing bowls to prevent flour “snowstorms.” Less mess = more fun.
- Assign roles: one stirs, one sprinkles, one taste-tests (the most important job, obviously).
- Lean on parchment and liners for easy release and zero stickiness.
- Cool completely before decorating—patience is a virtue, but a quick 10-minute fridge rest also works.
Allergy & Diet Swaps
- Dairy-free: Use vegan butter and dairy-free milk in mug cakes, plant-based cream cheese and coconut whip for cheesecake bites.
- Gluten-free: Choose 1:1 GF flour and certified oats; swap wafers with GF cookies.
- Nut-free: Skip nuts in muffins and verify candy coatings are nut-safe.
- Egg-free: Replace the egg in cookies/bars with a flax egg (1 tablespoon ground flax + 3 tablespoons water, rested 5 minutes).
Gear That Helps (But You Don’t Need Much)
- Cookie scoops for neat portions and even baking
- Silicone spatulas kids can handle easily
- Offset spatula or butter knife for smooth icing
- Toothpicks for swirling and decorating—tiny artists love them
Ready to bake? Whether you’re team gooey mug cake or all-in on rainbow swirls, these five treats are easy wins with huge smiles attached. Pull out the sprinkles, cue the taste tests, and make a little magic—one sweet bite at a time.
Printable Recipe Card
Want just the essential recipe details without scrolling through the article? Get our printable recipe card with just the ingredients and instructions.