Shark Cake for Kids Boys That Are Perfect for Ocean-Themed Parties – Fun, Easy, and Crowd-Pleasing
Planning an ocean-themed birthday and want a cake that kids will actually get excited about? A shark cake checks all the boxes: bold, fun, and surprisingly simple to pull off. You don’t need fancy tools or bakery-level skills to make it look awesome.
With a few smart shortcuts and some playful decorations, you can create a cake that looks like it came from a pro. Best of all, it’s delicious, easy to serve, and guaranteed to be the centerpiece of the party.
Shark Cake for Kids Boys That Are Perfect for Ocean-Themed Parties - Fun, Easy, and Crowd-Pleasing
Ingredients
Method
- Bake the cake layers. Preheat your oven as directed.
Line pans with parchment, spray lightly, and mix the batter. Divide evenly between the two pans and bake until a toothpick comes out clean. Cool in pans for 10 minutes, then turn out onto racks and cool completely.
- Level and stack. Use a serrated knife to level the tops so they’re flat.
Place one layer on your cake board. Spread a generous layer of frosting on top, then add the second layer. Press gently to set.
- Crumb coat. Apply a thin layer of frosting over the whole cake to trap crumbs.
Chill for 20–30 minutes until set. This makes the final coat smooth and clean.
- Tint the frosting. Divide your buttercream. Tint most of it ocean blue.
Keep some a slightly darker blue for depth and leave about 1/2 cup white for wave foam. Add color a little at a time—gel colors go a long way.
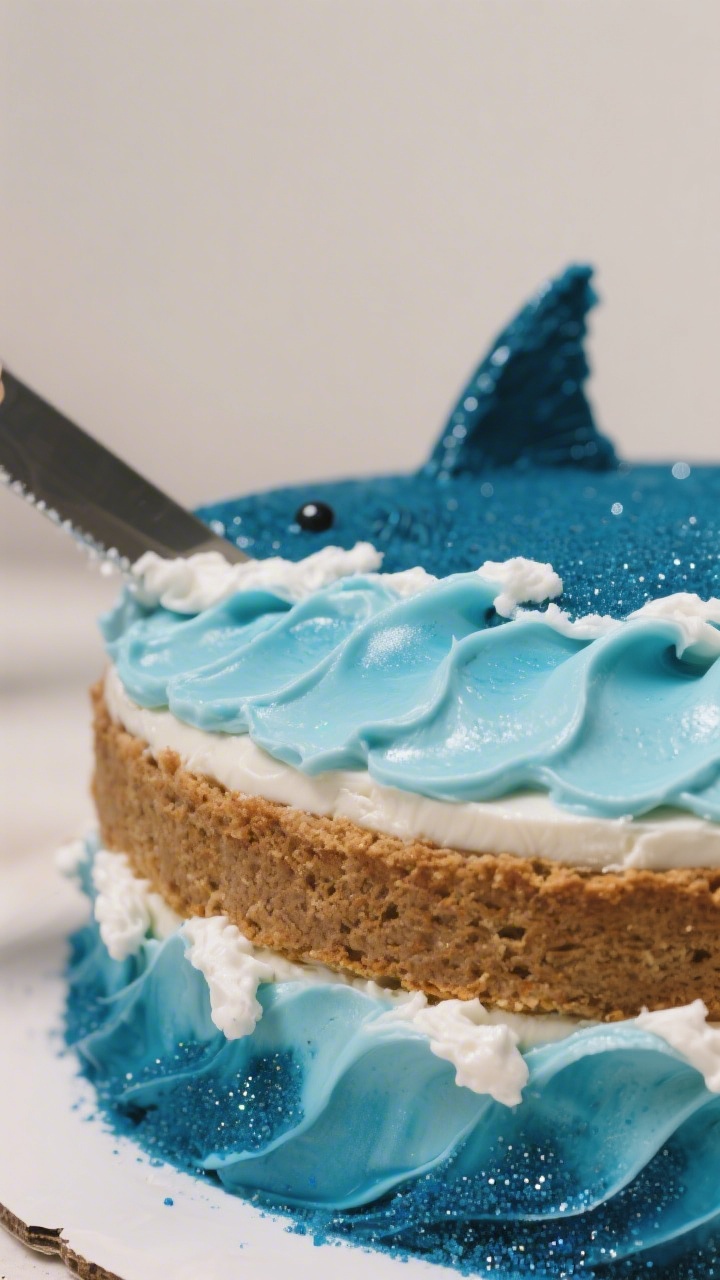
- Create the ocean effect. Frost the cake with the lighter blue. Add swipes of darker blue around the sides and top.
Use your spatula to blend in swoops, like water. Don’t aim for perfect; movement looks more natural.
- Add wave foam. Dab small patches of white frosting on peaks and along the edges. A quick swirl with the tip of your spatula gives it that foamy look.
Sprinkle a few blue sanding sugars for shimmer.
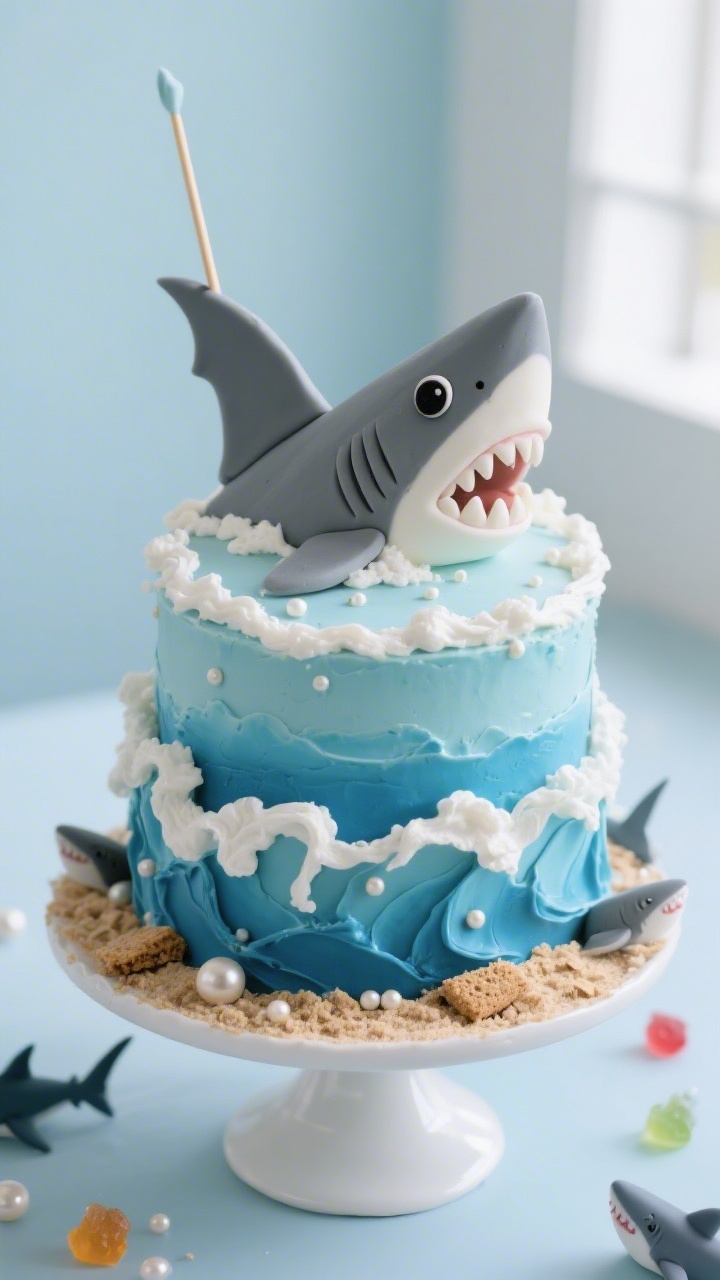
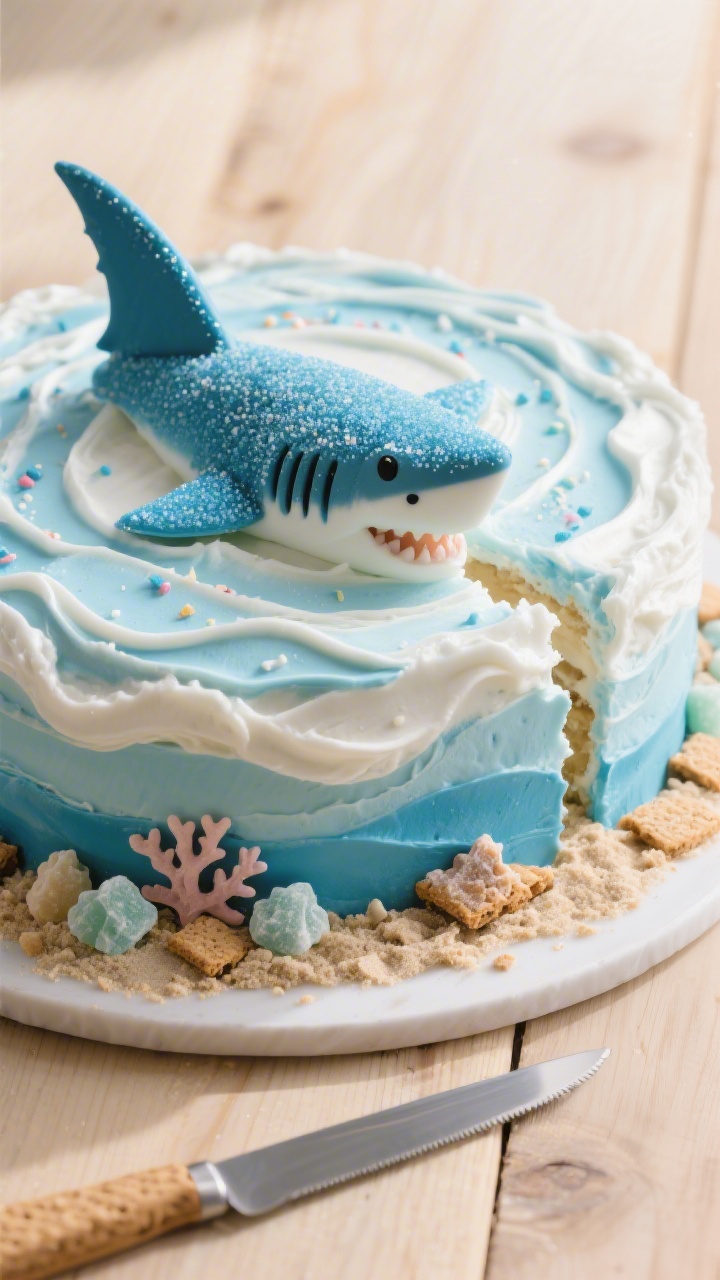
- Make the shark fin. For fondant: Roll gray fondant to about 1/4 inch thick and cut a classic fin shape (like a tall triangle with a curved back). Insert a food-safe skewer or sturdy lollipop stick into the base. Let it firm up for 15–20 minutes.
For cardstock: Cut a similar fin and tape it to a clean skewer.
- Place the fin. Insert the fin at a slight angle on the top of the cake so it looks like it’s cutting through waves. Press gently until stable. Add a touch of frosting at the base to “splash” around it.
- Make the shark face (optional). Use black fondant or mini chocolate chips for an eye peeking out of the “water.” Shape tiny white fondant triangles or cut mini marshmallows diagonally for teeth, then press a small arc near the edge to suggest a mouth just under the surface.
- Decorate with ocean details. Press crushed graham crackers around the base for sand.
Add gummy sharks, candy pearls, and rock candy clusters along the sides. Keep it simple so the fin stays the star.
- Chill, then serve. Refrigerate for 20–30 minutes to set the design. Take it out about 30 minutes before slicing so the frosting softens and flavors shine.
Disclosure: As Amazon Associates, we earn from qualifying purchases at no extra cost to you.
What Makes This Special
⭐ My secret tip – Ever since we started using this kids baking set, my toddler loves helping in the kitchen and is much more willing to try new foods. ✨ This is the blender we use for protein smoothies with yogurt, peanut butter, and fruit.
This shark cake is designed with busy parents in mind. It uses basic ingredients and simple techniques, but the finished look is pure wow.
The ocean “water” frosting and dramatic fin make it eye-catching without hours of work. You can customize colors, candy decorations, and flavors to match your party theme. And because it’s built on sturdy layers, it travels well and slices cleanly.
What You’ll Need
- For the Cake:
- 2 boxes vanilla or chocolate cake mix (or your favorite homemade recipe for two 9-inch rounds)
- Eggs, oil, and water as directed on the box
- Optional: 1 teaspoon vanilla extract or 1 teaspoon lemon zest for extra flavor
- For the Frosting:
- 4 cups buttercream frosting (store-bought or homemade)
- Blue gel food coloring (navy and sky blue if available)
- White food coloring or extra plain frosting for “foam” accents
- Shark Decorations:
- Gray fondant (about 8 ounces) or a large gray cardstock for a non-edible fin
- Black fondant or mini chocolate chips for eyes
- White fondant or mini marshmallows for teeth
- Optional: Plastic shark figurines, gummy sharks, or shark fin cupcake toppers
- Ocean Details:
- Crushed graham crackers for “sand”
- Assorted blue sprinkles or sanding sugar
- Candy pearls or rock candy for coral and bubbles
- Tools:
- Two 9-inch round cake pans
- Parchment paper and nonstick spray
- Offset spatula and bench scraper (or a butter knife and straight spatula)
- Serrated knife for leveling
- Piping bag with round or star tip (optional)
Instructions
⭐ My secret tip – Ever since we started using this kids baking set, my toddler loves helping in the kitchen and is much more willing to try new foods. ✨ This is the blender we use for protein smoothies with yogurt, peanut butter, and fruit.
- Bake the cake layers. Preheat your oven as directed.Line pans with parchment, spray lightly, and mix the batter. Divide evenly between the two pans and bake until a toothpick comes out clean. Cool in pans for 10 minutes, then turn out onto racks and cool completely.
- Level and stack. Use a serrated knife to level the tops so they’re flat.Place one layer on your cake board. Spread a generous layer of frosting on top, then add the second layer. Press gently to set.
- Crumb coat. Apply a thin layer of frosting over the whole cake to trap crumbs.Chill for 20–30 minutes until set. This makes the final coat smooth and clean.
- Tint the frosting. Divide your buttercream. Tint most of it ocean blue.Keep some a slightly darker blue for depth and leave about 1/2 cup white for wave foam. Add color a little at a time—gel colors go a long way.
- Create the ocean effect. Frost the cake with the lighter blue. Add swipes of darker blue around the sides and top.Use your spatula to blend in swoops, like water. Don’t aim for perfect; movement looks more natural.
- Add wave foam. Dab small patches of white frosting on peaks and along the edges. A quick swirl with the tip of your spatula gives it that foamy look.Sprinkle a few blue sanding sugars for shimmer.
- Make the shark fin. For fondant: Roll gray fondant to about 1/4 inch thick and cut a classic fin shape (like a tall triangle with a curved back). Insert a food-safe skewer or sturdy lollipop stick into the base. Let it firm up for 15–20 minutes.For cardstock: Cut a similar fin and tape it to a clean skewer.
- Place the fin. Insert the fin at a slight angle on the top of the cake so it looks like it’s cutting through waves. Press gently until stable. Add a touch of frosting at the base to “splash” around it.
- Make the shark face (optional). Use black fondant or mini chocolate chips for an eye peeking out of the “water.” Shape tiny white fondant triangles or cut mini marshmallows diagonally for teeth, then press a small arc near the edge to suggest a mouth just under the surface.
- Decorate with ocean details. Press crushed graham crackers around the base for sand.Add gummy sharks, candy pearls, and rock candy clusters along the sides. Keep it simple so the fin stays the star.
- Chill, then serve. Refrigerate for 20–30 minutes to set the design. Take it out about 30 minutes before slicing so the frosting softens and flavors shine.
How to Store
- Short-term: Keep the cake covered in a cake carrier at cool room temperature for up to 1 day.
- Refrigerate: If your space is warm or you used perishable fillings, refrigerate for up to 4 days.Bring to room temp before serving.
- Freeze: Wrap unfrosted layers tightly in plastic and foil, then freeze for up to 2 months. Thaw in the fridge overnight before decorating.
- Fondant note: If using a fondant fin, avoid humidity to prevent drooping. Add the fin close to serving time if your fridge runs moist.
⭐ My secret tip – Ever since we started using this kids baking set, my toddler loves helping in the kitchen and is much more willing to try new foods. ✨ This is the blender we use for protein smoothies with yogurt, peanut butter, and fruit.
Why This is Good for You
- Confidence booster: The design looks advanced but uses simple steps, which makes it great for new bakers.
- Customizable: You can adjust flavors, colors, and decorations for allergies and preferences.
- Kid-approved visuals: Bold shapes and textures make it exciting without relying on heavy amounts of candy.
- Portion-friendly: A sturdy two-layer cake slices neatly, so you can serve clean portions with less waste.
Pitfalls to Watch Out For
- Warm cake + frosting = sliding layers. Always cool layers completely before stacking.
- Over-coloring frosting. Gel color deepens over time.Add gradually to avoid a too-dark or bitter taste.
- Top-heavy fin. Use a skewer for support and insert at an angle. If the cake is very soft, chill it before adding the fin.
- Crumbs in the final coat. Don’t skip the crumb coat and chilling step—it’s what keeps the finish smooth.
- Too many toppings. Extra candies can compete with the fin. Keep the ocean vibe simple and clean.
Alternatives
- Sheet cake shortcut: Bake a 9×13 sheet cake, frost blue, and add a large fin plus gummies.Faster to decorate and serve.
- Cupcake pod: Frost blue swirls on cupcakes, top with mini fondant fins or gummy sharks. Great for classrooms and easy portioning.
- No-fondant option: Use a paper fin on a skewer. Remove before slicing for a fully edible plate.</>
- Flavor swaps: Try lemon cake with vanilla frosting for a bright “beachy” taste, or chocolate cake with cookies-and-cream frosting for a “deep sea” vibe.
- Dairy-free or gluten-free: Use compatible mixes and dairy-free buttercream.Check labels on candies and sprinkles.
FAQ
Can I make this a day ahead?
Yes. Frost the cake and chill it lightly, then add the fin and delicate candies the morning of the party. This keeps colors bright and textures crisp.
What if I don’t have gel food coloring?
Liquid color works, but you may need more and the frosting can thin.
If it softens too much, add a spoonful of powdered sugar to stiffen.
How do I get super smooth sides?
Chill after the crumb coat, apply a thicker final coat, and use a bench scraper warmed briefly under hot water. Light, steady pressure is key.
Can I use a box mix?
Absolutely. Box mixes are consistent and reliable.
Add a teaspoon of vanilla or a pinch of salt to round out the flavor.
How many does this serve?
A two-layer 9-inch cake typically serves 16–20 kids, depending on slice size. Cut smaller party slices if you’re serving other treats.
Is the fondant fin safe to eat?
Yes, fondant is edible. Just be mindful of the skewer support inside.
If you use cardstock, remove it before slicing.
How do I transport it?
Chill the decorated cake for 30 minutes, place it in a snug cake carrier, and keep it on a flat surface in the car. Avoid direct sun and sharp turns.
What if my frosting turns green?
Too much yellow in butter or food coloring can shift blue toward teal. Start with a whiter frosting base or add a tiny dab of purple to neutralize.
In Conclusion
A shark cake brings instant excitement to any ocean-themed party, and it doesn’t require bakery skills to look impressive.
With simple layers, a bold fin, and playful wave frosting, you’ll have a centerpiece kids can’t stop talking about. Customize the colors, keep the design clean, and let the fin steal the show. It’s fun to make, easy to serve, and guaranteed to make birthday photos unforgettable.
Printable Recipe Card
Want just the essential recipe details without scrolling through the article? Get our printable recipe card with just the ingredients and instructions.