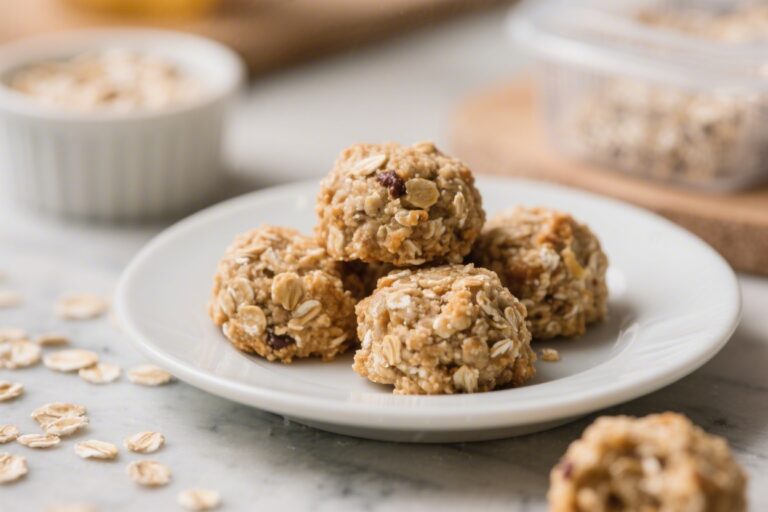
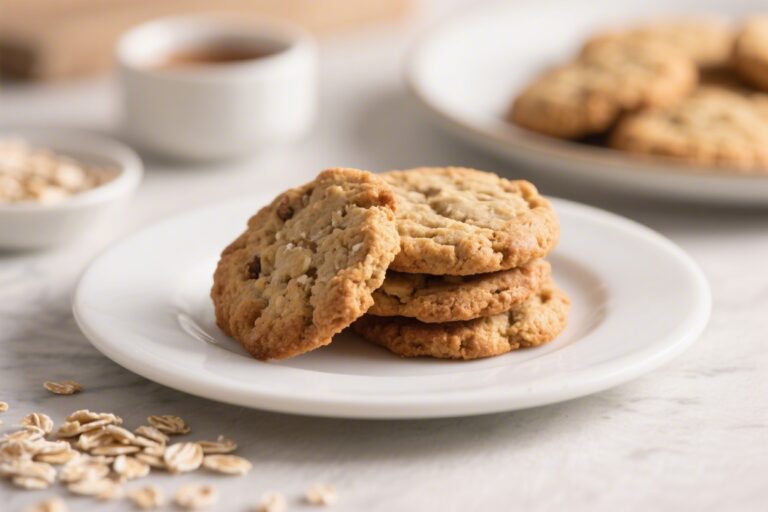
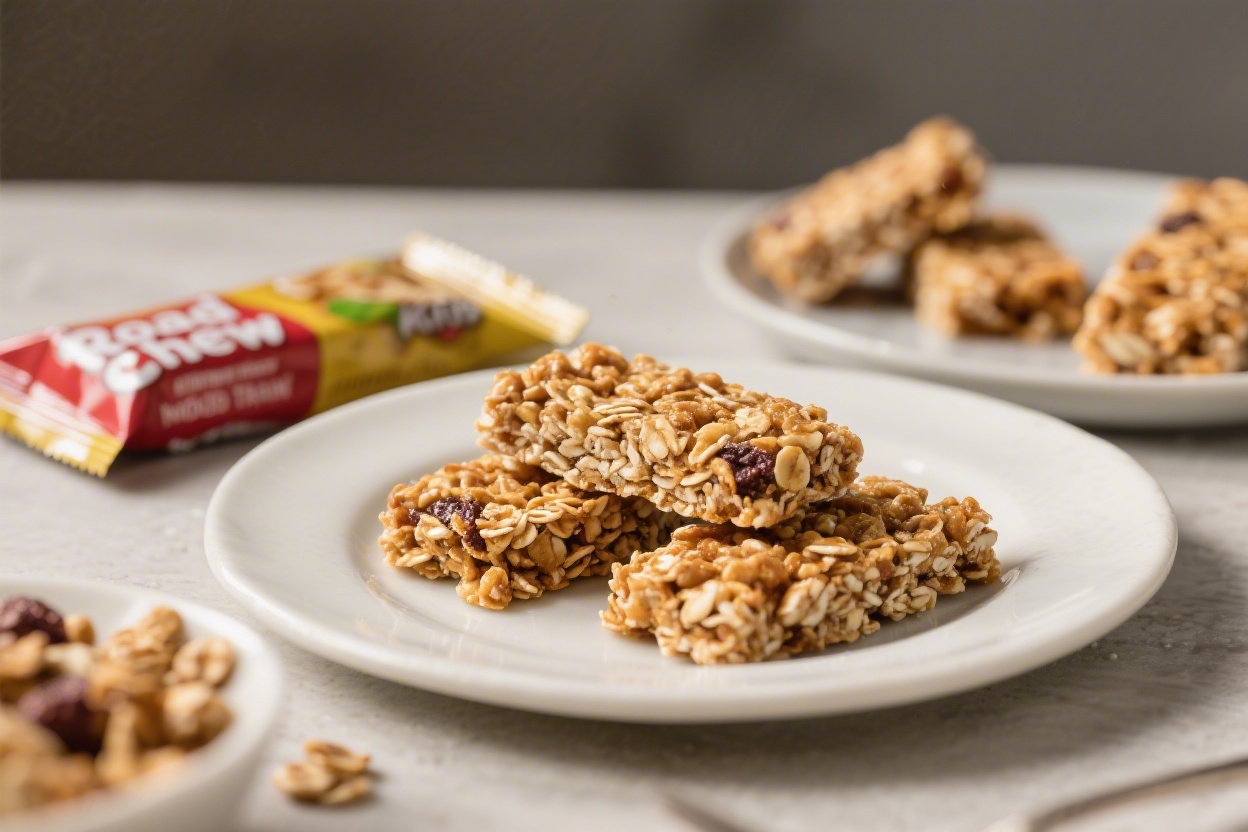
Road Trip Snacks for Kids – Homemade Chewy Granola Bars
Hitting the road with kids means packing snacks that are tasty, filling, and not a crumbly mess. These homemade chewy granola bars check every box. They’re sweet but not sugary, soft but sturdy, and easy to customize for picky eaters.
You can make them ahead, wrap them up, and toss them in a snack bag for the drive. Best of all, you know exactly what’s in them—real ingredients you can feel good about.
Road Trip Snacks for Kids – Homemade Chewy Granola Bars
Ingredients
Method
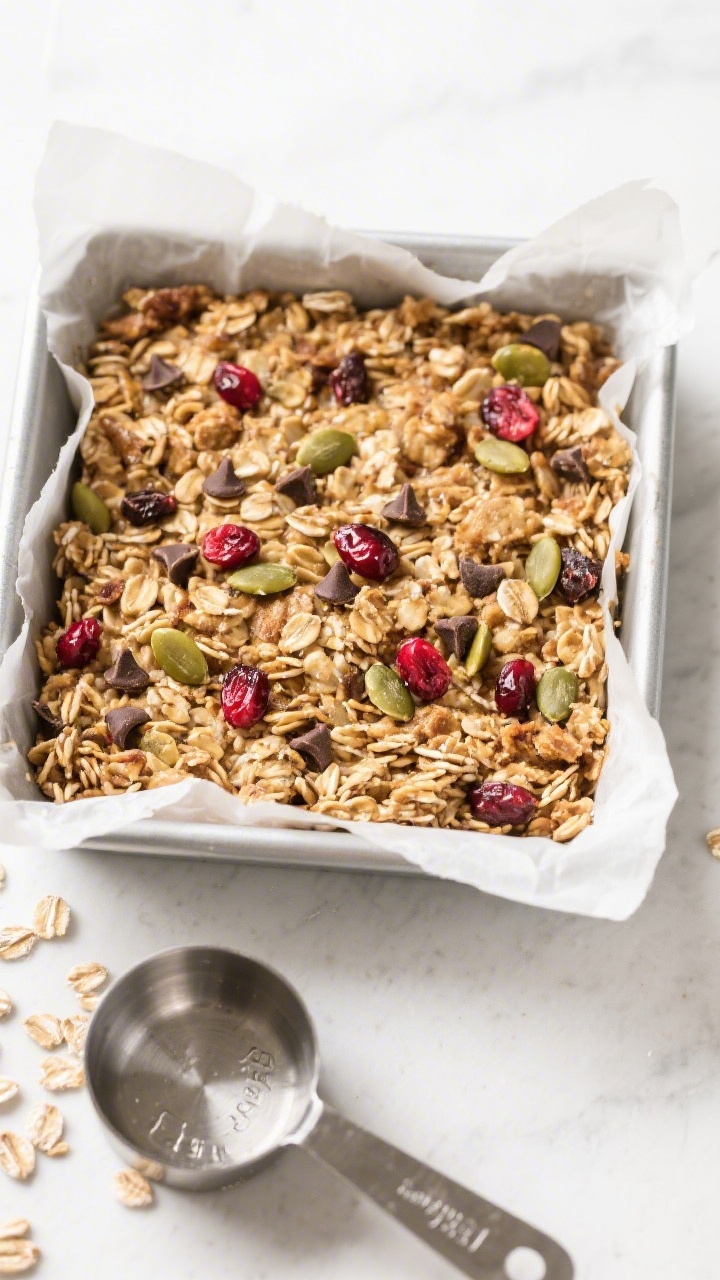
- Prep the pan: Line an 8x8-inch baking pan with parchment, leaving overhang on two sides for easy lifting. Lightly grease the parchment.
- Toast the oats (optional but recommended): In a dry skillet over medium heat, stir the oats for 3–4 minutes until lightly fragrant. Let cool slightly.
This adds depth and helps the bars hold together.
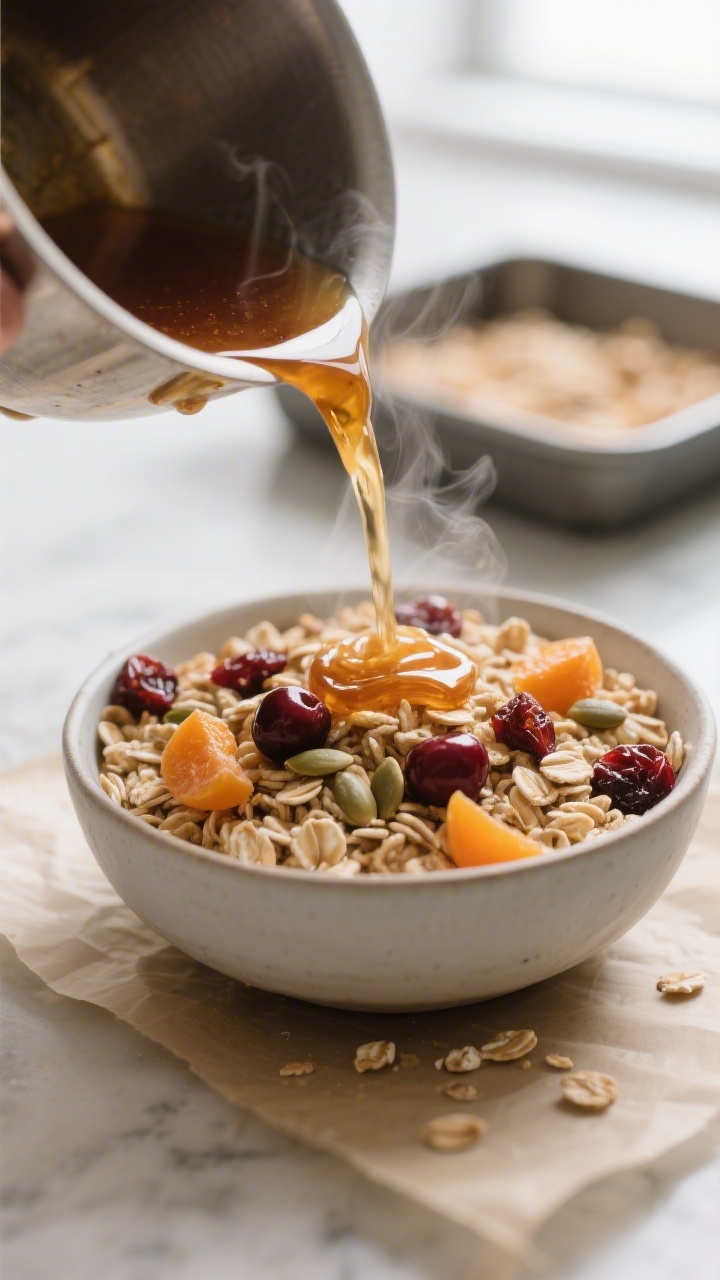
- Mix the dry base: In a large bowl, combine oats, crispy rice cereal (if using), dried fruit, and nuts or seeds.
- Make the sticky syrup: In a small saucepan, add butter or coconut oil, honey, and brown sugar. Warm over medium heat, stirring, until the mixture just starts to bubble around the edges. Simmer gently for 45–60 seconds, then remove from heat.
Stir in vanilla and salt.
- Combine: Pour the warm syrup over the oat mixture. Stir quickly and thoroughly to coat everything. Let the mixture cool for 3–4 minutes so it doesn’t melt the chocolate.
- Fold in chocolate: Add mini chocolate chips and stir just until distributed.
If they melt a little, that’s okay—it helps bind the bars.
- Press into the pan: Scrape the mixture into the prepared pan. Lay a second sheet of parchment on top and press very firmly with your hands or the bottom of a measuring cup. The firmer you press, the chewier and less crumbly the bars will be.
- Chill: Refrigerate for 1–2 hours, or until set.
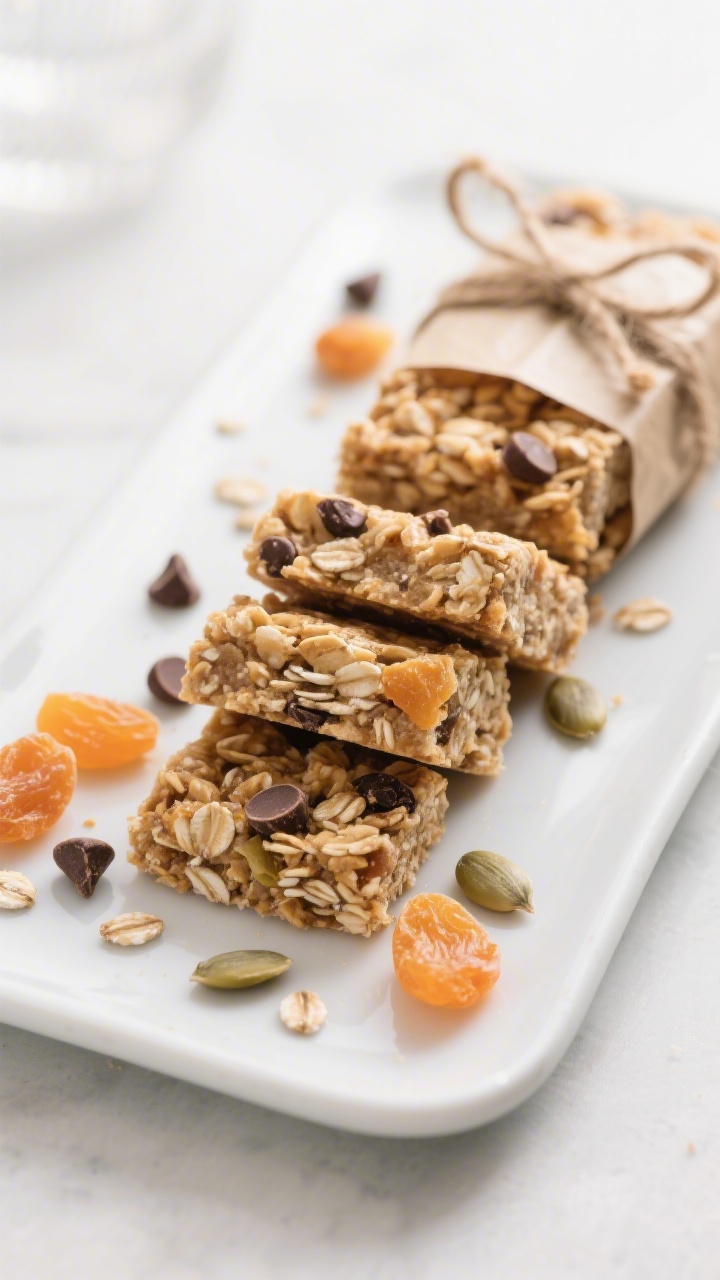
- Slice and store: Lift the slab out using the parchment and cut into 10–12 bars or small squares for little hands.
Disclosure: As Amazon Associates, we earn from qualifying purchases at no extra cost to you.
What Makes This Recipe So Good
- Chewy and kid-friendly: These bars hold together without being hard or crunchy, which makes them perfect for little teeth.
- Simple pantry ingredients: Oats, honey, nut or seed butter, and a few mix-ins. Nothing fancy.
- No baking stress: This is a no-bake recipe with a quick stovetop step, so it comes together fast.
- Customizable: Swap nuts for seeds, use different dried fruit, or add chocolate chips.
Make a few flavors in one batch.
- Great for travel: They pack well, don’t melt easily, and keep kids satisfied between stops.
Ingredients
- 2 1/2 cups old-fashioned rolled oats (not quick oats)
- 1/2 cup crispy rice cereal (optional, for light crunch)
- 1/2 cup nut or seed butter (peanut, almond, cashew, or sunflower seed butter)
- 1/3 cup honey or maple syrup
- 1/4 cup brown sugar or coconut sugar (for extra stickiness and chew)
- 3 tablespoons unsalted butter or coconut oil
- 1 teaspoon vanilla extract
- 1/4 teaspoon fine sea salt
- 1/2 cup mini chocolate chips or chopped chocolate (use dairy-free if needed)
- 1/3 cup chopped dried fruit (raisins, cranberries, apricots, cherries)
- 1/4 cup finely chopped nuts or seeds (almonds, walnuts, pumpkin seeds, or hemp hearts)
Instructions
- Prep the pan: Line an 8×8-inch baking pan with parchment, leaving overhang on two sides for easy lifting. Lightly grease the parchment.
- Toast the oats (optional but recommended): In a dry skillet over medium heat, stir the oats for 3–4 minutes until lightly fragrant. Let cool slightly.
This adds depth and helps the bars hold together.
- Mix the dry base: In a large bowl, combine oats, crispy rice cereal (if using), dried fruit, and nuts or seeds.
- Make the sticky syrup: In a small saucepan, add butter or coconut oil, honey, and brown sugar. Warm over medium heat, stirring, until the mixture just starts to bubble around the edges. Simmer gently for 45–60 seconds, then remove from heat.
Stir in vanilla and salt.
- Combine: Pour the warm syrup over the oat mixture. Stir quickly and thoroughly to coat everything. Let the mixture cool for 3–4 minutes so it doesn’t melt the chocolate.
- Fold in chocolate: Add mini chocolate chips and stir just until distributed.
If they melt a little, that’s okay—it helps bind the bars.
- Press into the pan: Scrape the mixture into the prepared pan. Lay a second sheet of parchment on top and press very firmly with your hands or the bottom of a measuring cup. The firmer you press, the chewier and less crumbly the bars will be.
- Chill: Refrigerate for 1–2 hours, or until set.
- Slice and store: Lift the slab out using the parchment and cut into 10–12 bars or small squares for little hands.
Keeping It Fresh
- Room temperature: Store bars in an airtight container for up to 4 days.
Separate layers with parchment to prevent sticking.
- Refrigerator: Keeps them firm and fresh for up to 10 days. Great for packing the night before a trip.
- Freezer: Freeze individually wrapped bars for up to 2 months. Thaw at room temperature for 20–30 minutes or pop into a lunchbox frozen so they’re perfect by snack time.
- Travel tip: Wrap bars in parchment or wax paper, then place in a resealable bag to catch any loose crumbs in the car.
Benefits of This Recipe
- Balanced energy: Oats and nut/seed butter offer fiber, protein, and healthy fats to keep kids full longer.
- Less mess: The chewy texture means fewer crumbs on car seats and less stickiness on fingers.
- Allergy-friendly options: Use sunflower seed butter and dairy-free chocolate to make these nut-free.
- Budget-friendly: Homemade bars cost less than store-bought and avoid preservatives and artificial flavors.
- Control the sweetness: Adjust the sugar and mix-ins based on your family’s preference.
Pitfalls to Watch Out For
- Bars not sticking together: The syrup needs that brief simmer to thicken.
Press the mixture firmly in the pan. If needed, add 1–2 more tablespoons of honey.
- Bars too hard: Boiling the syrup too long can make the bars firm. Keep it to a gentle bubble for under a minute.
- Chocolate melting: Let the mixture cool a few minutes before adding chips, or sprinkle chips on top and press them in.
- Too crumbly: Skip quick oats and stick to old-fashioned.
Also be sure to measure dry ingredients accurately—too many add-ins can throw off the balance.
- Allergy cross-contact: If making nut-free, double-check labels and use separate utensils and storage containers.
Recipe Variations
- Trail Mix Bars: Add sunflower seeds, pumpkin seeds, chopped dried apricots, and mini chocolate chips.
- PB&J Bars: Use peanut butter and stir in chopped dried strawberries or raspberries. Drizzle with a tiny bit of warmed strawberry jam before chilling.
- Chocolate Coconut: Swap 1/4 cup oats for 1/4 cup unsweetened shredded coconut. Use dark chocolate chips.
- Banana Bread Twist: Add 1/2 teaspoon cinnamon and 2 tablespoons finely chopped dried banana chips.
- School-Safe Nut-Free: Use sunflower seed butter, pumpkin seeds, hemp hearts, and dairy-free chips.
- Protein Boost: Stir in 2 tablespoons hemp hearts or a scoop (about 20 g) of neutral protein powder.
If using powder, add 1 extra tablespoon honey to keep bars chewy.
FAQ
Can I use quick oats instead of old-fashioned oats?
Quick oats can make the bars chalky and crumbly. Old-fashioned rolled oats hold their shape and give the best chewy texture.
What can I use instead of honey?
Maple syrup works well. The bars will be slightly softer, so press extra firmly and chill a bit longer.
Brown rice syrup also works and makes the bars very sticky and chewy.
How do I make these completely nut-free?
Use sunflower seed butter instead of nut butter and choose nut-free mix-ins like pumpkin seeds, dried fruit, and dairy-free chocolate. Check labels to avoid cross-contact.
Do these melt in a hot car?
They hold up well, but in very warm weather the chocolate may soften. Pack them in a small cooler or use chocolate-free variations for hot days.
Can I reduce the sugar?
Yes, but keep enough sticky sweetener to bind the bars.
Try reducing the brown sugar to 2 tablespoons and keeping the honey at 1/3 cup. Press firmly and chill well.
How thick should the bars be?
In an 8×8-inch pan, they’ll be about 3/4 to 1 inch thick. For thinner bars, use a 9×9-inch pan and reduce chill time slightly.
Do I need the crispy rice cereal?
No, but it adds a light crunch kids love.
If you skip it, add an extra 1/4 cup oats to keep the ratio balanced.
Final Thoughts
Homemade chewy granola bars make road trips smoother and snack times easier. They’re quick to mix, easy to customize, and built for little hands. Make a batch the day before you leave, wrap them up, and you’ve got a car-ready snack that keeps everyone happy.
Once you see how simple and reliable they are, you’ll skip the store-bought bars for good.
Printable Recipe Card
Want just the essential recipe details without scrolling through the article? Get our printable recipe card with just the ingredients and instructions.