Halloween Snacks for Kids School That Disappear Faster Than Candy
Short on time but big on spooky vibes? These Halloween snacks are easy, classroom-friendly, and ridiculously cute. They use simple ingredients, minimal prep, and zero fuss—perfect for last-minute party trays or lunchbox surprises. Bonus: they’re nut-free (as written) and designed to survive the backpack commute.
1. Monster Apple Bites With Peanut-Free “Fangs”
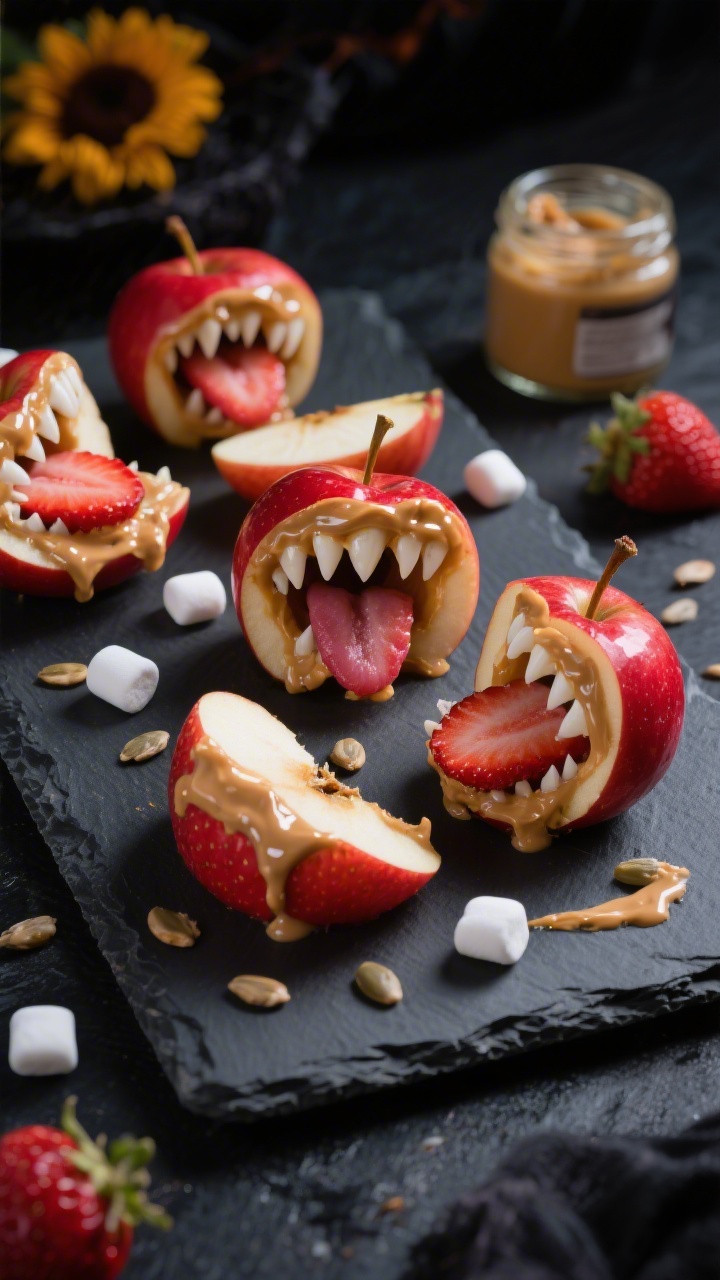
These little apple mouths are goofy, crunchy, and majorly crowd-pleasing. They look impressive but take minutes to build, and you can make a whole tray without turning on the oven. Great for kids who love silly snacks that aren’t sugar bombs.
Disclosure: As Amazon Associates, we earn from qualifying purchases at no extra cost to you.
Ingredients:
- 4 medium red apples, cored and sliced into 16 wedges each
- 1/2 cup sunflower seed butter (or soy nut butter)
- 1/2 cup mini marshmallows (for “teeth”)
- 16 strawberry slices (tongues), optional
- 32 candy eyeballs
- 2 tablespoons honey or maple syrup (to help eyeballs stick)
- Lemon juice (to keep apples from browning)
Instructions:
- Toss apple slices with a splash of lemon juice to slow browning. Pat dry so the spread sticks.
- Spread a thin layer of sunflower seed butter on one side of two apple slices.
- Line mini marshmallows along the edge of one slice to make “teeth.” Top with the second slice, spread sides facing in, to form a mouth.
- Slide in a strawberry slice for a “tongue,” if using.
- Dot a tiny bit of honey or syrup on the top slice and press on two candy eyeballs so your monster can see who it’s about to chomp.
Pro tip: Build these the morning of the party and store in a sealed container. For school-friendly swaps, use vegan mini marshmallows or thin banana coins as “teeth.” Want extra crunch? Add a few crisped rice cereal bits inside the mouth.
2. Mummy Pizza Dippers That Vanish From the Tray
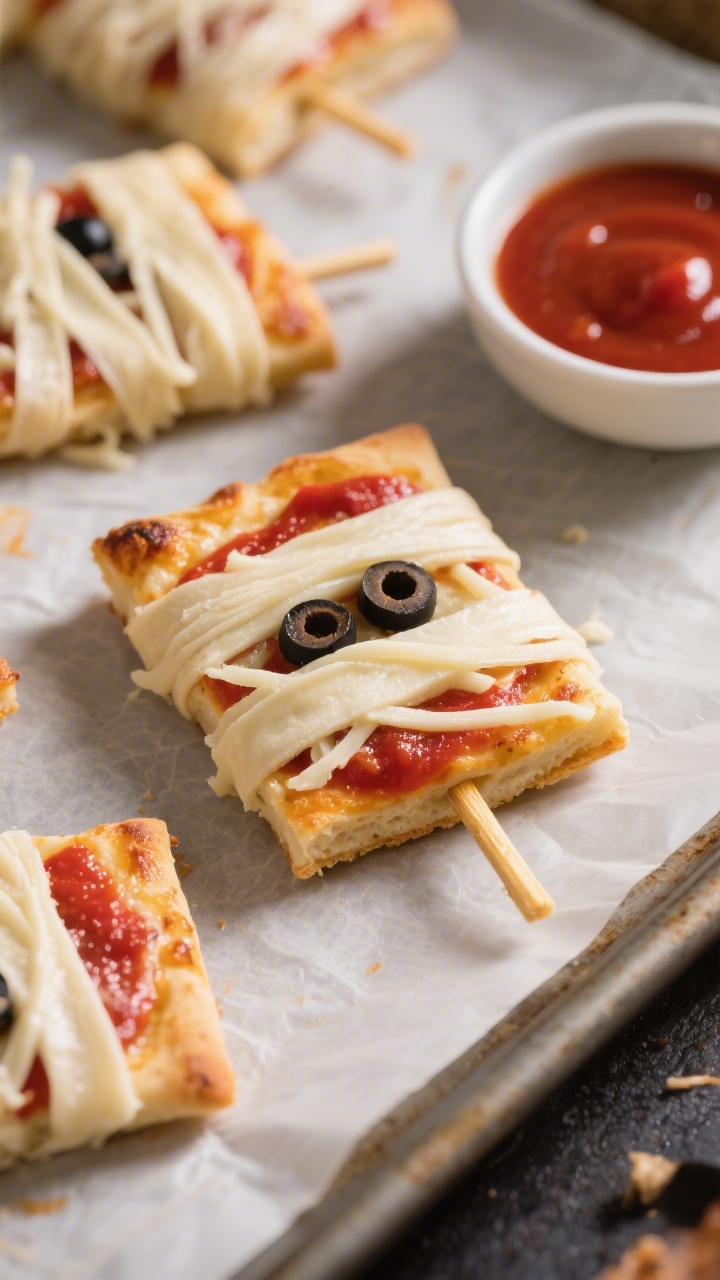
Pillowy, cheesy, and delightfully wrapped like little mummies, these pizza dippers are a fast crowd favorite. They bake in under 15 minutes and travel like champs. Kids love pulling the “bandage” cheese strips apart—instant spooky fun.
Ingredients:
- 1 pound refrigerated pizza dough
- 1 cup shredded mozzarella cheese
- 8 mozzarella string cheeses, cut into thin strips (for “bandages”)
- 1/2 cup pizza sauce (plus extra for dipping)
- 24 olive slices or 48 mini pepperoni slices (for “eyes”)
- 1 tablespoon olive oil
- 1/2 teaspoon garlic powder
- 1/2 teaspoon dried oregano
- Pinch of salt
Instructions:
- Preheat oven to 425°F (220°C). Line a baking sheet with parchment.
- On a lightly floured surface, roll dough into a 10×14-inch rectangle. Cut into 16 “fingers” (strips about 1 x 5 inches).
- Brush strips with olive oil and sprinkle with garlic powder, oregano, and a pinch of salt.
- Spread a thin ribbon of pizza sauce down the center of each strip, sprinkle with shredded mozzarella, and then lay string-cheese “bandages” diagonally across, leaving a small gap near the top for eyes.
- Place two olive slices or mini pepperoni bits in the gap for eyes and press gently.
- Bake 10–14 minutes until golden and melty. Cool slightly before packing.
Serve with: Warm marinara for dipping. For a veggie boost, tuck a paper-thin zucchini slice under the “bandages.” Want gluten-free? Use a GF dough or flatbread. Seriously, these are the first to go.
3. Ghostly Banana Pops With Chocolate Drizzle
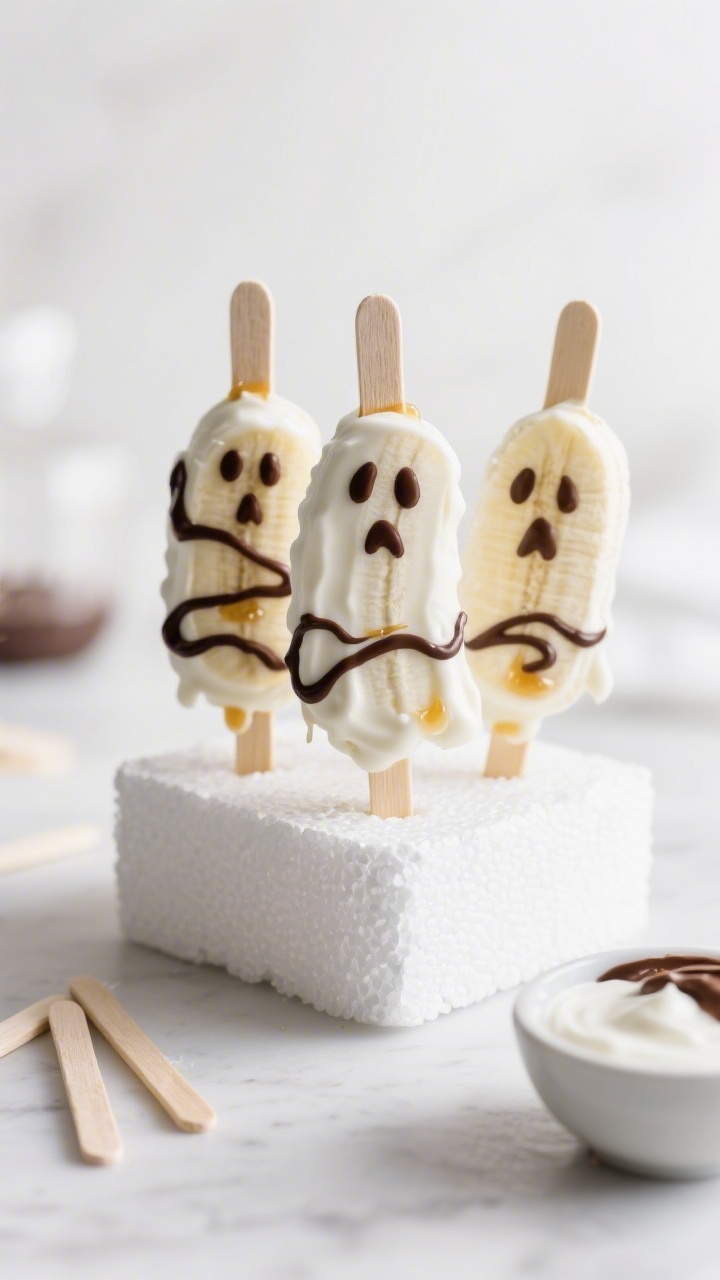
Frozen banana ghosts are the perfect sweet treat without a sugar overload. They’re no-bake, super cute, and safe for most classrooms. Kids go wild for the chocolate “boo” faces, and you’ll love how fast they come together.
Ingredients:
- 6 ripe but firm bananas, peeled and halved crosswise
- 12 popsicle sticks or sturdy paper straws
- 1 1/2 cups vanilla Greek yogurt (or dairy-free vanilla yogurt)
- 1 tablespoon honey or maple syrup (optional, for sweetness)
- 1 cup white chocolate chips (or dairy-free white coating), melted for extra “ghostly” sheen
- 1/2 cup mini chocolate chips (for eyes and mouths)
- 1 tablespoon coconut oil (to smooth melting chocolate), optional
- Sprinkles or crushed freeze-dried strawberries (optional “blush”)
Instructions:
- Insert a stick into each banana half. Freeze on a lined tray for 20–30 minutes until firm.
- Whisk yogurt with honey (if using). Dip each frozen banana into the yogurt to coat. Return to the tray and freeze 10 minutes to set.
- Melt white chocolate chips with coconut oil in short bursts in the microwave, stirring until smooth. Drizzle over the bananas for a glossy ghost coat (optional but cute).
- Press on mini chocolate chips as eyes and a long “O” mouth while the coating is tacky. Freeze 20 more minutes.
Make-ahead magic: Store in a freezer-safe bag up to 1 week. For school transport, wrap each pop in parchment and keep cold with an ice pack. Variation: Use dark chocolate drizzle and call them “midnight ghosts.” Kids love the drama.
4. Witch Hat Pretzel Bites You Can Make in 10 Minutes

Zero baking. Maximum cuteness. These witch hats are salty-sweet and perfectly poppable—ideal for party platters and quick assembly lines with little helpers.
Ingredients:
- 30 mini chocolate-covered cookies or fudge-striped cookies (round, flat)
- 30 chocolate kisses (unwrapped)
- 1/2 cup colored candy melts (purple, green, or orange)
- 2 teaspoons coconut oil (to thin candy melts), optional
- 30 mini pretzel rods (for broomsticks on the side, optional)
- Assorted sprinkles (for “hat bands”)
Instructions:
- Place cookies flat-side up on a tray to be the hat brims.
- Melt candy melts with coconut oil until smooth. Spoon a small dot onto the center of each cookie, then press a chocolate kiss on top to form a hat.
- Use a toothpick to paint a thin “hat band” around the base of the kiss with the melted candy. Add sprinkles before it sets.
- If adding broomsticks, tie a tiny candy belt (a skinny strip of fruit leather) near the tip of each pretzel rod and serve alongside.
Tip: Make these the night before; they store well in a lidded container at room temp. Swap candy melts for tinted royal icing if you prefer. For dairy-free, use DF cookies and kisses or shape small cones from modeling chocolate—still adorable.
5. Jack-O’-Lantern Veggie Cups With Ranch “Webs”
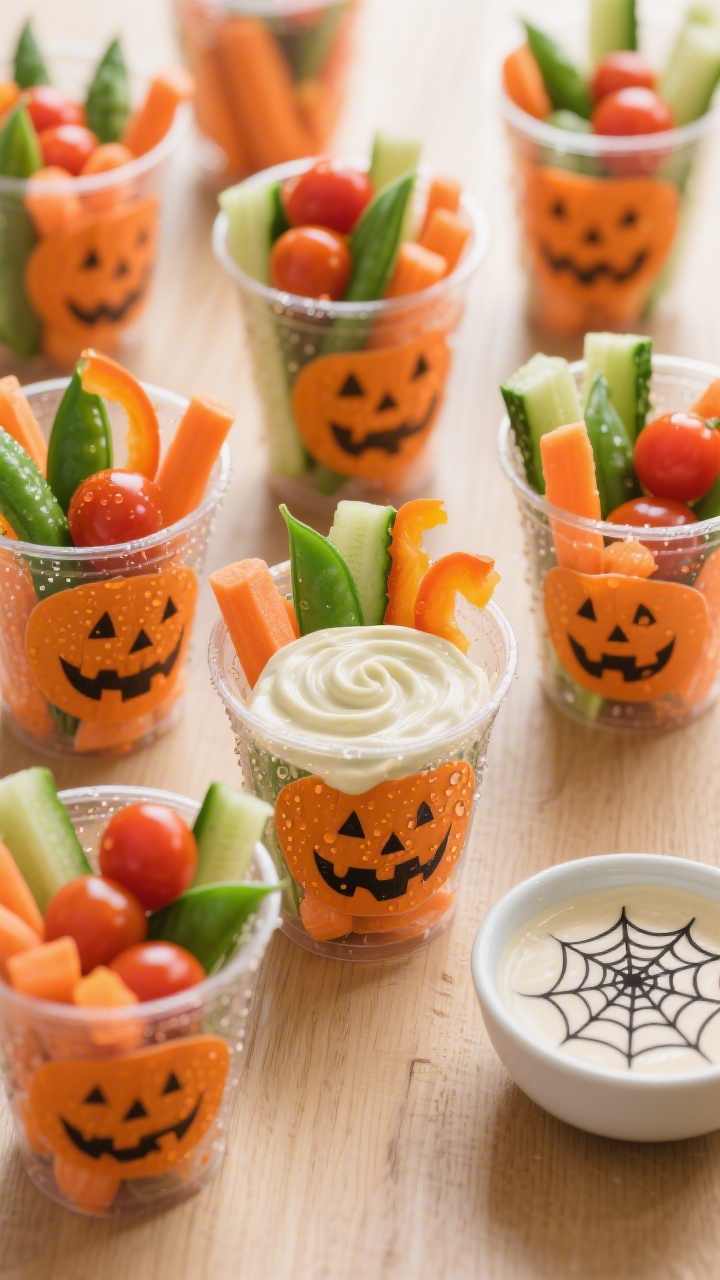
Finally, a veggie tray kids will actually eat. These single-serve cups turn crunchy veg into mini pumpkin faces with a creamy ranch web on top. They’re grab-and-go, colorful, and a parent-pleasing balance to all the sweets.
Ingredients:
- 10 clear 9–10 oz plastic cups
- 1 cup cherry tomatoes
- 2 cups baby carrots
- 2 cups cucumber sticks
- 2 cups orange bell pepper strips
- 1 cup snap peas or green beans
- 1 1/4 cups ranch dip (or dairy-free ranch)
- 2 tablespoons plain Greek yogurt (to thicken ranch, optional)
- Black food-safe marker (to draw faces)
Instructions:
- Use the marker to draw simple jack-o’-lantern faces on the outside of each cup. Let dry 2–3 minutes.
- Whisk ranch with yogurt if you want a thicker dip. Spoon 2 tablespoons into the bottom of each cup.
- Layer orange bell pepper strips and carrots first (pumpkin color!), then add cucumbers, snap peas, and a few cherry tomatoes for contrast. Pack snugly so they travel well.
- For a “web,” drizzle a thin spiral of ranch on top and drag a toothpick outward from the center to create lines.
Serving ideas: Top each cup with a celery leaf as a “stem.” For extra crunch, add a few baked pita chips on the side. Allergies? Use egg-free, dairy-free ranch. These stay fresh for several hours—ideal for classroom parties.
Packing & Allergy-Safe Tips
Keep it simple for school: label anything with potential allergens and prioritize nut-free ingredients. If your school is strict, stick to sunflower seed butter, dairy-free swaps, and sealed transport. Use ice packs for anything creamy or perishable and pack snacks in shallow containers so designs don’t smudge in transit.
Time-Saving Strategy
- Make a “decoration station”: pre-draw faces and pre-cut fruit/veg the night before.
- Assemble cold treats (banana pops, apple bites) morning-of for best texture.
- Bake the pizza mummies while you decorate the witch hats. Multitasking win.
There you go: five spooky, school-friendly bites that are easy, festive, and guaranteed to make the snack table the main event. Pick one or go big with all five—either way, you’ll be the Halloween hero. Now grab those candy eyeballs and let the fun begin!
Printable Recipe Card
Want just the essential recipe details without scrolling through the article? Get our printable recipe card with just the ingredients and instructions.