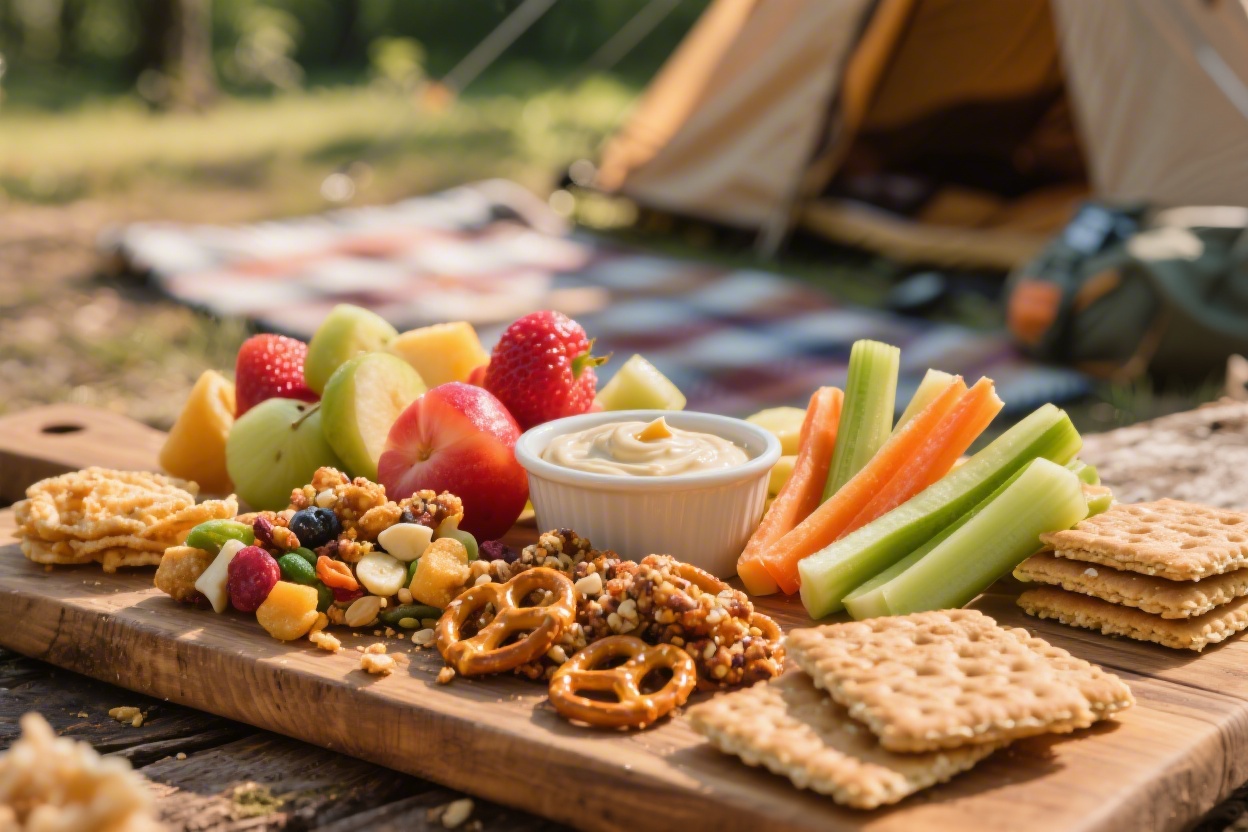
Camping Snacks for Kids – 5 Easy Outdoor Snack Ideas They’ll Beg for Again
Let’s be honest: hungry kids can turn a peaceful campsite into a chaotic snack negotiation. The fix? Fun, fast, and finger-friendly bites that pack easy, taste great, and don’t turn your cooler into a disaster zone. These five kid-approved camping snacks are big on crunch, color, and “can I have another?” energy—without requiring a full camp kitchen.
You’ll mix, wrap, skewer, and toast your way to happy little campers. Minimal mess, maximum smiles. Ready?
Disclosure: As Amazon Associates, we earn from qualifying purchases at no extra cost to you.
1. Trail Mix Cones That Make Hiking Feel Like Dessert
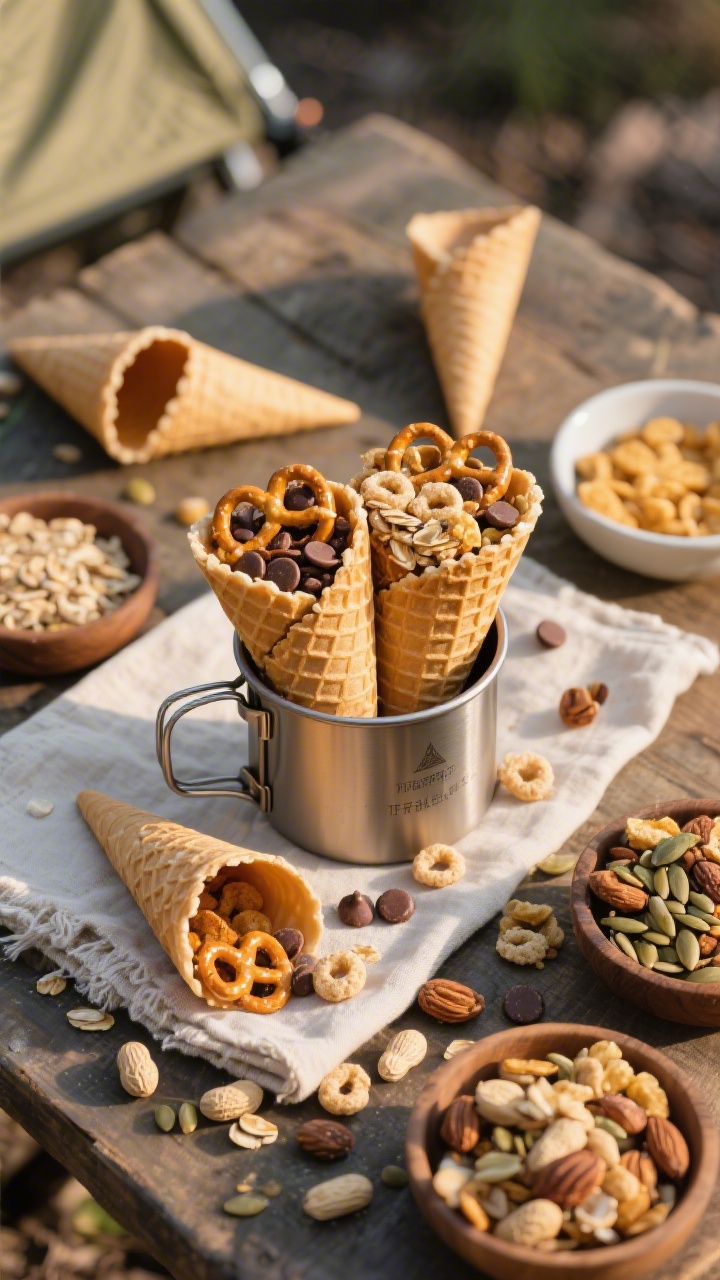
These crispy waffle cones are basically edible snack cups—no bowls, no spills, no clean-up drama. Kids love building their own combos, and you’ll love that you can tweak them for allergies and preferences. Perfect for hikes, hammock hangs, or that “I need something now” moment back at camp.
Ingredients:
- 6 waffle cones (regular or mini)
- 1 cup mini pretzels
- 1 cup toasted oat cereal or whole-grain cereal
- 1/2 cup roasted peanuts or sunflower seeds (for nut-free)
- 1/2 cup mini chocolate chips or chocolate-covered raisins
- 1/2 cup dried fruit (cherries, cranberries, or raisins)
- 1/4 cup mini marshmallows (optional but beloved)
- Small squares of parchment or foil for wrapping
Instructions:
- Prep a “build station” by pouring each mix-in into its own small container. Keep the cones in a separate basket so they don’t crack.
- Let kids fill cones with a balance of crunchy, chewy, and chocolatey—aim for 3–4 tablespoons of mix-ins per cone.
- Wrap the bottom third of each cone with parchment or foil for clean hands and easy transport.
- Serve immediately or store wrapped cones in a lidded container for up to a day to keep them crisp.
Pro tip: Want less sugar? Swap chocolate for cacao nibs and mini marshmallows for freeze-dried fruit. For heat, keep chocolate add-ins sealed in the cooler until serving so they don’t melt into a cocoa avalanche.
2. Rainbow Veggie Pinwheels Kids Actually Reach For
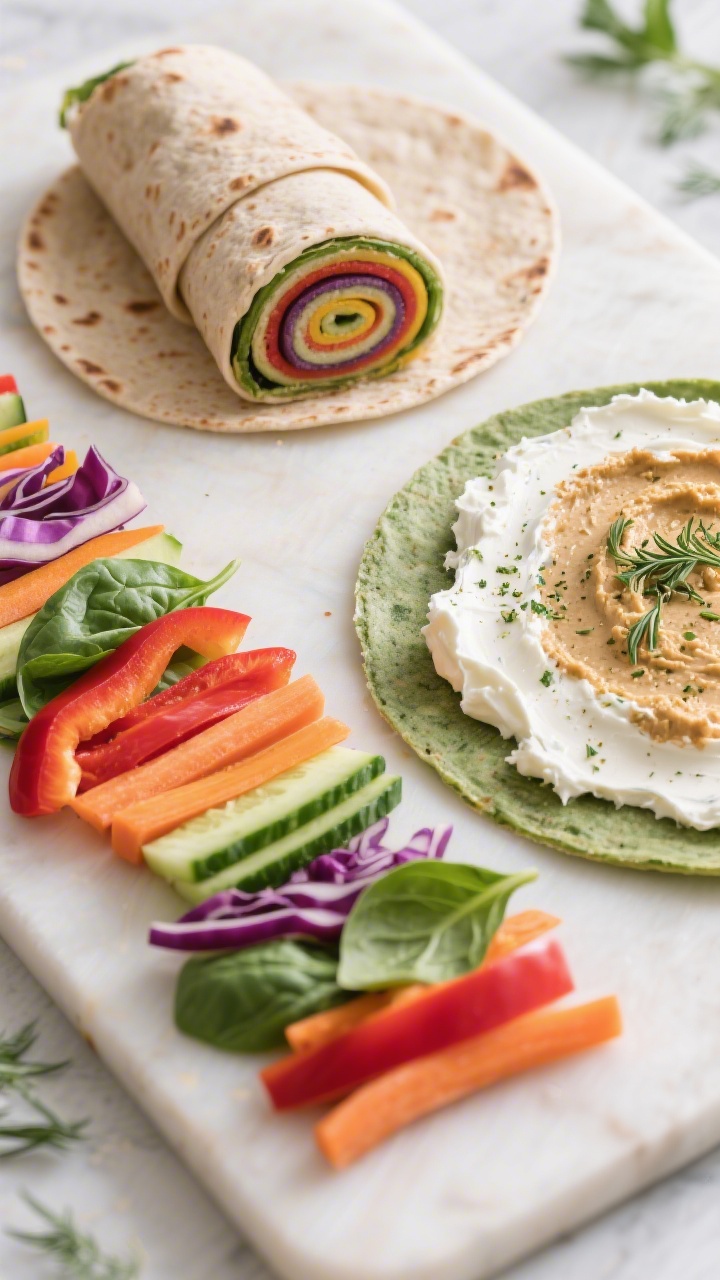
Colorful, crunchy, and secretly loaded with vegetables—these pinwheels are like party food that went camping. They’re easy to slice and share, and the creamy spread keeps everything tucked in tight. Plus, they won’t wilt if you prep them a few hours ahead.
Ingredients:
- 4 large flour tortillas (whole wheat or spinach if you want extra green)
- 8 ounces cream cheese, softened (or hummus for dairy-free)
- 1 teaspoon ranch seasoning or 1 tablespoon fresh herbs (dill, chives)
- 1 cup shredded carrots
- 1 cup baby spinach, chopped
- 1 cup bell peppers, finely diced (mix of red/yellow for color)
- 1/2 cup cucumber, seeded and diced
- 1/2 cup shredded cheddar or mozzarella (optional)
- Pinch of salt and pepper
Instructions:
- In a bowl, mix cream cheese with ranch seasoning (or herbs), plus a pinch of salt and pepper until smooth.
- Lay out a tortilla and spread a thin, even layer of the creamy base all the way to the edges. This is your veggie glue.
- Sprinkle a light, even layer of carrots, spinach, peppers, cucumber, and cheese (if using). Don’t overload—thin layers roll tighter.
- Tightly roll the tortilla into a log. Repeat with remaining tortillas.
- Wrap each roll in plastic wrap or foil and chill in the cooler for 20–30 minutes for cleaner slices.
- Unwrap and slice into 1-inch pinwheels. Serve cold.
Variation: Add turkey slices for protein lovers, or swap cream cheese for avocado mash with lime for a dairy-free twist. If you’re prepping ahead, keep cucumbers dry by patting with a paper towel—no soggy pinwheels on your watch.
3. Campfire Apple Nachos With Peanut Butter Drizzle

Think nachos, but fresh, crunchy, and sweet. Apple slices form the “chips,” and you drizzle them with warm peanut butter, chocolate, and crunchy toppings. It’s a low-mess, high-cheer crowd-pleaser that looks impressive on a picnic table.
Ingredients:
- 4 crisp apples (Honeycrisp or Gala), cored and thinly sliced
- 1 tablespoon lemon juice (to prevent browning)
- 1/3 cup peanut butter (or sunflower seed butter for nut-free)
- 2 tablespoons honey or maple syrup
- 1/4 cup mini chocolate chips
- 1/4 cup granola or crushed graham crackers
- 2 tablespoons shredded coconut or chopped nuts (optional)
- Pinch of cinnamon
Instructions:
- Toss apple slices with lemon juice in a large bowl to keep them bright.
- In a small camp pot or heat-safe cup, gently warm peanut butter with honey over low heat or near the campfire until spoon-drizzly. Stir until smooth.
- Arrange apple slices on a platter or cutting board. Drizzle the warm peanut butter sauce over the top.
- Sprinkle with chocolate chips, granola, coconut, and a pinch of cinnamon.
- Serve immediately and let kids grab with fingers or toothpicks. No double-dipping rules here—just smiles.
Make it lighter: Skip the chocolate chips and add blueberries or sliced strawberries. For extra camp flair, use a squeeze bottle for the drizzle—seriously satisfying zigzags guaranteed.
4. Cheesy Campfire Quesadilla Pockets
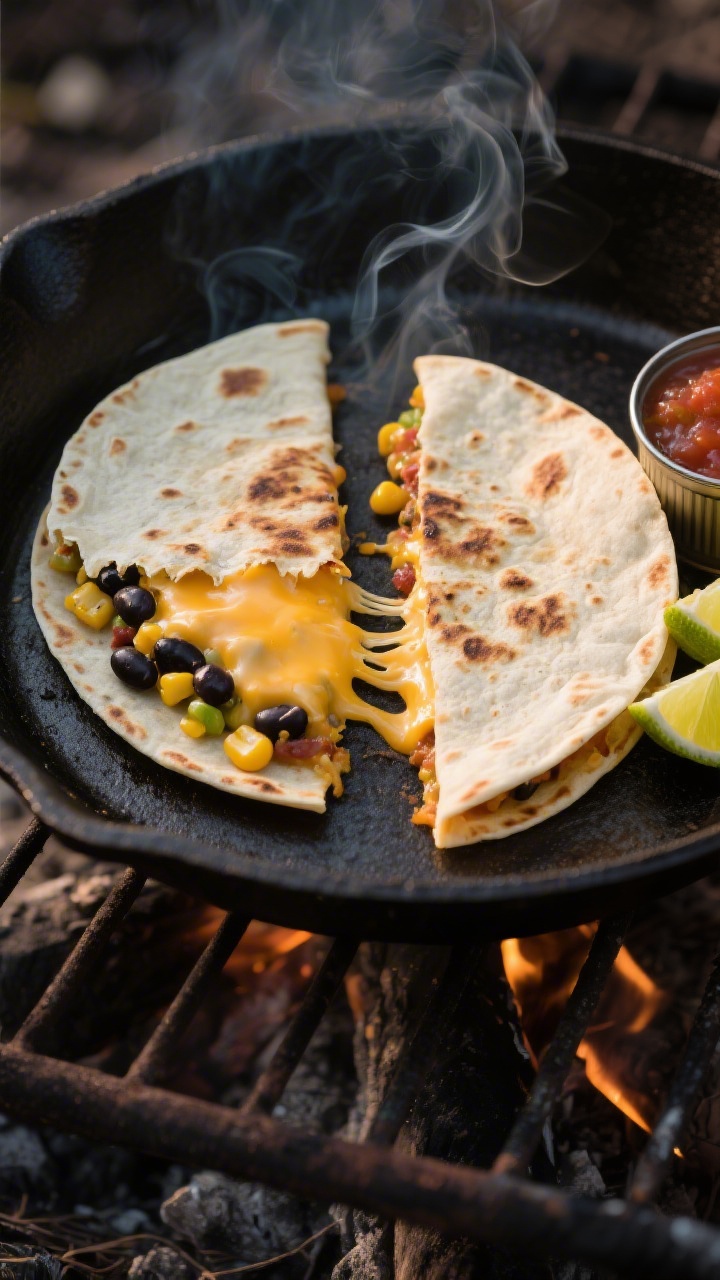
Quesadillas are the camp MVP: melty, toasty, and infinitely customizable. These foil-wrapped pockets cook right on the grate (or a skillet) and make zero crumb explosions in the tent. Great for snack time, late-night munchies, or that in-between meal gap after a big hike.
Ingredients:
- 4 medium flour tortillas
- 1 1/2 cups shredded cheese (cheddar, Monterey Jack, or a blend)
- 1 cup black beans, rinsed and drained
- 1/2 cup corn kernels (canned or thawed frozen)
- 1/2 cup mild salsa or diced tomatoes
- 2 tablespoons olive oil or butter
- Salt and pepper, to taste
- Foil sheets for wrapping
- Optional dips: guacamole, sour cream, extra salsa
Instructions:
- Lay a tortilla on a piece of foil. Spread a thin layer of cheese over half.
- Add a few spoonfuls of beans, corn, and salsa. Season lightly with salt and pepper. Top with more cheese—cheese is your sealant.
- Fold the tortilla in half. Brush both sides with a little oil or butter.
- Wrap loosely in foil, leaving a small gap at the top for steam to escape.
- Cook over campfire coals or on a grill for 5–7 minutes per side, flipping once, until cheese is melted and edges are lightly crisp. In a skillet, cook 3–4 minutes per side over medium heat.
- Let cool 2 minutes, then open foil carefully and slice into wedges.
Tip: Add cooked shredded chicken or sautéed peppers for bigger appetites. For spice-sensitive kiddos, keep salsa on the side and go extra on the cheese. Serve with guac for healthy fats and bonus happy faces.
5. No-Bake S’mores Energy Bites (All The Fun, Less The Sticky)

Love s’mores but not the sugar crash? These poppable bites bring all the campfire flavor—graham, chocolate, marshmallow—without needing an open flame. They pack beautifully, don’t melt easily, and taste like dessert disguised as a sensible snack.
Ingredients:
- 1 1/2 cups rolled oats
- 3/4 cup crushed graham crackers (about 5 full sheets)
- 1/2 cup mini chocolate chips
- 1/2 cup mini marshmallows, chopped if large
- 1/2 cup creamy peanut butter or sunflower seed butter
- 1/3 cup honey or maple syrup
- 1 teaspoon vanilla extract
- Pinch of salt
Instructions:
- In a large bowl, stir together oats, crushed grahams, chocolate chips, marshmallows, and a pinch of salt.
- In a separate bowl, mix peanut butter, honey, and vanilla until smooth.
- Pour the wet mixture over the dry and stir until everything is evenly coated and clumpy.
- Chill the bowl for 15 minutes to make rolling easier.
- With clean hands, roll into 1-inch balls. If the mix is sticky, lightly dampen your hands or add a tablespoon more oats.
- Store in an airtight container. Keep cool in the shade or cooler; they’ll hold for 3–4 days.
Make it yours: Add chia seeds for crunch, swap marshmallows for freeze-dried mini marshmallows to avoid stickiness, or drizzle with a whisper of melted chocolate if you’re feeling fancy. These also make an amazing trail bribe—er, treat—mid-hike.
Packing And Prep Tips
Keep snacks happy and kids happier with a few smart moves:
- Use clear, stackable containers so kids can “shop” with their eyes.
- Pack a tiny cutting board and a sharp paring knife in a sheath for quick slicing.
- Bring wipes, toothpicks, and a small trash bag to keep sticky fingers and camp tables under control.
- Label allergy-friendly items clearly—especially nut-free vs. nut-filled mixes.
Make-Ahead Game Plan
- Trail Mix Cones: Pre-portion mix-ins in snack bags; assemble on site to keep cones crisp.
- Pinwheels: Roll and chill up to 24 hours ahead; slice at camp.
- Apple Nachos: Core and slice apples at camp to avoid browning, or pack sliced with lemon in a sealed container.
- Quesadilla Pockets: Pre-fill and wrap in foil; cook over the fire when the “I’m hungry” chorus starts.
- Energy Bites: Make entirely at home; they’re grab-and-go gold.
There you go—five fun, low-fuss camping snacks that taste like a mini adventure all on their own. Pick one or make the whole lineup. Either way, you’ll be the campsite legend who kept the kids snacking, smiling, and asking for seconds (trust me). Now pack the cooler, grab the marshmallow sticks, and let snack time steal the show.
Printable Recipe Card
Want just the essential recipe details without scrolling through the article? Get our printable recipe card with just the ingredients and instructions.