5 Fruit Animals for Kids That Are Cute, Easy, and Healthy
You know what gets kids to devour fruit without a single reminder? Turning it into adorable animals. These fruity critters are fast to assemble, ridiculously cute, and totally snack-time worthy. Perfect for lunchboxes, birthday parties, or a rainy afternoon activity that ends in something sweet and healthy.
I’ve kept everything simple, mostly no-cook, and 100% parent-friendly. Grab a cutting board, a few cookie cutters if you have them (not required!), and let’s turn snack time into a mini zoo.
Disclosure: As Amazon Associates, we earn from qualifying purchases at no extra cost to you.
1. Strawberry Ladybug Snack That Flies Off the Plate
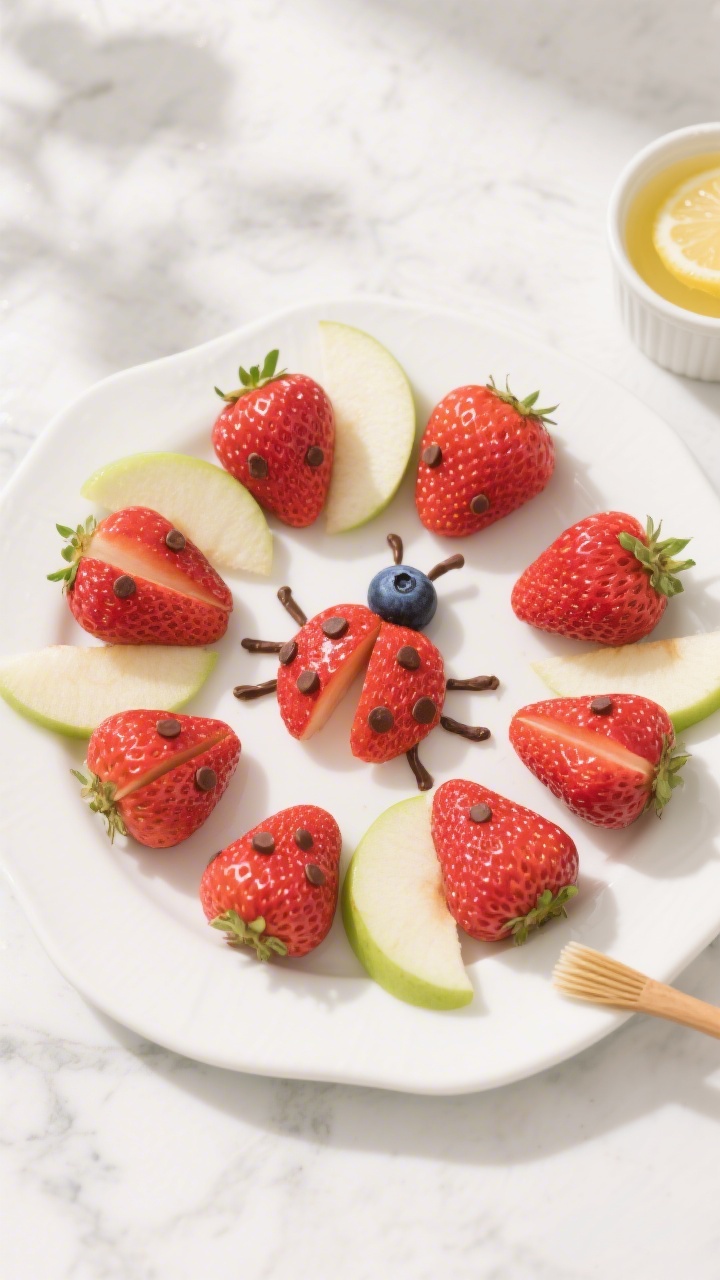
These little ladybugs look fancy but come together in minutes. They’re the ultimate after-school surprise—bright, juicy, and naturally sweet. Bonus points for the built-in portion control: one per kid… or three, if you’re the kid at heart.
Ingredients:
- 8 large strawberries, hulled
- 1 small apple (preferably green), thinly sliced into 8 half-moons
- 16 mini chocolate chips (for spots)
- 8 blueberries (for heads)
- 1 tablespoon lemon juice (to brush apples)
- 1 tablespoon honey or maple syrup (optional, for shine)
- 1 small sprig fresh mint (optional, for “leaf” garnish)
Instructions:
- Prep the “wings.” Slice each strawberry in half lengthwise. If they’re very large, gently fan the halves apart to look like wings.
- Add heads. Place a blueberry at the pointy end of each strawberry to form a head. Tuck it slightly underneath so it looks attached.
- Give them spots. Press mini chocolate chips, point-side down, into the cut side of each strawberry half to create polka dots. About 2 chips per half keeps things cute, not crowded.
- Create the leaf base. Brush the apple slices with lemon juice to prevent browning, then place one under each ladybug so it looks like it’s resting on a leaf. Drizzle a whisper of honey if you want a glossy finish.
- Plate and garnish. Arrange ladybugs on a platter. Add tiny mint leaves for the garden vibe.
Pro tip: Swap chocolate chips for raisins or cacao nibs if you want to go fully unprocessed. Serving these with a dollop of vanilla yogurt makes them feel like dessert—even though they’re mostly fruit.
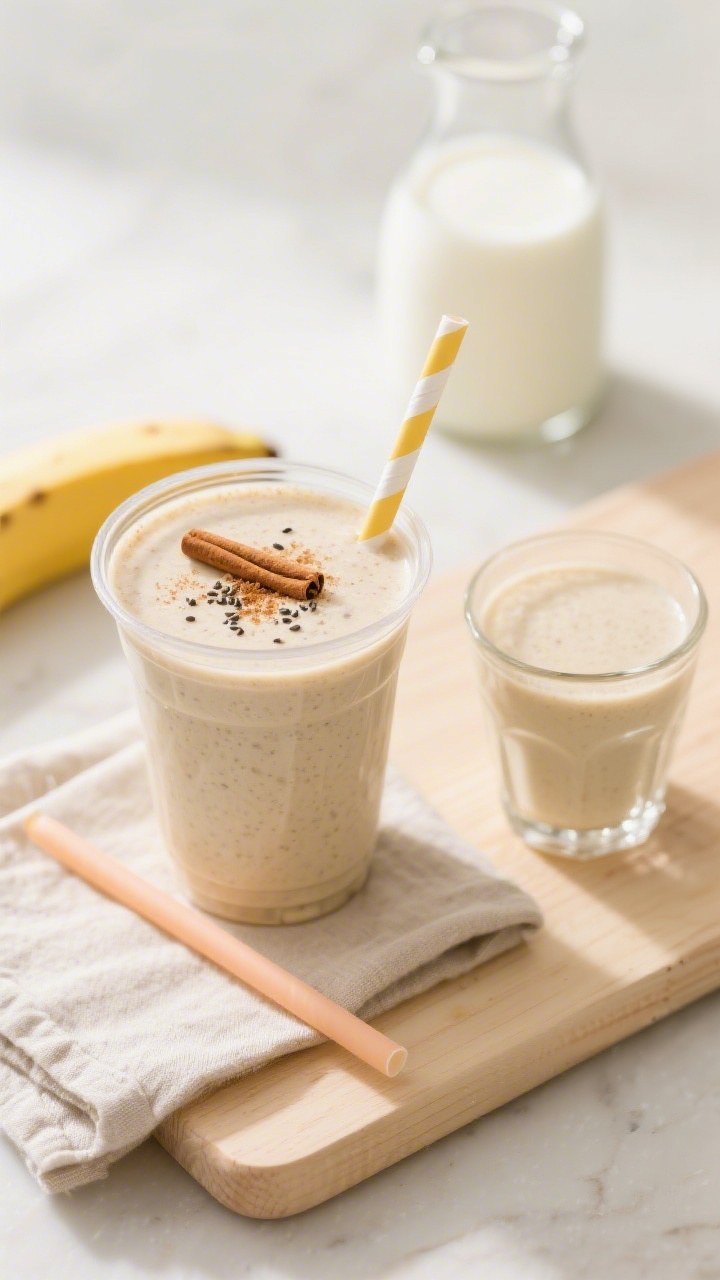
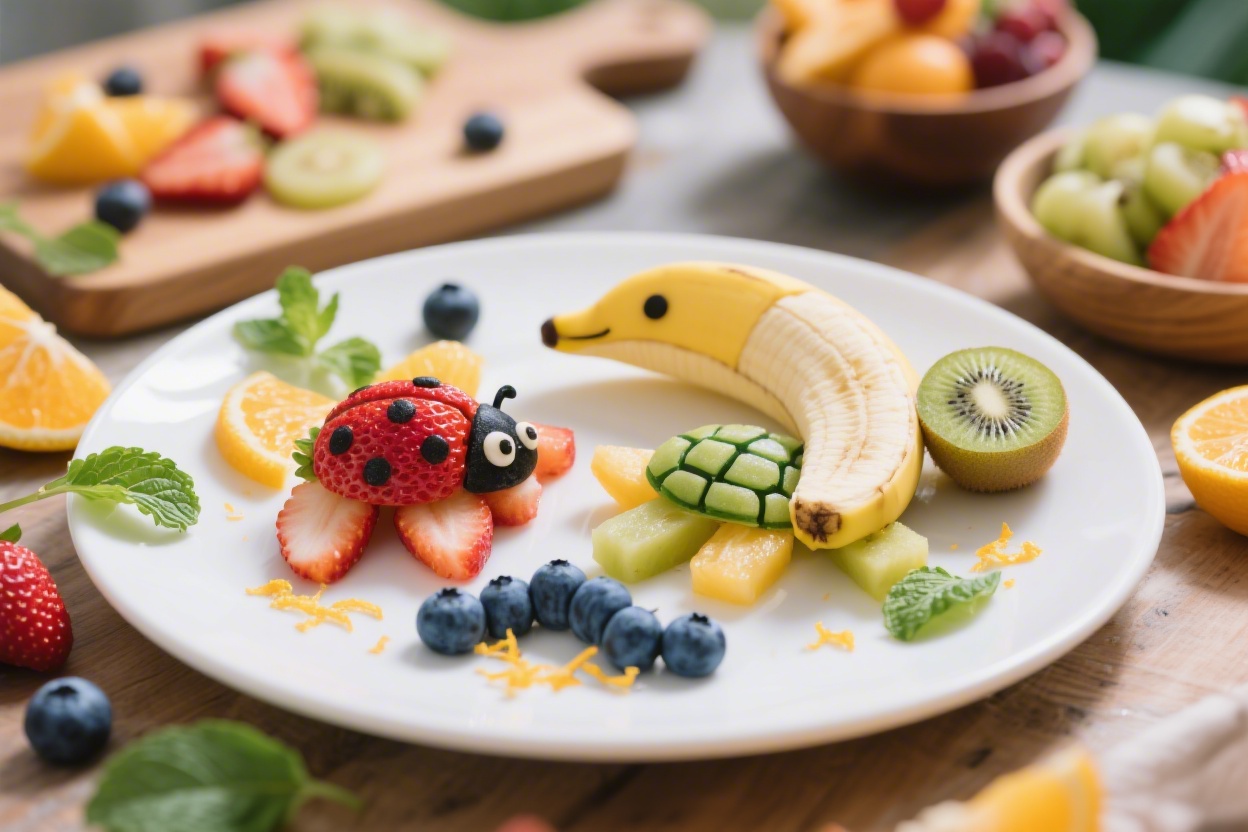
2. Banana-Dolphin Smoothie Cups That Make Waves
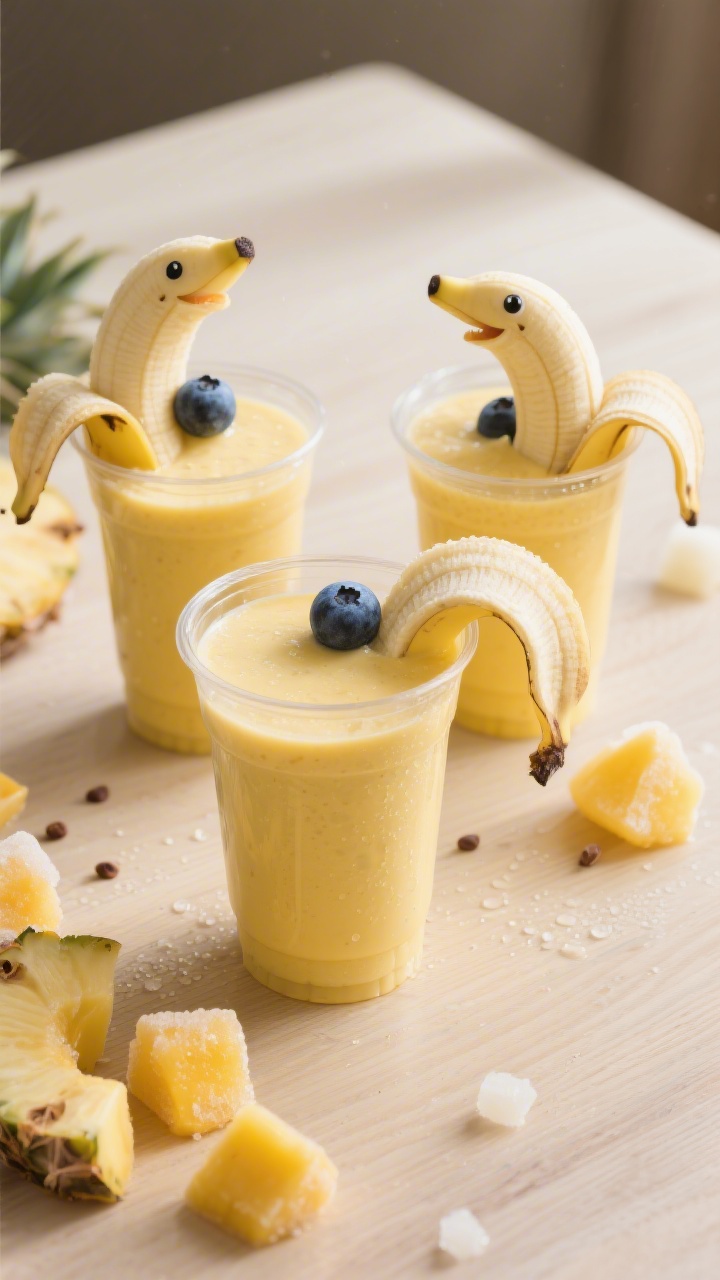
These dolphins literally hang out on the rim of your cup, holding a grape “ball.” Kids lose it—in the best way. You’ll get the cutest presentation with minimal effort, plus a creamy smoothie that’s naturally sweet and loaded with potassium.
Ingredients:
- 2 ripe bananas (plus 2 more for the dolphin garnishes)
- 1 cup frozen pineapple chunks
- 1 cup frozen mango chunks
- 1 to 1 1/2 cups milk or non-dairy milk
- 1/2 cup plain or vanilla yogurt
- 1 tablespoon chia seeds (optional)
- 8 seedless grapes (for the “balls”)
- 2 chocolate chips or edible marker (for eyes)
- 1 teaspoon lemon juice
Instructions:
- Blend the smoothie. In a blender, add 2 ripe bananas, pineapple, mango, milk, yogurt, and chia (if using). Blend until silky. Adjust with more milk for a pourable texture.
- Make the dolphins. Slice the stem end of each garnish banana about 1/2 inch down to create a “mouth.” Gently pry it open just enough to hold a grape.
- Add details. Dot on eyes with a tiny dab of melted chocolate or an edible marker. Brush banana “faces” with lemon juice to slow browning.
- Assemble. Pour smoothie into cups. Perch each banana dolphin on the rim with the split end facing outward and tuck a grape in its mouth.
Serve it up: Sprinkle granola on top for crunch or swirl in a spoonful of peanut butter for extra protein. If transporting, prep the smoothie in lidded jars and add the banana dolphins at the last minute to keep them perky.
3. Kiwi Turtle Pond That Kids Can Build Themselves
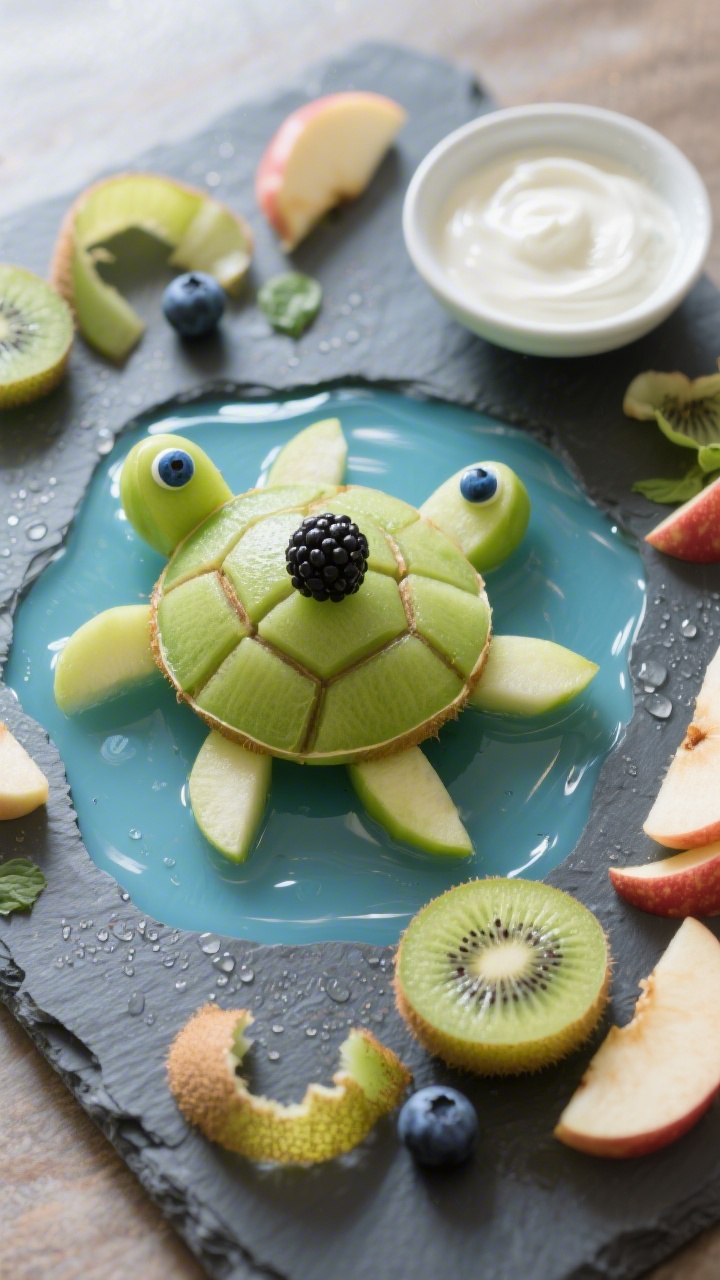
Think snack meets craft project. A kiwi “shell,” apple “legs,” and blueberry “eyes” make these turtles almost too cute to eat. They’re perfect for playdates or a weekend brunch board where everyone builds their own buddy.
Ingredients:
- 4 kiwis, peeled and halved crosswise
- 1 green apple, sliced into thin wedges for legs and tail
- 8 small grapes or blackberries (for heads)
- 8 blueberries (for eyes)
- 2 tablespoons unsweetened shredded coconut (optional “sand”)
- 1 tablespoon lemon juice (for apples)
- Toothpicks (optional, for stability—use with supervision)
Instructions:
- Shape the shells. Slice each kiwi in half to form 8 domed “shells.” Score a light crisscross pattern on top with a small knife for a turtle shell look.
- Prep the limbs. Cut the apple into small wedges for four legs and a triangular tail per turtle. Brush with lemon juice to keep them bright.
- Add the head. Place a grape or blackberry in front of the kiwi shell. If serving to older kids, secure with a toothpick; otherwise, nestle it close.
- Attach eyes. Press two blueberries gently into the head fruit. If they won’t stick, slice a tiny flat spot on the head fruit first or use a dab of yogurt as “glue.”
- Build the pond. Scatter coconut on a plate like sand, then arrange turtles on top with apple legs and tail tucked under each kiwi shell.
Variation: Swap kiwi for halved golden kiwi or melon balls if your kiddo prefers a milder flavor. A swirl of vanilla yogurt “water” on the plate makes it extra whimsical—and snack-worthy.
4. Apple Owl Toast That’s Wise, Wholesome, and Crunchy
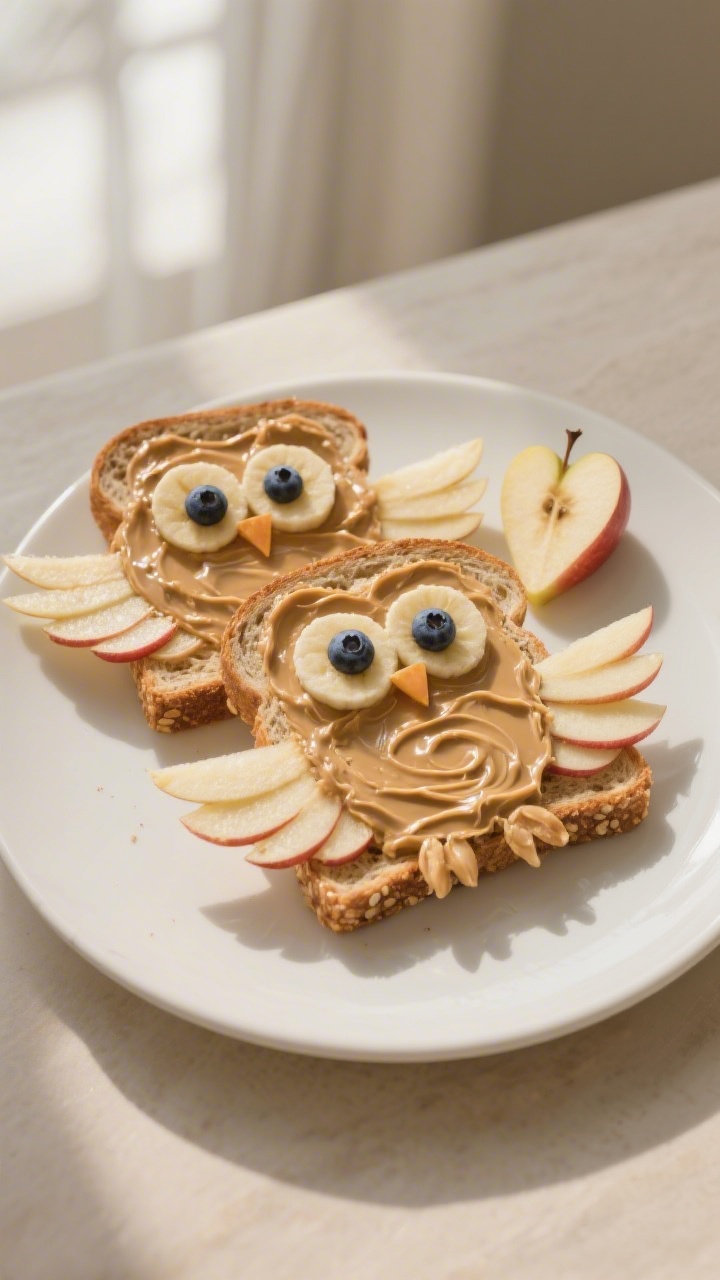
Breakfast or snack, this little owl is all about cozy crunch. Whole-grain toast, creamy nut butter, and crisp apples—then a fruity face kids can customize. It’s a fun, fuel-packed bite that feels like a tiny art project.
Ingredients:
- 2 slices whole-grain bread
- 3 tablespoons peanut butter or almond butter (sub sunflower butter for nut-free)
- 1 crisp apple (Honeycrisp or Gala), thinly sliced
- 4 banana slices (for eyes)
- 8 blueberries (for pupils and buttons)
- 2 small orange segments or 2 thin carrot triangles (for beaks/feet)
- 1 teaspoon honey or maple syrup (optional)
- Pinch of cinnamon (optional)
Instructions:
- Toast and spread. Toast the bread to your liking. Spread with nut or seed butter while warm so it gets glossy. Sprinkle with a pinch of cinnamon if you’d like.
- Make the face. Place two banana slices near the top of each toast as big owl eyes. Add blueberries in the center for pupils.
- Build the feathers. Overlap thin apple slices in neat rows down the toast to mimic feathers. Fan them slightly for texture.
- Add details. Set a small orange segment or carrot triangle as the beak, and two tiny pieces at the base as feet. Drizzle a tiny bit of honey if your apples are super tart.
Make it yours: Use pear slices instead of apple for a softer bite. For extra crunch, sprinkle granola “feathers.” Want protein? Add chia or hemp seeds over the nut butter. This is also amazing with cinnamon raisin bread—trust me.
5. Spiraled Watermelon Sunset Turtle Platter
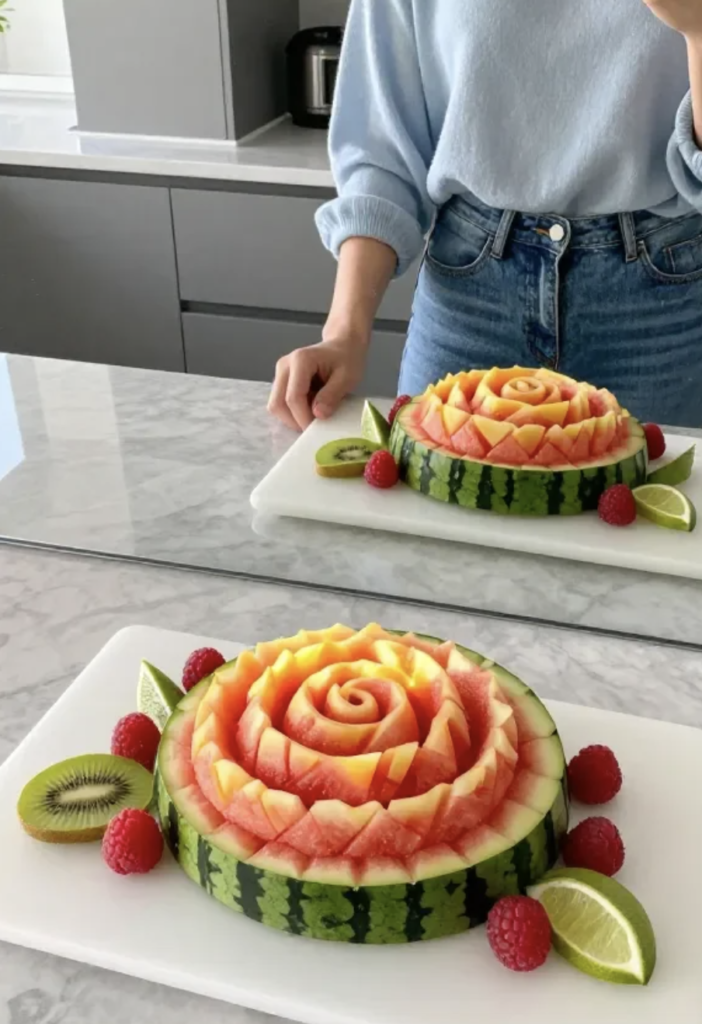
For parties, this is your showstopper. A watermelon shell becomes the turtle’s back, and you fill it with a rainbow of fruit. It’s dramatic, healthy, and doubles as the centerpiece everyone won’t stop photographing.
Ingredients:
- Watermelon shell carved in a spiraled pattern with sunset hues
- Raspberries to accent the shell edges for a rosy glow
- Kiwi triangles or thin lime wedges to mimic tiny sea greens
- Orange segments or mandarin slices for a warm contrast
- Carved grapefruit wedges to boost brightness
- Dark chocolate or cocoa-dusted melon balls for eyes
Instructions:
Build the shell in a spiral that radiates outward, then layer the smaller fruit pieces around the edges to create a sun-kissed halo. The bright citrus tones echo sunset skies, so keep everything from pale to intense within that warm family. Use a few mint leaves to simulate sea grass; it adds depth and a touch of fresh perfume that kids will notice as they lean in for a closer look.
Want more tips? Here are quick reminders to keep everything easy and fun:
- Prep ahead: slice and carve the melon the day before if your schedule is chaotic. Keep pieces chilled until serving to maintain color and freshness.
- Keep it fresh: drizzle lime or lemon juice on cut surfaces to prevent browning, especially for the larger shell areas.
- Texture contrast: throw in a few crunchy elements like toasted sesame seeds or crisp apple sticks to add bite and variety.
Tips for Success With Fruit Animals
- Use ripe but firm fruit. Too soft and things slide; too hard and cutting becomes a battle.
- Keep a “glue.” A tiny dab of yogurt, nut butter, or honey helps attach eyes and details.
- Prevent browning. Brush apples, pears, and bananas with lemon juice or pineapple juice.
- Let kids help. Assign age-appropriate jobs: washing fruit, placing eyes, or arranging “wings.”
- Make it a board. Build a snackable zoo by plating all five animals together—instant wow.
Ready to turn snack time into showtime? These five fruit animals are cute, easy, and actually good for kids (and you). Grab your fruit bowl, channel your inner artist, and have fun—because when food is this playful, everyone eats better. Seriously, you’ll never look at a strawberry the same way again.
Printable Recipe Card
Want just the essential recipe details without scrolling through the article? Get our printable recipe card with just the ingredients and instructions.