5 Sandwich Ideas for Kids That Are Perfect for Lunchboxes They’ll Actually Eat
Your lunchbox routine doesn’t have to be a daily gamble. These five kid-approved sandwiches are fast, fun, and built to survive the backpack toss. We’re talking crisp where they should be, creamy where they could be, and packed with enough flavor to come home with zero leftovers. Ready to upgrade lunchtime without fancy chef stuff? Let’s build some sandwiches.
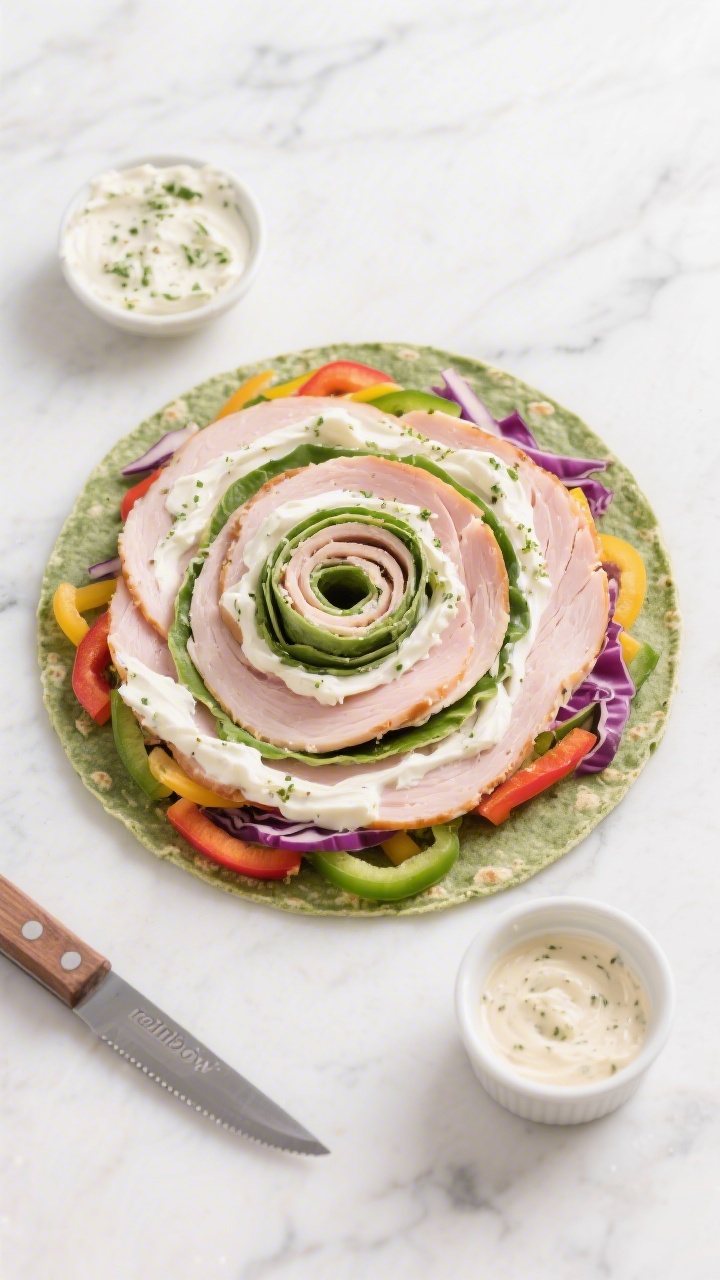
1. Rainbow Turkey Pinwheels With Creamy Ranch Swirls
⭐ My secret tip – Ever since we started using this kids baking set, my toddler loves helping in the kitchen and is much more willing to try new foods. ✨ This is the blender we use for protein smoothies with yogurt, peanut butter, and fruit.
These pinwheels look like party confetti, which is why kids devour them. The ranch spread keeps everything juicy, the veggies add crunch, and the tortilla rolls up into neat little spirals that fit perfectly into lunchbox compartments. Bonus: they’re easy to customize for picky eaters and totally make-ahead friendly.
Disclosure: As Amazon Associates, we earn from qualifying purchases at no extra cost to you.
Ingredients:
- 2 large spinach or plain flour tortillas (10-inch)
- 3 tablespoons light cream cheese, softened
- 1 tablespoon ranch seasoning mix
- 6 ounces sliced deli turkey (smoked or oven-roasted)
- 1/2 cup shredded cheddar cheese
- 1/2 cup very thinly sliced red bell pepper
- 1/2 cup shredded carrots
- 1/2 cup baby spinach, stems removed
- 1 teaspoon honey (optional, for a hint of sweetness)
Instructions:
- In a small bowl, mix the cream cheese with the ranch seasoning until smooth. If your kid likes a little sweeter vibe, stir in the honey.
- Lay a tortilla flat and spread with half the ranch cream cheese, going all the way to the edges—this is your edible glue.
- Layer half the turkey evenly over the tortilla. Sprinkle on half the cheddar, then arrange half the peppers, carrots, and spinach in a thin, even layer.
- Roll the tortilla up tightly from one edge to the other. Repeat with the second tortilla and remaining ingredients.
- Use a sharp knife to trim the ends (chef’s snack), then slice each roll into 6–8 pinwheels. Wipe the knife between cuts for clean spirals.
Pack with apple slices and a small container of hummus or yogurt dip. Want to switch it up? Swap turkey for rotisserie chicken, try whole-wheat tortillas, or tuck in thin cucumber ribbons for extra crunch. Pro tip: wrap the rolled tortillas in plastic and chill 15 minutes before slicing—cleaner cuts, happier lunchbox.
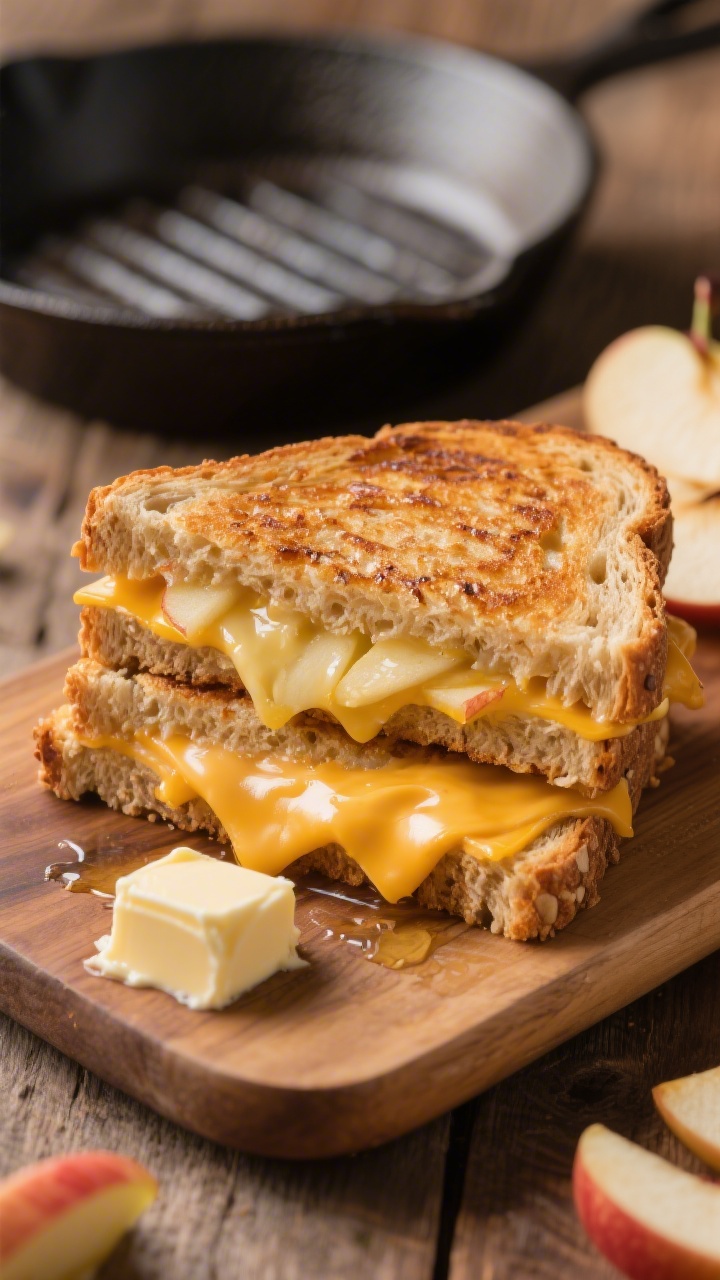
2. Crunchy Apple Cheddar “Grilled” Sandwich (No Grill Needed)
⭐ My secret tip – Ever since we started using this kids baking set, my toddler loves helping in the kitchen and is much more willing to try new foods. ✨ This is the blender we use for protein smoothies with yogurt, peanut butter, and fruit.
It’s the classic grilled-cheese vibe but lunchbox-proofed. Crisp apple slices team up with sharp cheddar and a swipe of mustard-honey magic for sweet-salty balance. We “grill” the bread in a pan just until golden, then cool before packing so it stays crisp instead of soggy. Seriously, it’s kid gold.
Ingredients:
- 4 slices whole-grain sandwich bread
- 1 tablespoon softened butter (or mayo) for toasting
- 4 ounces sliced sharp cheddar cheese
- 1 small sweet apple (Gala or Honeycrisp), cored and thinly sliced
- 1 teaspoon Dijon mustard
- 1 teaspoon honey
- Pinch of cinnamon (optional, for warmth)
Instructions:
- Stir the mustard, honey, and cinnamon in a small bowl. Spread a thin layer on two slices of bread.
- Layer cheddar over the honey-mustard, then arrange apple slices evenly on top. Cap with the remaining bread slices.
- Lightly butter the outside of each sandwich. Warm a nonstick skillet over medium heat and toast the sandwiches 2–3 minutes per side until the bread is golden and the cheese just begins to melt.
- Transfer to a rack and let cool completely—this keeps the interior crisp. Slice into halves or fun shapes once cool.
Pack with a small container of roasted chickpeas or trail mix for extra protein. Variations: swap cheddar for gouda, add a few raisins inside, or use pear slices for a softer bite. If your kid is team “no mustard,” skip it and spread a whisper of cream cheese under the apples for tang without the zing.
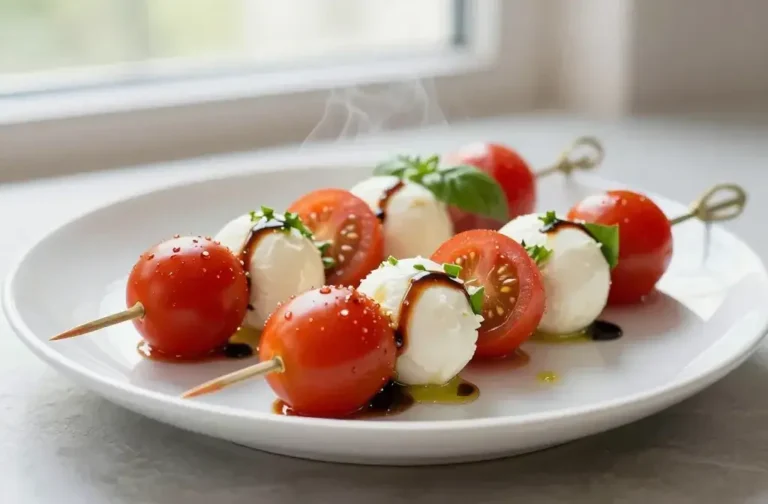
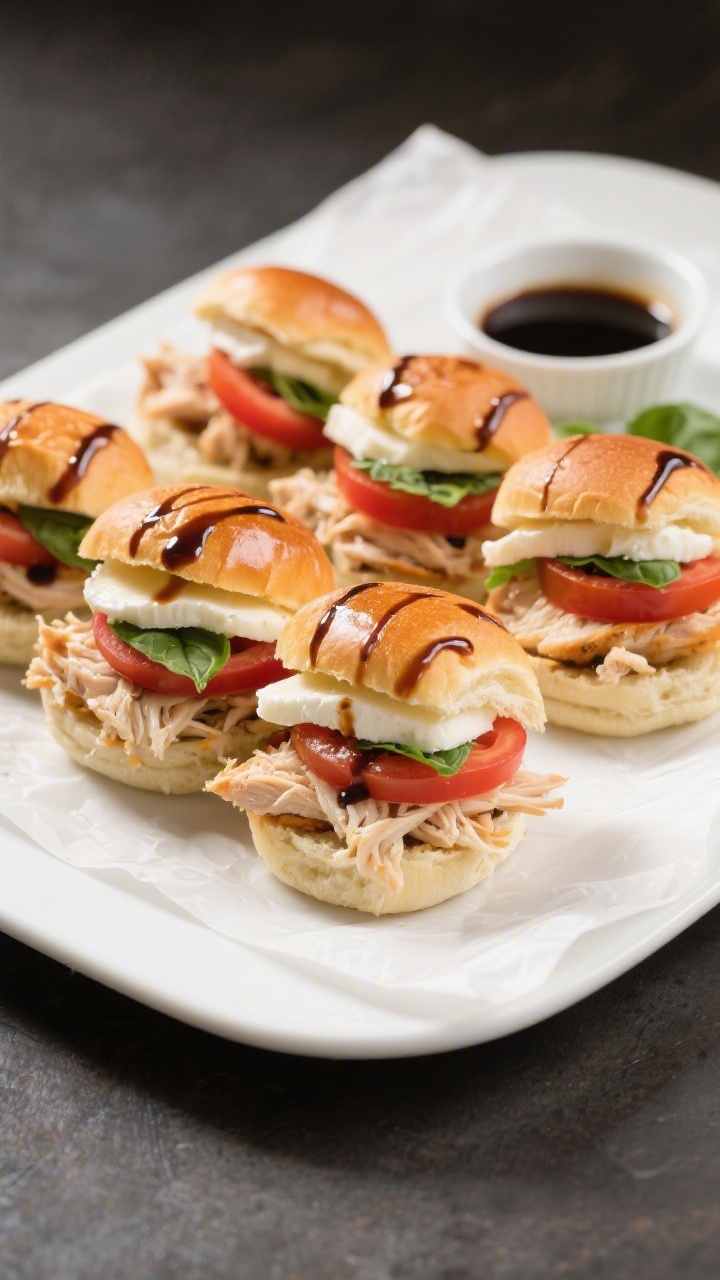
3. Mini Caprese Chicken Sliders With Balsamic Drizzle
⭐ My secret tip – Ever since we started using this kids baking set, my toddler loves helping in the kitchen and is much more willing to try new foods. ✨ This is the blender we use for protein smoothies with yogurt, peanut butter, and fruit.
Think caprese salad, but kid-sized and built to travel. Juicy shredded chicken, mild mozzarella, and sweet tomatoes tuck into soft slider rolls. A quick balsamic-honey drizzle adds big flavor without being too grown-up. These hold up beautifully until lunchtime.
Ingredients:
- 6 soft slider rolls
- 1 cup cooked shredded chicken (rotisserie works great)
- 1/2 cup shredded low-moisture mozzarella or 6 thin slices fresh mozzarella
- 1/2 cup grape tomatoes, thinly sliced
- 1/4 cup fresh basil, sliced thin (or baby spinach for milder flavor)
- 1 tablespoon olive oil
- 1 tablespoon balsamic vinegar
- 1 teaspoon honey
- Pinch of salt and black pepper
Instructions:
- In a bowl, whisk olive oil, balsamic, honey, salt, and pepper. Toss half with the shredded chicken to moisten and flavor it.
- Split the slider rolls. Layer chicken, mozzarella, and tomato slices. Sprinkle with basil (or spinach for a gentler taste).
- Drizzle just a little of the remaining balsamic mixture over the tomatoes—think gentle rain, not thunderstorm.
- Close the sliders and press lightly. If packing later, wrap tightly in parchment or foil.
Serve with cucumber coins or a cup of fruit. For a warm option at home, you can bake the assembled sliders at 350°F (175°C) for 6–8 minutes to melt the cheese, then cool before packing. Want a dairy-free version? Use avocado slices instead of mozzarella and skip the warm step.
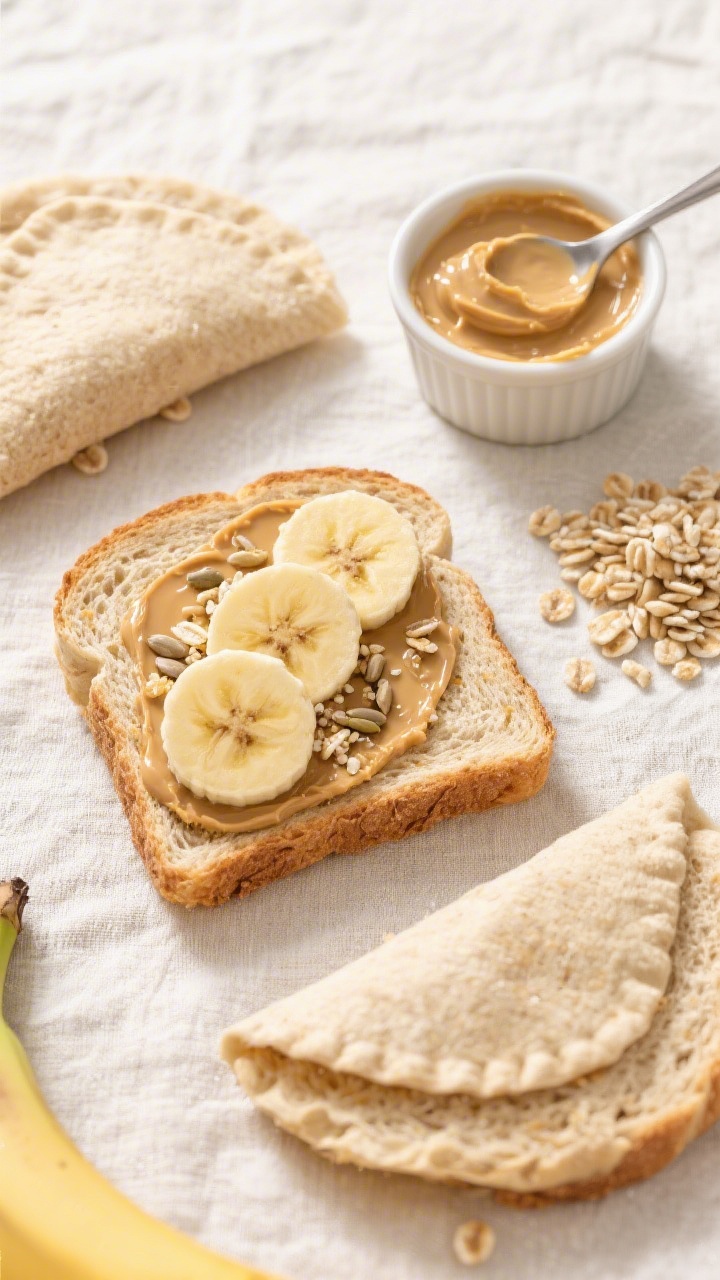
4. Sunbutter Banana Crunch Pockets (Nut-Free, Classroom-Safe)
⭐ My secret tip – Ever since we started using this kids baking set, my toddler loves helping in the kitchen and is much more willing to try new foods. ✨ This is the blender we use for protein smoothies with yogurt, peanut butter, and fruit.
Meet the PB&J’s allergy-friendly cousin. Creamy sunflower seed butter meets sliced banana and a whisper of crunch inside a perfectly sealed “pocket” you make right from sandwich bread. It’s sweet, satisfying, and safe for nut-free schools—plus, no sticky leaks.
Ingredients:
- 4 slices soft whole-wheat or white sandwich bread
- 3 tablespoons sunflower seed butter (or soy nut butter)
- 1 medium ripe banana, sliced into thin rounds
- 1 tablespoon crispy rice cereal or crushed freeze-dried strawberries
- 1 teaspoon maple syrup (optional)
- Pinch of flaky salt (optional, for balance)
Instructions:
- Trim crusts if your kid prefers. Lightly flatten each bread slice with a rolling pin—this helps them seal.
- Spread sunflower butter over two slices. Drizzle with a tiny bit of maple syrup if using.
- Top with banana slices in a single layer and sprinkle with the crispy rice or crushed berries for that crunch.
- Place the remaining bread slices on top. Use the tines of a fork to crimp and seal all around the edges, creating pockets. Press firmly so nothing escapes.
- Cut each pocket in half or use a large round cookie cutter to make sealed circles.
These pair perfectly with carrot sticks or a yogurt tube. To switch it up, add a few mini chocolate chips on special days (you’re the hero now), or swap bananas for thin apple slices. Pro tip: if your lunch sits for hours, brush banana slices with a little lemon-water to slow browning—no one wants sad bananas.
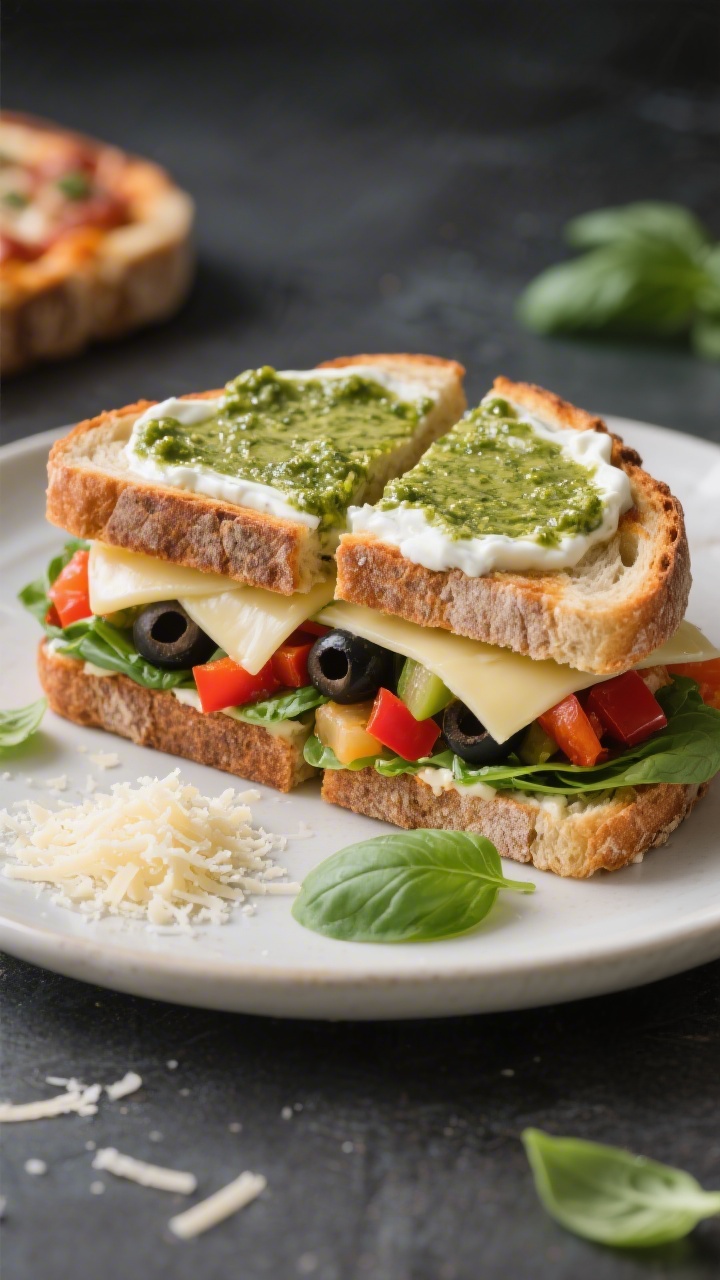
5. Savory Veggie Pizza Sandwich With Creamy Pesto Spread
⭐ My secret tip – Ever since we started using this kids baking set, my toddler loves helping in the kitchen and is much more willing to try new foods. ✨ This is the blender we use for protein smoothies with yogurt, peanut butter, and fruit.
This one tastes like cold pizza but fresher and way less greasy. A creamy pesto spread anchors a stack of crunchy veggies and mild provolone on sturdy bread. It’s colorful, fun, and sneakily packed with fiber—and it actually gets better as it sits. Trust me, this is the one that surprises picky eaters.
Ingredients:
- 4 slices sturdy sourdough or multigrain bread
- 2 tablespoons plain Greek yogurt
- 1 tablespoon prepared basil pesto
- 1 teaspoon grated Parmesan (optional, extra umami)
- 4 slices provolone or mozzarella
- 1/2 cup very thinly sliced cucumber
- 1/2 cup very thinly sliced mini bell peppers
- 1/3 cup shredded lettuce or baby spinach
- 1/4 cup sliced black olives (optional)
- 2 tablespoons pizza sauce or marinara (thick style)
- Pinch of dried oregano
Instructions:
- Stir the Greek yogurt, pesto, and Parmesan together until smooth. Spread over two slices of bread.
- Top each with a slice of provolone, then layer cucumber, peppers, and lettuce. Scatter olives if using.
- On the remaining bread slices, spread a thin layer of pizza sauce and sprinkle with oregano.
- Close the sandwiches sauce-side down. Press gently and cut into halves or squares.
Pack with grapes or a small cup of edamame for extra protein. If your kid is anti-olives, skip them and add a few mini pepperoni slices or chickpeas for heft. For tiny hands, consider building this in a pita pocket—it keeps all the good stuff contained and easy to eat.
Lunchbox Success Tips
Want these sandwiches to land as well at noon as they did at 7 a.m.? A few quick wins make all the difference.
- Keep the crunch: Pat wet veggies dry and cool any toasted bread completely before packing.
- Layer smart: Put spreads and cheese next to bread; tuck juicy items (tomatoes, cukes) in the middle.
- Use barriers: Leafy greens and cheese act like edible raincoats for bread—deploy them.
- Pack snug: A tight fit inside the lunchbox keeps layers from sliding during bus-bounce hour.
- Chill factor: Add an ice pack if you’re using meats, cheese, or yogurt-based spreads.
Make-Ahead and Batch Tips
- Sunday prep: Wash and slice veggies, mix spreads, and portion deli meats so assembly takes 3 minutes flat.
- Freeze smart: Pinwheels and pockets don’t love the freezer, but cooked chicken and slider rolls do. Thaw overnight.
- Kid sous-chefs: Let kids pick two veggies and one spread each week—it’s amazing how much more they’ll eat when they helped choose.
There you go—five playful, durable, and seriously tasty lunchbox sandwiches your kids will actually finish. Rotate them through the week, mix and match fillings, and watch those lunchboxes come home empty. Ready to make tomorrow’s lunch in under ten minutes? You’ve got this.
Printable Recipe Card
Want just the essential recipe details without scrolling through the article? Get our printable recipe card with just the ingredients and instructions.