Lion Cake for Kids That Is Perfect for a Jungle Birthday Party – Easy, Fun, and Adorable
Planning a jungle birthday party and need a show-stopping dessert? This lion cake is cute, kid-friendly, and surprisingly simple to put together. You don’t need special tools or expert baking skills—just a couple of round cakes and a few clever decorating tricks.
The result is a happy lion face that makes kids smile before they even take a bite. Plus, it tastes as good as it looks, with soft cake and creamy frosting.
Lion Cake for Kids That Is Perfect for a Jungle Birthday Party - Easy, Fun, and Adorable
Ingredients
Method
-
Prep and bake. Preheat your oven according to your cake recipe.
Grease and line two round pans with parchment. Divide the batter evenly and bake until a toothpick comes out clean. Cool in pans 10 minutes, then turn out onto racks to cool completely.
-
Make the buttercream. Beat softened butter until fluffy, 2–3 minutes.
Add powdered sugar in batches with vanilla and salt. Thin with cream until smooth and spreadable. You want a medium consistency that holds soft peaks.
-
Tint your colors. Divide frosting into bowls: a large portion for golden yellow (face), a medium portion for orange/brown (mane), a small portion for light tan (snout), and a tiny bit for black or deep brown (details).
Go slowly with gel colors so you don’t overdo it.
-
Level and stack. If needed, level cake tops with a serrated knife. Place the first layer on a board. Add a thin layer of frosting (your choice of color), then top with the second layer.
Apply a thin crumb coat of yellow frosting over the whole cake to seal in crumbs. Chill 15–20 minutes.
-
Frost the lion’s face. Spread a smooth, thicker layer of golden yellow frosting over the chilled cake. Use an offset spatula to get clean sides and a flat top.
-
Create the snout. With light tan frosting, pipe or spread an oval on the lower half of the cake.
Smooth the edges so it blends gently with the face. This is where the nose and mouth will go.
-
Add eyes and nose. Press two chocolate chips (flat side out) near the top third of the face for eyes. Add a chocolate-covered almond or round candy for the nose centered on the snout.
For extra sparkle, dot tiny bits of white marshmallow or fondant on the eyes.
-
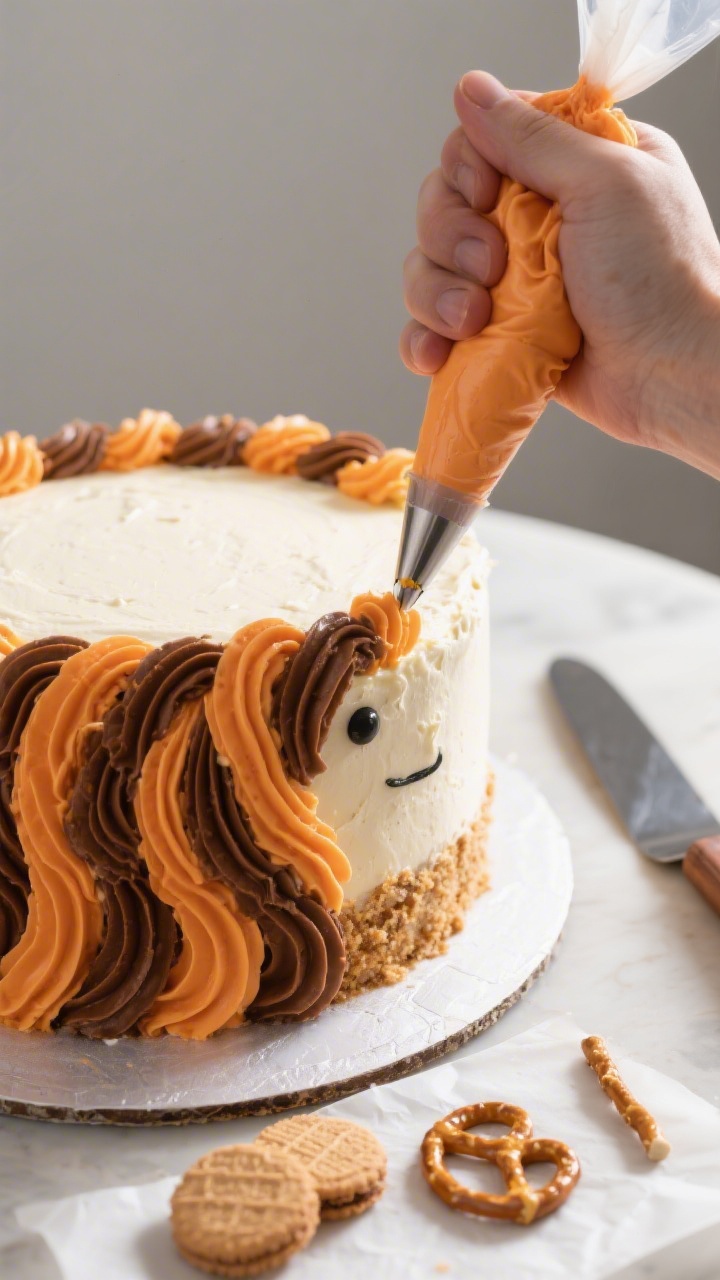
Draw the mouth and whiskers. Use a small round tip with black or dark brown frosting to pipe a short line down from the nose, then curve it into a gentle smile on both sides. Add 3–4 short whisker lines on each side of the snout. If you don’t have a piping bag, snip a tiny corner off a zip-top bag.
-
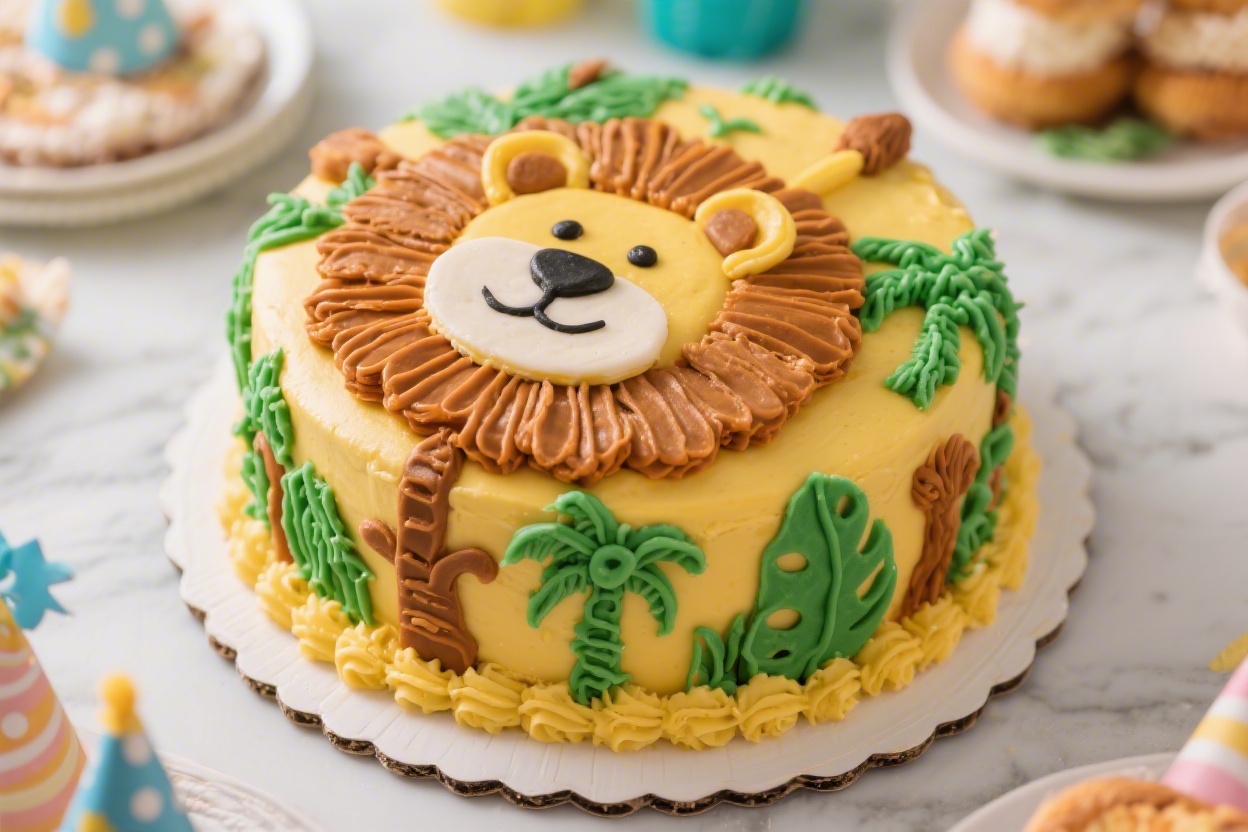
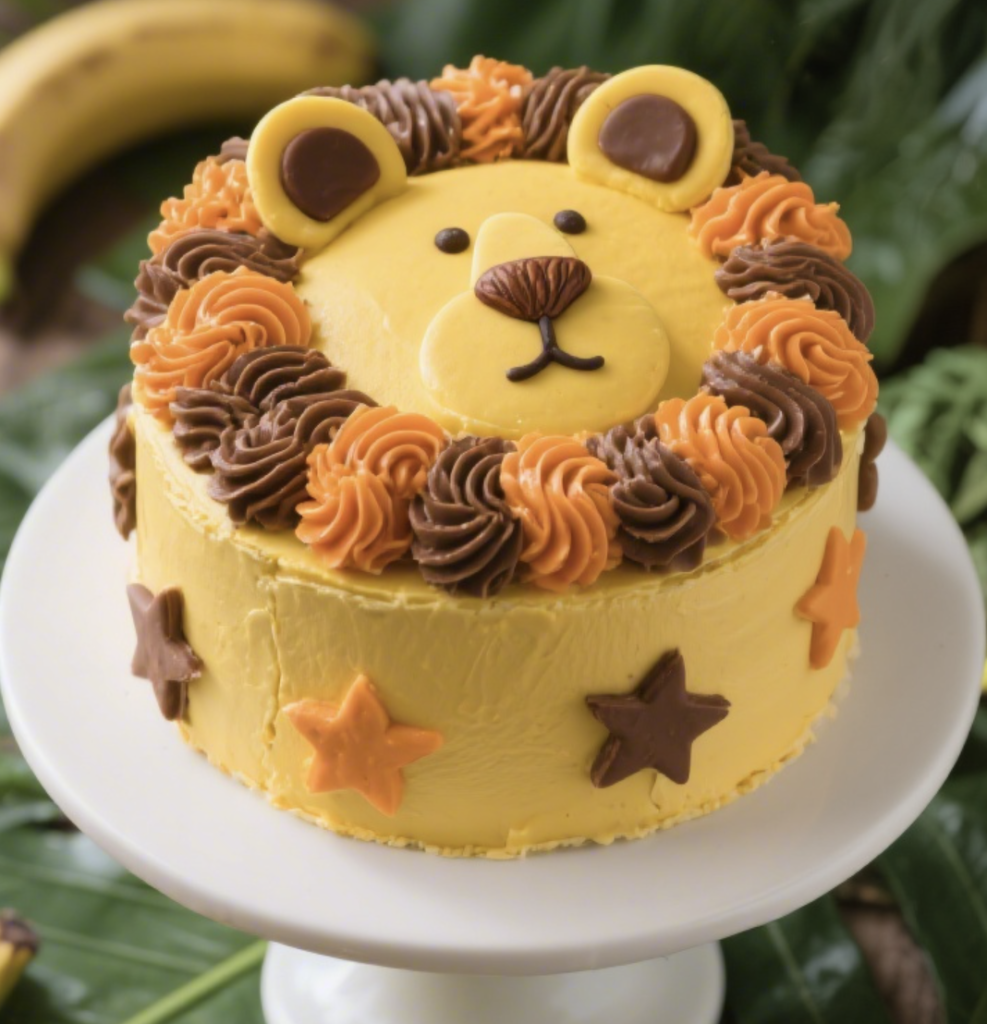
Build the mane. Pipe stars or rosettes around the top edge and sides with orange and brown frosting, mixing shades for a lively look.
Or press wafer cookies, pretzel sticks, or even candy corn around the edges for a playful, textured mane. Add orange and yellow sprinkles here if you like.
-
Optional ears. Pipe two mounds of frosting at the top edge and dot the centers with a darker color. Alternatively, use halved cookies coated with frosting and attach with a dab of buttercream.
-
Chill to set. Refrigerate the finished cake for 20–30 minutes so the decorations hold their shape.
Bring to room temperature before serving for the best texture.
Disclosure: As Amazon Associates, we earn from qualifying purchases at no extra cost to you.
Why This Recipe Works
⭐ My secret tip – Ever since we started using this kids baking set, my toddler loves helping in the kitchen and is much more willing to try new foods. ✨ This is the blender we use for protein smoothies with yogurt, peanut butter, and fruit.
This cake uses two basic round cakes, so the shape is easy to build without carving. The lion’s face is made with smooth buttercream, and the mane comes together with quick piping or candy placement—no complicated techniques required.
Simple pantry ingredients keep the flavors classic and kid-approved. And if baking from scratch isn’t your thing, boxed cake mix and store-bought frosting work great here. The decorations are flexible too, so you can adjust colors and details to fit your theme.
What You’ll Need
- For the cake:
- 2 boxes yellow or vanilla cake mix (plus eggs, oil, and water as directed) or your favorite homemade vanilla cake batter
- Two 8-inch or 9-inch round cake pans
- Nonstick baking spray or butter and flour for pans
- For the frosting:
- 1 1/2 cups unsalted butter, softened
- 5–6 cups powdered sugar
- 2–3 tablespoons heavy cream or milk
- 2 teaspoons vanilla extract
- Pinch of salt
- For colors and decorations:
- Gel food coloring: golden yellow, orange, brown, and black
- Chocolate chips or brown candy melts (for eyes)
- Mini chocolate candies or chocolate-covered almonds (for nose)
- Black licorice strings or chocolate frosting (for whiskers and mouth)
- Marshmallows or white fondant (optional, for eye highlights)
- Wafer cookies, pretzel rods, or piped frosting (for mane)
- Sprinkles in orange/yellow/brown (optional)
- Tools:
-
- Offset spatula or butter knife
- Piping bags (or zip-top bags) with open star tip and round tip
<li<>>Cake turntable (optional but helpful)
-
- Cooling racks and parchment paper
- Serrated knife (for leveling)
Instructions
⭐ My secret tip – Ever since we started using this kids baking set, my toddler loves helping in the kitchen and is much more willing to try new foods. ✨ This is the blender we use for protein smoothies with yogurt, peanut butter, and fruit.
- Prep and bake. Preheat your oven according to your cake recipe.Grease and line two round pans with parchment. Divide the batter evenly and bake until a toothpick comes out clean. Cool in pans 10 minutes, then turn out onto racks to cool completely.
- Make the buttercream. Beat softened butter until fluffy, 2–3 minutes.Add powdered sugar in batches with vanilla and salt. Thin with cream until smooth and spreadable. You want a medium consistency that holds soft peaks.
- Tint your colors. Divide frosting into bowls: a large portion for golden yellow (face), a medium portion for orange/brown (mane), a small portion for light tan (snout), and a tiny bit for black or deep brown (details).Go slowly with gel colors so you don’t overdo it.
- Level and stack. If needed, level cake tops with a serrated knife. Place the first layer on a board. Add a thin layer of frosting (your choice of color), then top with the second layer.Apply a thin crumb coat of yellow frosting over the whole cake to seal in crumbs. Chill 15–20 minutes.
- Frost the lion’s face. Spread a smooth, thicker layer of golden yellow frosting over the chilled cake. Use an offset spatula to get clean sides and a flat top.
- Create the snout. With light tan frosting, pipe or spread an oval on the lower half of the cake.Smooth the edges so it blends gently with the face. This is where the nose and mouth will go.
- Add eyes and nose. Press two chocolate chips (flat side out) near the top third of the face for eyes. Add a chocolate-covered almond or round candy for the nose centered on the snout.For extra sparkle, dot tiny bits of white marshmallow or fondant on the eyes.
- Draw the mouth and whiskers. Use a small round tip with black or dark brown frosting to pipe a short line down from the nose, then curve it into a gentle smile on both sides. Add 3–4 short whisker lines on each side of the snout. If you don’t have a piping bag, snip a tiny corner off a zip-top bag.
- Build the mane. Pipe stars or rosettes around the top edge and sides with orange and brown frosting, mixing shades for a lively look.Or press wafer cookies, pretzel sticks, or even candy corn around the edges for a playful, textured mane. Add orange and yellow sprinkles here if you like.
- Optional ears. Pipe two mounds of frosting at the top edge and dot the centers with a darker color. Alternatively, use halved cookies coated with frosting and attach with a dab of buttercream.
- Chill to set. Refrigerate the finished cake for 20–30 minutes so the decorations hold their shape.Bring to room temperature before serving for the best texture.
How to Store
- Room temperature: Keep the cake covered at cool room temp for up to 24 hours.
- Refrigerate: Store loosely covered for 3–4 days. Let it sit out 30–60 minutes before slicing so the buttercream softens.
- Freeze: Wrap unfrosted cake layers tightly and freeze up to 2 months. Thaw wrapped at room temp.You can also freeze the fully frosted cake on a sheet pan until firm, then wrap well; thaw in the fridge overnight.
⭐ My secret tip – Ever since we started using this kids baking set, my toddler loves helping in the kitchen and is much more willing to try new foods. ✨ This is the blender we use for protein smoothies with yogurt, peanut butter, and fruit.
Health Benefits
- Portion control is easy. A themed cake encourages small slices because the focus is on the design, not stacking on extra frosting.
- Customizable ingredients. You can use whole-wheat pastry flour, reduce sugar in the batter, or choose lower-sugar frosting without losing the fun factor.
- Allergen-friendly options. This design works with dairy-free butter, gluten-free mixes, and plant-based milk so more kids can enjoy a slice.
- Homemade wins. Making frosting at home lets you skip artificial flavors and control the sweetness.
Pitfalls to Watch Out For
- Warm cake + frosting = sliding layers. Always cool layers completely and chill after the crumb coat.
- Colors turning dull. Use gel food coloring (not liquid) and add a little at a time. Colors deepen as they sit.
- Crumbly finish. Don’t skip the crumb coat. It traps crumbs and makes the final layer smooth.
- Too-stiff frosting. If frosting won’t spread, add 1 teaspoon of cream at a time.If it’s too soft to pipe the mane, chill it for 5 minutes.
- Heavy mane decorations sliding off. Press cookies or candies gently into a chilled, slightly tacky surface—don’t overload one area.
Recipe Variations
- Chocolate lion: Use chocolate cake with a vanilla face and deep chocolate mane for bold contrast.
- Caramel swirl: Add caramel between layers and a light caramel drip under the mane for extra flair.
- Tropical twist: Fill with pineapple or mango jam to match the jungle theme.
- Rainbow mane: Pipe rosettes in bright rainbow colors for a party-perfect look.
- Mini lion cupcakes: Top cupcakes with yellow frosting, add candy eyes and noses, and pipe tiny manes around the edges.
- No-pipe version: Use wafer cookies or cereal pieces around the edge for the mane and draw details with a food-safe marker on fondant cutouts.
FAQ
Can I make this cake a day ahead?
Yes. Frost and decorate the cake, chill to set, then cover lightly and keep in the fridge overnight. Let it warm slightly before serving for the best texture.
What if I don’t have piping tips?
Use zip-top bags with small corners snipped off for lines and dots.
For the mane, spread small spoonfuls of frosting in a circle or use cookies and pretzels for texture.
How do I get a smooth lion face?
Apply a crumb coat, chill, then spread a thicker layer of frosting. Use a warm offset spatula (dip in hot water, wipe dry) to smooth the surface.
Which cake flavor works best?
Yellow or vanilla cake is classic and lets the decorations shine. Chocolate, marble, or funfetti are great too—just match the frosting colors so they pop.
Can I make this dairy-free or gluten-free?
Yes.
Use a gluten-free cake mix and dairy-free butter with plant-based milk for the frosting. Check decorations to ensure they’re allergen-safe.
How many people does it serve?
An 8-inch two-layer cake serves about 12–16 small slices. A 9-inch serves 16–20, depending on slice size.
How do I transport the cake?
Chill the decorated cake until the frosting is firm.
Place it in a snug cake box on a flat surface in your car and drive carefully to avoid sudden stops.
In Conclusion
This lion cake brings big personality to any jungle birthday party without stressing you out in the kitchen. With simple shapes, bright colors, and flexible decorations, it’s a fun project you can finish in an afternoon. Swap flavors, adjust the mane, and make it your own.
Most of all, enjoy the smiles when your little party guests meet the king of the dessert table.
Printable Recipe Card
Want just the essential recipe details without scrolling through the article? Get our printable recipe card with just the ingredients and instructions.