5 Kids Sandwich Ideas That Are Easy and Fun to Make—no Lunchbox Left Behind
Kids + sandwiches = the ultimate power duo. These recipes are quick to assemble, big on flavor, and designed for tiny hands and picky palates. We’re talking bright colors, playful shapes, and smart shortcuts that make lunch feel like a mini party. Ready to turn “meh” into “more, please”?
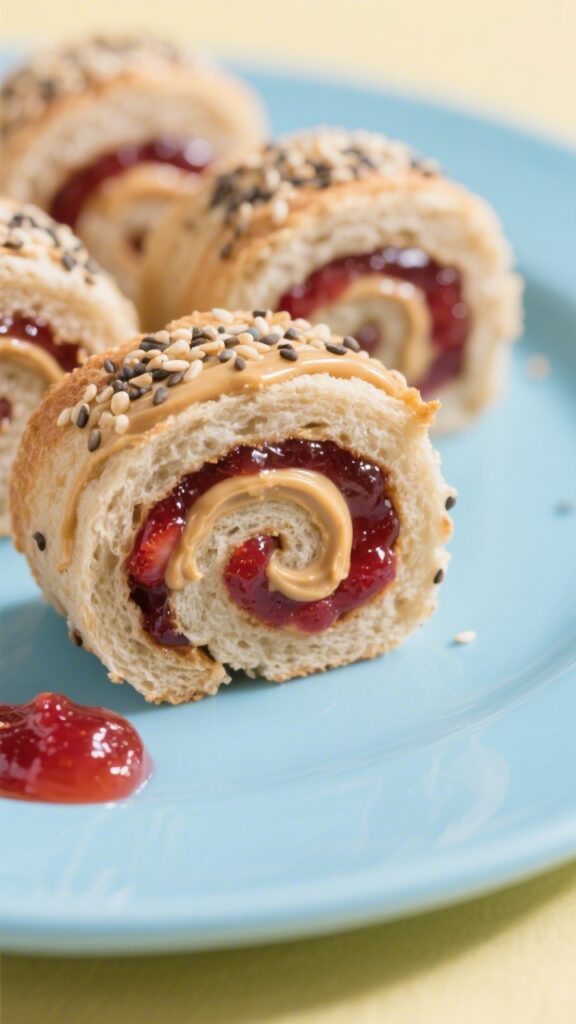
1. PB&J Sushi Rolls With Crunchy Confetti
⭐ My secret tip – Ever since we started using this kids baking set, my toddler loves helping in the kitchen and is much more willing to try new foods. ✨ This is the blender we use for protein smoothies with yogurt, peanut butter, and fruit.
Meet the classic PB&J, leveled up into adorable bite-size “sushi” rolls. They’re perfect for lunchboxes, playdates, or an after-school snack that looks way more complicated than it is. The crunchy confetti (a sneaky mix-in) gives every bite a fun texture kids love.
Disclosure: As Amazon Associates, we earn from qualifying purchases at no extra cost to you.
Ingredients:
- 2 slices soft sandwich bread, crusts removed
- 3 tablespoons creamy peanut butter (or sunflower seed butter for nut-free)
- 2 tablespoons strawberry or grape jam
- 2 tablespoons crispy rice cereal or crushed freeze-dried strawberries (the “confetti”)
- 1 teaspoon honey (optional)
Instructions:
- Flatten the bread with a rolling pin until thin and flexible. This helps it roll without tearing.
- Spread a thin layer of peanut butter over each slice, edge to edge. Add a light ribbon of jam across the bottom third.
- Sprinkle the crispy rice cereal or crushed freeze-dried fruit over the jam line for that crunchy pop.
- Starting from the jam side, roll each slice up tightly like a sushi roll. If needed, add a tiny swipe of honey at the seam to help it stick.
- Slice each roll into 5–6 bite-size rounds with a sharp knife. Wipe the blade between cuts for neat pieces.
Serve these with apple slices or baby carrots for balance. For variety, try almond butter and blueberry jam or sunflower butter and apricot preserves. Want extra pizzazz? Dot a plate with yogurt “soy sauce” (a spoonful of vanilla yogurt) for playful dipping—trust me, kids love the pretend factor.
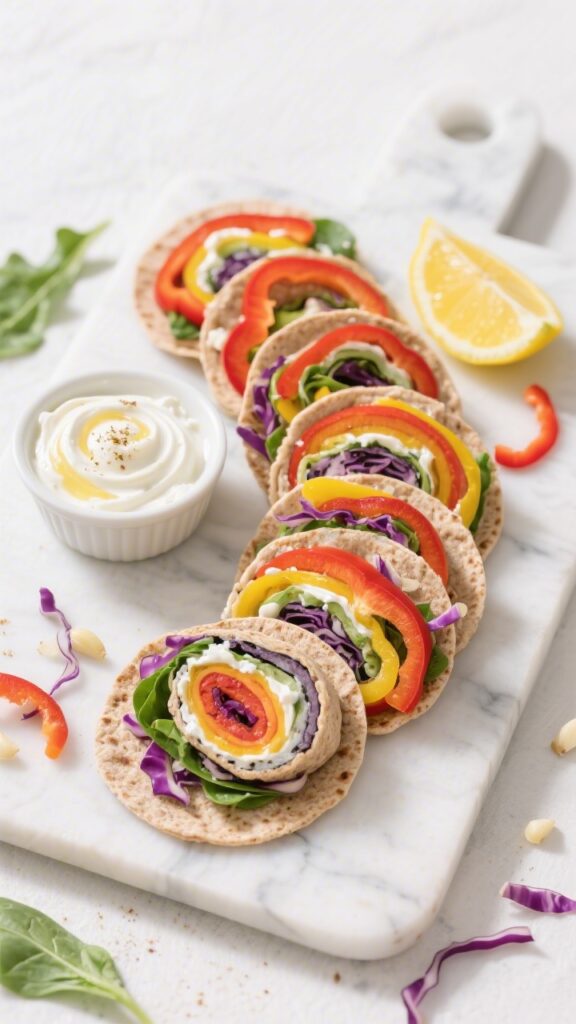
2. Rainbow Veggie Cream Cheese Pinwheels
⭐ My secret tip – Ever since we started using this kids baking set, my toddler loves helping in the kitchen and is much more willing to try new foods. ✨ This is the blender we use for protein smoothies with yogurt, peanut butter, and fruit.
These pinwheels pack color, crunch, and creaminess into every swirl. They’re quick, customizable, and an easy way to sneak in veggies without the lecture. Great for lunchboxes, picnics, or snack boards where you want something bright and biteable.
Ingredients:
- 2 large flour tortillas (8–10 inches)
- 4 ounces whipped cream cheese (softer and easier to spread)
- 1/2 cup finely shredded carrots
- 1/2 cup finely chopped cucumbers (patted dry)
- 1/2 cup finely chopped red bell pepper
- 1/4 cup finely chopped purple cabbage
- 1 tablespoon ranch seasoning or everything bagel seasoning
- Pinch of salt
Instructions:
- In a small bowl, mix cream cheese with ranch seasoning and a tiny pinch of salt. Spread evenly over the tortillas, leaving a 1/2-inch border.
- Scatter veggies in thin, even stripes across the tortilla to create a rainbow effect. Keep layers light so the roll holds.
- Roll each tortilla up snugly from one edge to the other. Place seam-side down and chill for 10 minutes to set.
- Slice into 1-inch pinwheels using a sharp, serrated knife with a gentle sawing motion.
Serve with a small cup of hummus or Greek yogurt dip. Swap in what your kid prefers—sweet corn, avocado, or spinach all work. For a protein boost, add turkey slices or shredded rotisserie chicken before rolling. Pro tip: pat watery veggies dry so your pinwheels don’t get soggy—seriously, it’s a game-changer.
3. Cheesy Pizza Pockets You Can Make In 10 Minutes

⭐ My secret tip – Ever since we started using this kids baking set, my toddler loves helping in the kitchen and is much more willing to try new foods. ✨ This is the blender we use for protein smoothies with yogurt, peanut butter, and fruit.
Pizza + sandwich = instant win. These toasty pockets use simple pantry ingredients and deliver all the gooey, melty vibes kids crave. They’re perfect for quick dinners, lunchboxes (wrap in foil to keep warm), or a Friday movie-night treat.
Ingredients:
- 4 slices sturdy sandwich bread
- 4 tablespoons pizza sauce or marinara
- 1/2 cup shredded mozzarella cheese
- 8 mini pepperoni slices (optional)
- 1 tablespoon butter, softened
- 1/4 teaspoon Italian seasoning or dried oregano
- Pinch of garlic powder
Instructions:
- Preheat a nonstick skillet over medium heat. Meanwhile, use a rolling pin to lightly flatten each bread slice.
- Spread 1 tablespoon pizza sauce on two slices. Top with mozzarella and mini pepperoni. Sprinkle with Italian seasoning and a pinch of garlic powder.
- Place the remaining bread slices on top to make sandwiches. Crimp the edges with a fork to help seal.
- Butter the outsides of each sandwich. Cook in the skillet 2–3 minutes per side until golden and cheese is melted. Press gently with a spatula to help seal and melt.
- Let cool for 1–2 minutes before cutting into halves or fun shapes.
Serve with extra warm marinara for dipping and some sliced cucumbers on the side. Want to switch it up? Try Hawaiian style with tiny bits of ham and pineapple, or go veggie with mushrooms and spinach. For air fryer fans, cook at 370°F (188°C) for 5–6 minutes, flipping once—extra crispy, minimal effort.
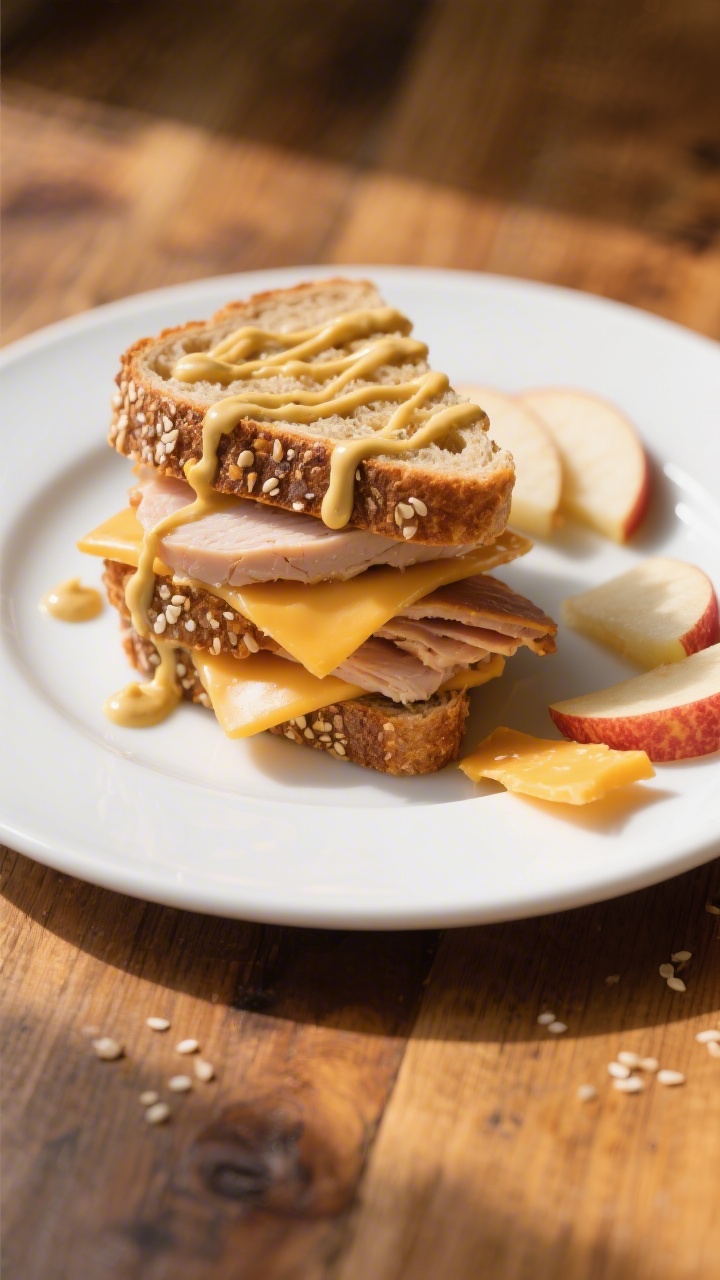
4. Turkey Apple Cheddar Stackers With Honey-Mustard Drizzle
⭐ My secret tip – Ever since we started using this kids baking set, my toddler loves helping in the kitchen and is much more willing to try new foods. ✨ This is the blender we use for protein smoothies with yogurt, peanut butter, and fruit.
Here’s a sweet-savory combo that hits all the notes: crunchy apple, sharp cheddar, and tender turkey. No stove, no fuss—just fresh, satisfying bites that feel like mini gourmet sliders. It’s a great sandwich when you want protein but still want that kid-friendly twist.
Ingredients:
- 2 slices whole-grain bread
- 4–6 thin slices roasted turkey
- 4 slices sharp cheddar (or 1/3 cup shredded)
- 1 small crisp apple (Honeycrisp or Gala), cored and thinly sliced
- 1 tablespoon mayonnaise
- 1 teaspoon Dijon mustard
- 1 teaspoon honey
- 1 teaspoon butter (optional, for toasting)
- Pinch of black pepper
Instructions:
- In a small bowl, whisk mayonnaise, Dijon, and honey until smooth. Taste and adjust sweetness.
- Optional but delicious: lightly butter the bread and toast in a skillet until golden for extra structure.
- Spread the honey-mustard on both slices. Layer turkey, cheddar, and apple slices. Finish with a pinch of black pepper.
- Close the sandwich and press gently. For warm, melty vibes, set in a skillet over low heat with a lid for 2 minutes per side.
Cut into quarters or use cookie cutters for fun shapes. Swap cheddar for Gouda or provolone, or replace apple with pear if that’s what’s on hand. For gluten-free, use a sturdy GF bread or make cracker stackers by assembling everything on whole-grain crackers—perfect for snack plates.
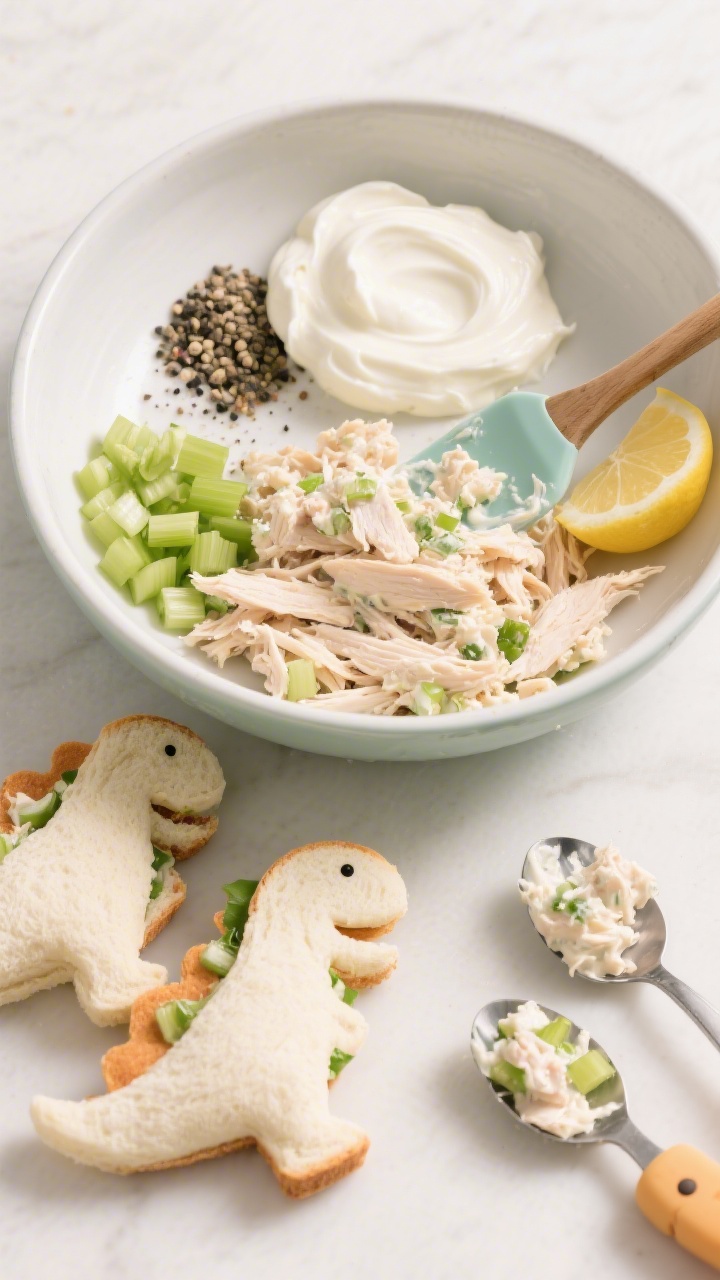
5. Chicken Salad Dino Pockets With Hidden Veggie Crunch
⭐ My secret tip – Ever since we started using this kids baking set, my toddler loves helping in the kitchen and is much more willing to try new foods. ✨ This is the blender we use for protein smoothies with yogurt, peanut butter, and fruit.
This is the chicken salad you can make on autopilot—creamy, crunchy, and kid-approved. Tuck it into pita “pockets” or shape cutters for dino-sandwich fun. It’s fantastic for using up rotisserie chicken and sneaking in extra veggies without the side-eye.
Ingredients:
- 1 1/2 cups cooked shredded chicken
- 1/3 cup plain Greek yogurt
- 2 tablespoons mayonnaise
- 1 teaspoon lemon juice
- 1/4 teaspoon salt
- 1/8 teaspoon black pepper
- 1/3 cup finely diced celery
- 1/4 cup finely diced red or green apple
- 2 tablespoons finely chopped dill pickles or sweet relish (optional)
- 2 tablespoons shredded carrot
- 2 small whole-wheat pitas or 4 slices soft bread
- Butter lettuce leaves (optional)
Instructions:
- In a medium bowl, mix yogurt, mayonnaise, lemon juice, salt, and pepper until smooth.
- Fold in chicken, celery, apple, pickles or relish, and carrot. Stir until evenly combined.
- Warm pitas briefly in a dry skillet or microwave to make them flexible. Cut in half to create pockets.
- Line each pocket with a lettuce leaf, then spoon in the chicken salad. If using bread, spread a thin layer and cut with fun cookie cutters (dinosaurs, stars, you name it).
Serve with grapes or snap peas for crunch. Add-ins like sweet corn, chopped cranberries, or slivered almonds change the vibe fast. For dairy-free, use an egg-free, dairy-free mayo and skip the yogurt—add a splash of olive oil to keep it creamy.
Tips To Keep Sandwiches Kid-Ready And Lunchbox-Proof
- Dry is your friend: Pat wet veggies and fruit to avoid soggy bread.
- Layer smart: Place cheese or lettuce as a moisture barrier next to bread.
- Cut creatively: Small shapes = big excitement. Save the scraps for DIY croutons or breadcrumbs.
- Pack sauces on the side: Dips make everything feel like a treat and keep textures crisp.
- Temperature check: Cool hot fillings before packing so condensation doesn’t ruin the crunch.
There you have it—five kid-loved sandwiches that are fast, flexible, and actually fun to make. Pick one, pull out a cookie cutter, and watch lunch disappear. And hey, make an extra for yourself—you’ve earned it.
Printable Recipe Card
Want just the essential recipe details without scrolling through the article? Get our printable recipe card with just the ingredients and instructions.