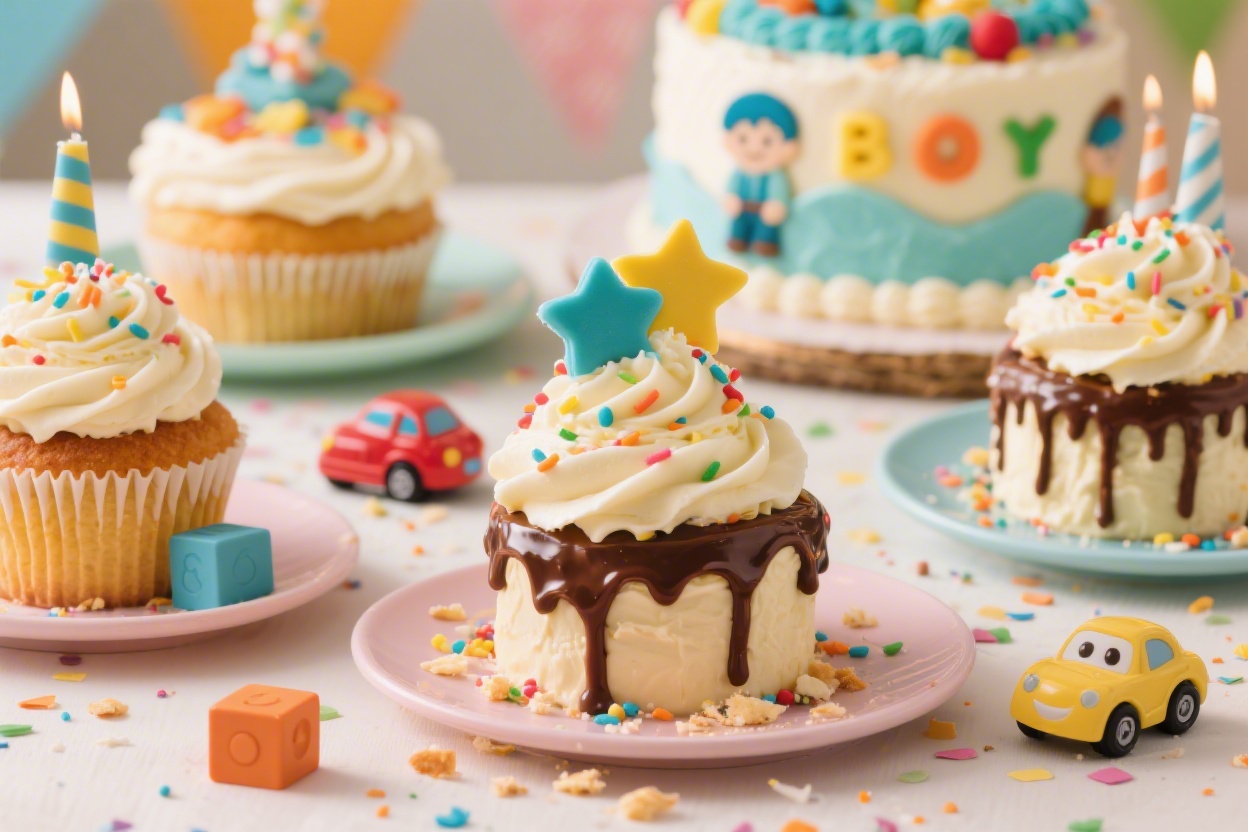
5 Kids Cakes for Boys That Are Perfect for Birthday Parties—no Bakery Needed
You’ve got a birthday party on the calendar and a kid who’s already picked a theme. Now what? These five playful, foolproof cakes bring the “wow” factor without requiring a pastry school diploma. We’re talking bright colors, bold shapes, and easy decorating tricks you can pull off the night before—sprinkles and toy toppers very much encouraged.
Each recipe is designed to be flexible: use your favorite vanilla or chocolate base, swap frostings if you like, and lean into shortcuts that save time. Trust me, these cakes look epic on the table and taste like a celebration.
Disclosure: As Amazon Associates, we earn from qualifying purchases at no extra cost to you.
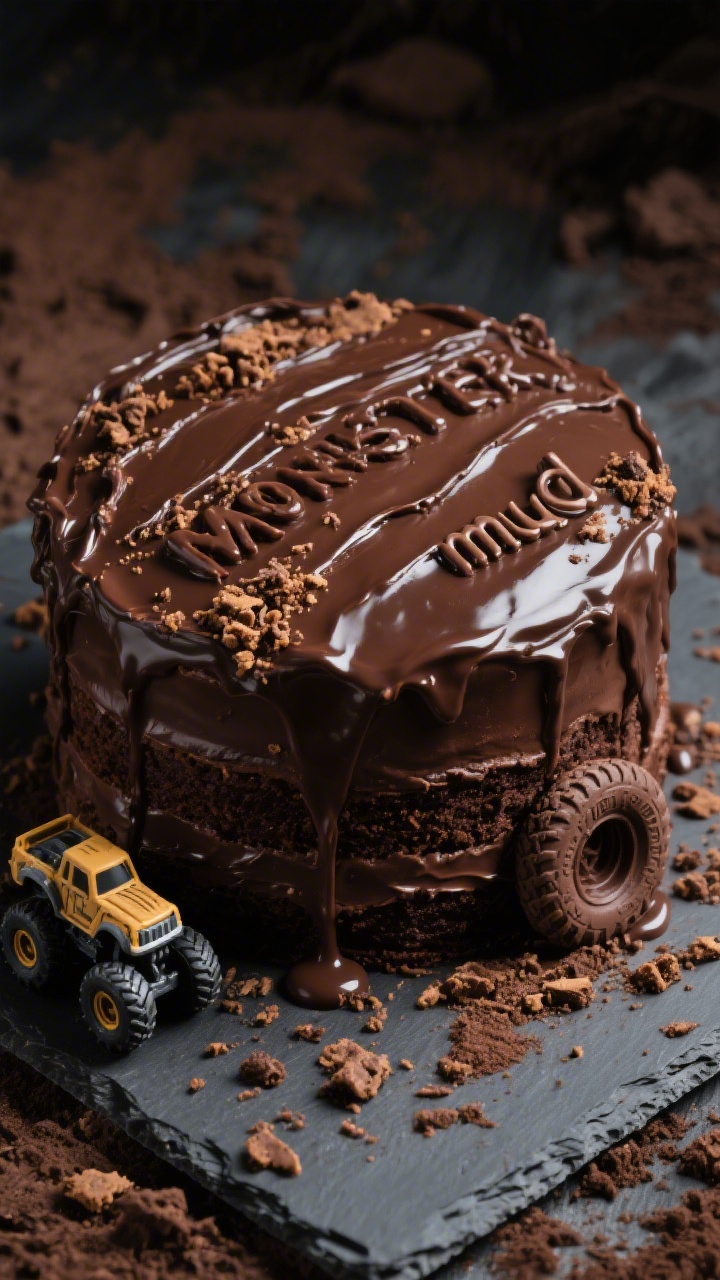
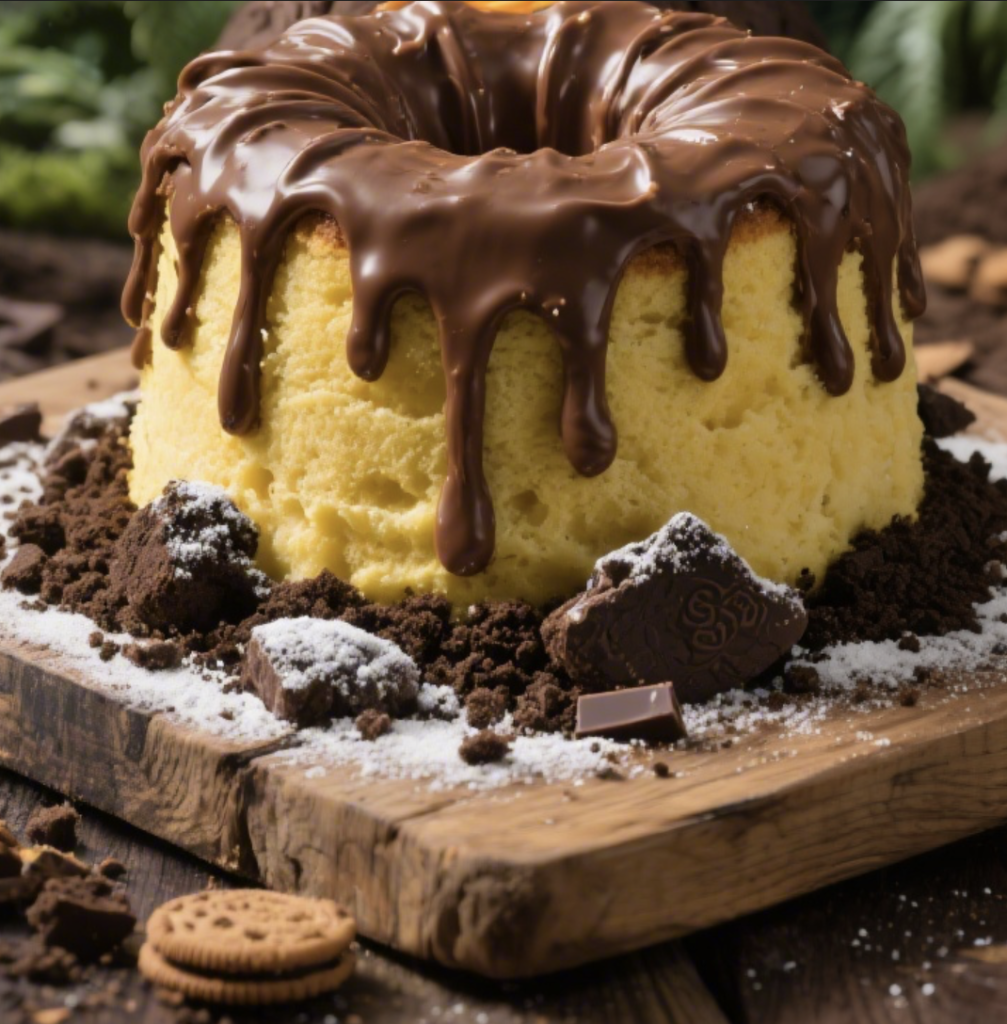
1. Monster Truck Mud-Slide Cake With Cookie-Crumb Tracks
⭐ My secret tip – Ever since we started using this kids baking set, my toddler loves helping in the kitchen and is much more willing to try new foods. ✨ This is the blender we use for protein smoothies with yogurt, peanut butter, and fruit.
If your kid loves big wheels and muddy adventures, this cake brings the off-road action indoors. It’s a rich chocolate base, a silky fudge frosting, and “mud” made from crushed cookies. Park a couple of clean toy monster trucks on top, and you’ve got instant birthday hero status.
Ingredients:
- 2 cups all-purpose flour
- 3/4 cup unsweetened cocoa powder
- 1 3/4 cups granulated sugar
- 1 1/2 tsp baking powder
- 1 1/2 tsp baking soda
- 1 tsp fine salt
- 2 large eggs, room temperature
- 1 cup whole milk
- 1/2 cup neutral oil (canola or vegetable)
- 2 tsp vanilla extract
- 1 cup hot coffee (or hot water)
- 1 1/2 cups heavy cream
- 12 oz semisweet chocolate chips (for ganache frosting)
- 24 chocolate sandwich cookies, crushed (for “mud”)
- 2–3 toy monster trucks (clean and dry)
- Optional: chocolate sprinkles and mini pretzel rods (for “logs”)
Instructions:
- Preheat oven to 350°F (175°C). Grease and line two 9-inch round cake pans with parchment.
- In a large bowl, whisk flour, cocoa, sugar, baking powder, baking soda, and salt.
- Whisk in eggs, milk, oil, and vanilla until smooth. Slowly pour in hot coffee; the batter will be thin—totally normal.
- Divide between pans and bake 28–32 minutes, until a toothpick comes out with a few moist crumbs. Cool completely.
- Make ganache: Heat heavy cream until steaming (not boiling). Pour over chocolate chips in a heatproof bowl. Let sit 3 minutes, then whisk until glossy. Chill 20–25 minutes, stirring occasionally, until thick enough to spread.
- Level cake layers if needed. Place one layer on a board, spread a 1/2-inch layer of ganache, then top with the second layer. Use the rest to frost the top and sides.
- Make tracks: Use a spoon to carve two shallow “rut” lines across the top. Fill with crushed cookies for thick mud. Press more crumbs along the sides at the base.
- Add details: Sprinkle chocolate sprinkles, place mini pretzel “logs,” and park the toy trucks in the cookie mud. Slightly tilt a truck for that action shot effect.
Serve with cold milk and extra cookie “gravel.” Want color? Add gummy rocks or candy-coated chocolates around the base. For a simpler version, use store-bought fudge frosting and go big on cookie crumbs—no one complains about more mud.
2. Galaxy Blast Rocket Ship Cake With Swirled Night Sky

⭐ My secret tip – Ever since we started using this kids baking set, my toddler loves helping in the kitchen and is much more willing to try new foods. ✨ This is the blender we use for protein smoothies with yogurt, peanut butter, and fruit.
Space fans, this one’s for you. A vanilla sheet cake becomes a starry galaxy with buttercream swirls, and a simple cut-and-stack turns it into a rocket ship. It’s dramatic, colorful, and surprisingly easy—you’ll feel like mission control when it launches to the table.
Ingredients:
- 2 1/2 cups all-purpose flour
- 2 1/2 tsp baking powder
- 1/2 tsp baking soda
- 1 tsp fine salt
- 1 3/4 cups granulated sugar
- 3/4 cup unsalted butter, softened
- 3 large eggs, room temperature
- 2 tsp vanilla extract
- 1 1/4 cups buttermilk, room temperature
- 1 1/2 cups unsalted butter, softened (for frosting)
- 5 cups powdered sugar
- 1/4 cup heavy cream or milk (plus more as needed)
- 1 tsp vanilla extract (for frosting)
- Gel food colors: navy/black, purple, blue, pink
- Assorted sprinkles or edible stars
- 2 sugar cones (for rocket boosters)
- 3–4 wafer cookies or graham crackers (for fins)
- Silver sprinkles or edible glitter (optional but awesome)
Instructions:
- Preheat oven to 350°F (175°C). Grease and line a 9×13-inch pan with parchment.
- Whisk flour, baking powder, baking soda, and salt. In a separate bowl, cream butter and sugar until fluffy, 2–3 minutes.
- Beat in eggs one at a time, then vanilla. Add dry ingredients alternately with buttermilk, starting and ending with dry. Mix until just combined.
- Pour into pan, smooth top, and bake 30–35 minutes. Cool completely.
- Make buttercream: Beat butter until creamy. Add powdered sugar gradually, then vanilla and cream. Beat until smooth and spreadable. Divide into bowls and tint: navy/black, purple, blue, and a little pink.
- Shape the rocket: Turn the cooled cake out onto a board. Cut a long rectangle for the rocket body (about 4×12 inches). Use leftover pieces to create a pointed nose cone and tail. Cut small triangles from wafer cookies for fins.
- Crumb-coat all pieces with a thin layer of white or light-colored frosting. Chill 15 minutes.
- Frost the “sky”: Spread navy across your board or a cake base as a background. Dollop purple, blue, and pink in random spots. Lightly swirl with an offset spatula for a galaxy look.
- Assemble rocket on the galaxy background. Frost with white or silver-tinted buttercream. Attach wafer fins and sugar-cone boosters at the base. Add sprinkles/stars around and streaks of pink/blue under boosters for “flames.”
Finish with edible glitter for that cosmic shimmer. Short on time? Skip the cut-out rocket and frost the sheet cake with galaxy swirls, then add a plastic rocket topper and call it interstellar. Seriously, kids go wild for the colors alone.
3. Dino Dig Volcano Cake With Caramel “Lava” Drip
This cake roars—literally if you add toy dinos that make noise. A bundt cake becomes a volcano, a crater gets filled with candy “fossils,” and a warm caramel drip flows like lava. It’s dramatic, tactile, and pure party magic.
Ingredients:
- 1 box yellow or vanilla cake mix (plus ingredients on the box) or your favorite homemade vanilla batter (enough for a bundt)
- 1 bundt pan, greased and floured
- 2 cups chocolate buttercream (store-bought or homemade)
- 1/2 cup caramel sauce (thick but pourable)
- Red and orange gel food colors
- 1 cup crushed graham crackers (for sand)
- 1/2 cup chocolate sandwich cookie crumbs (for dirt)
- Assorted candies: gummy dinos, chocolate rocks, candy bones
- 3–5 small plastic dinosaurs (cleaned)
- Green sprinkles or shredded coconut tinted green (for foliage)
Instructions:
- Preheat oven according to cake directions. Prepare batter and bake in a bundt pan until a tester comes out clean. Cool 10 minutes, then turn out and cool completely.
- Place the bundt cake upside-down (wider part on top) on a board. Trim if needed for stability.
- Frost the whole cake with chocolate buttercream to create a rocky volcano surface. Use a spatula to add rough, jagged texture.
- Mix crushed grahams and cookie crumbs. Scatter around the base as the landscape. Press in chocolate rocks and gummy dinos partially “buried.”
- Color caramel: Divide caramel into two bowls and tint one red, one orange. Warm 5–10 seconds in the microwave if too thick.
- Drip time: Spoon alternating red and orange caramel along the top opening so it drips down like lava. Let some flow into the center “crater.”
- Add green sprinkles or coconut clusters for prehistoric plants. Position toy dinos around the scene—one climbing the slope earns bonus points.
Serve with a scoop of vanilla ice cream to tame the “heat.” Want less mess? Use red/orange tinted white chocolate ganache instead of caramel for a set-and-forget drip. Pro tip: freeze the bundt 20 minutes before frosting—fewer crumbs and easier texture work.
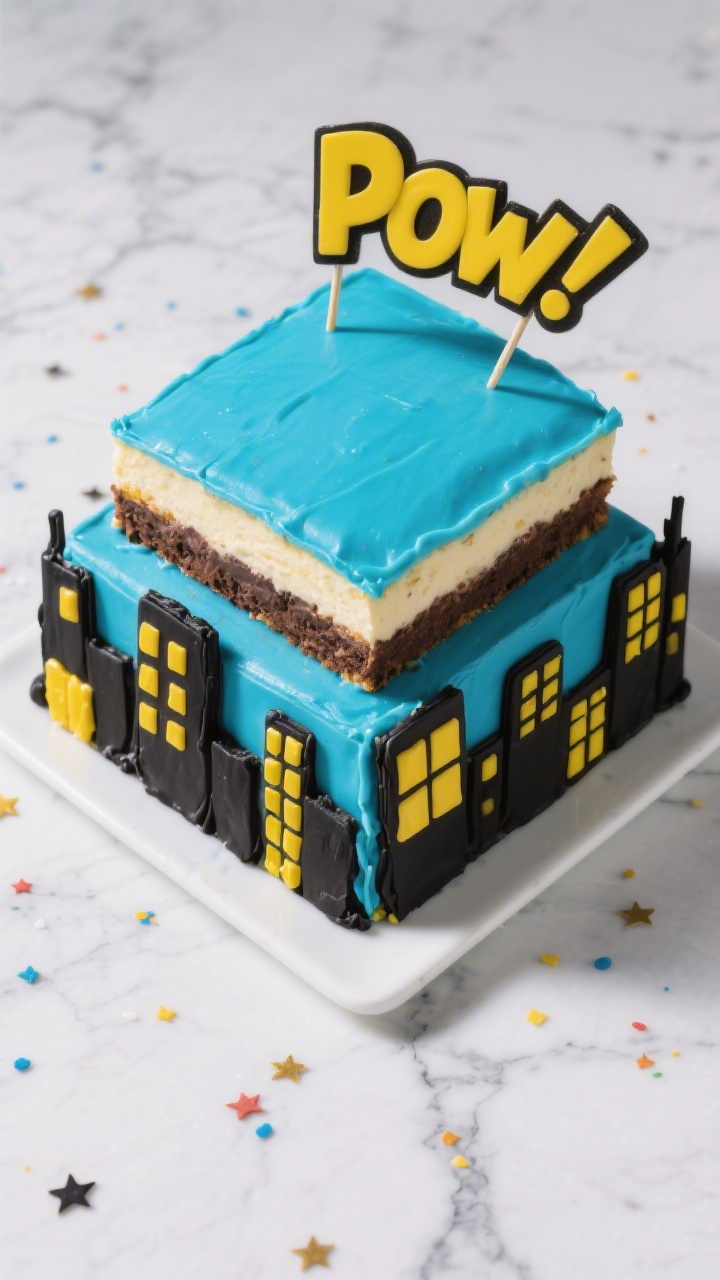
4. Superhero City Skyline Cake With Comic Pow! Toppers
⭐ My secret tip – Ever since we started using this kids baking set, my toddler loves helping in the kitchen and is much more willing to try new foods. ✨ This is the blender we use for protein smoothies with yogurt, peanut butter, and fruit.
Is your kiddo team cape? Build a bright city skyline with easy rectangle cuts and dot windows for instant comic-book vibes. A bold buttercream palette and DIY speech-bubble toppers scream “Kapow!” without a lot of fuss.
Ingredients:
- Two 8-inch square cakes (vanilla, chocolate, or marble), cooled
- 3–4 cups vanilla buttercream
- Gel colors: bright blue, yellow, black
- 1 cup chocolate frosting (for building outlines)
- 1 cup yellow fondant or yellow candy melts (for moon and windows), or yellow buttercream
- Black licorice laces or chocolate sprinkles (for window rows)
- Wafer cookies or graham crackers (for building shapes)
- Paper, markers, and toothpicks for toppers (Pow!, Zap!, Boom!)
Instructions:
- Level the square cakes. Stack with a thin layer of buttercream between them on a board.
- Tint most of the buttercream bright blue and frost the entire cake for a night sky. Chill 15 minutes.
- Create buildings: Use wafer cookies and graham crackers to form rectangles along the front and sides of the cake. Frost them with chocolate frosting to look like silhouettes.
- Add windows: Dot small squares of yellow buttercream with a piping bag, or press on tiny pieces of yellow fondant/candy melts. Add licorice laces or lines of chocolate sprinkles for window rows.
- Make a moon: Roll out yellow fondant and cut a circle, or swirl a circle of yellow frosting. Place in the sky corner.
- DIY toppers: Cut paper speech bubbles, write Pow!, Zap!, Boom!, then tape to toothpicks and insert on top. Optional: add a plastic superhero figurine flying across the moon.
Switch up the palette with purple skies and white stars for a different comic feel. If you’re short on time, skip the wafer buildings and pipe rectangles directly with chocolate frosting—it still reads as a skyline. Kids love personal touches, so add their initial in a “bat-signal” spotlight for instant cheers.
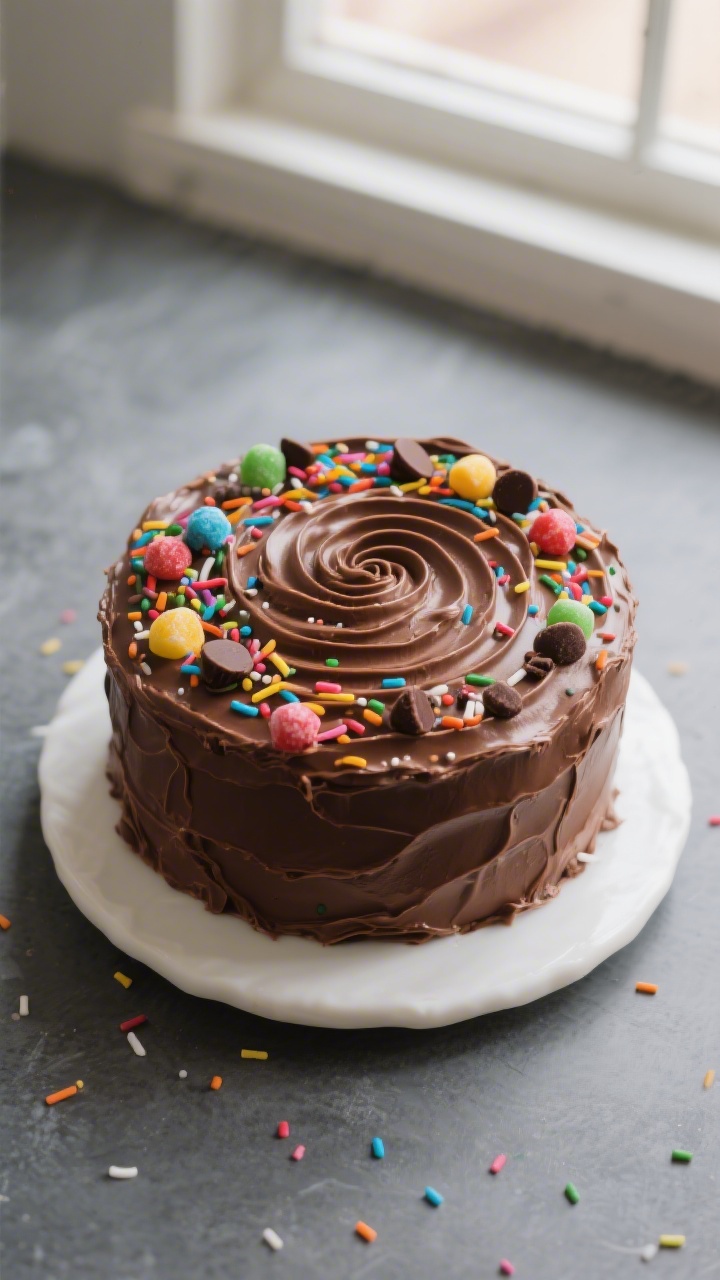
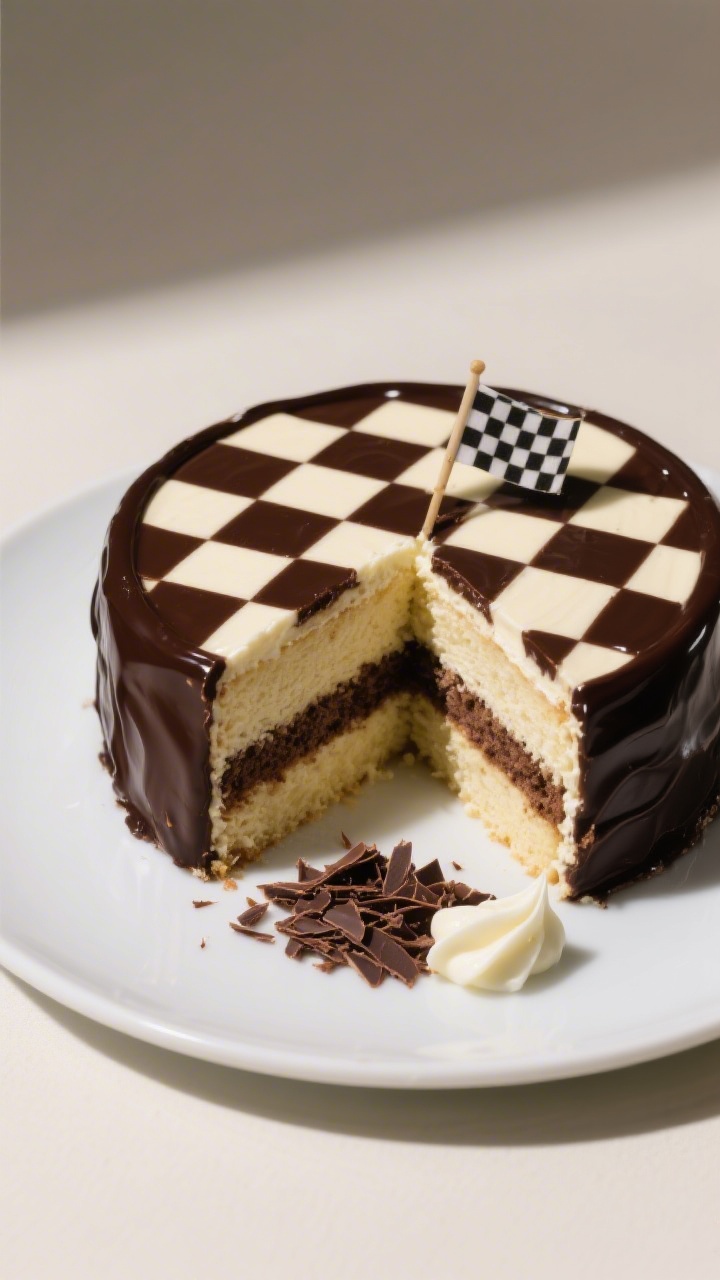
5. Racing Flag Checkerboard Cake With Vanilla-Chocolate Squares
⭐ My secret tip – Ever since we started using this kids baking set, my toddler loves helping in the kitchen and is much more willing to try new foods. ✨ This is the blender we use for protein smoothies with yogurt, peanut butter, and fruit.
Ready, set, party. This cake looks fancy when sliced—clean black-and-white squares like a finish flag—but it’s easier than it appears. A simple assembly trick and a high-contrast frosting make it podium-worthy.
Ingredients:
- 1 batch vanilla cake batter (for two 8-inch rounds)
- 1 batch chocolate cake batter (for two 8-inch rounds)
- 2 1/2–3 cups vanilla buttercream (for filling and crumb coat)
- 2 cups dark chocolate buttercream (for outer frosting)
- Black-and-white checkered ribbon or fondant (optional decoration)
- Mini checkered flags or toy race cars for the top
- Ring cutters: 6-inch and 4-inch (or trace-and-cut with templates)
Instructions:
- Bake two vanilla and two chocolate layers in 8-inch pans. Cool completely and level tops.
- Create rings: Using ring cutters, cut each layer into three concentric circles (8-inch outer ring, 6-inch middle, 4-inch inner). Carefully separate the rings.
- Assemble checker layers: For layer one, place a chocolate outer ring, vanilla middle ring, and chocolate center. For layer two, invert the pattern (vanilla outer, chocolate middle, vanilla center). Repeat for layers three and four if using all four layers, or stick to two for a shorter cake.
- Lightly brush the ring edges with a bit of buttercream and press together so each composite layer feels like a single disk.
- Stack with vanilla buttercream between layers. Apply a thin crumb coat and chill 20 minutes.
- Frost the outside with dark chocolate buttercream for high contrast. Smooth the sides.
- Decorate the base with a checkered ribbon or press on small squares of black-and-white fondant. Add toy race cars on top and pipe a simple white buttercream “track” with dashed lines.
When you slice, you’ll get that satisfying checkerboard reveal—cue gasps. Shortcut: If ring-cutting sounds like too much, bake one vanilla and one chocolate layer, stack, and swirl the top with both frostings. Add flags and cars for instant track day vibes.
Bake Smarter: Frosting, Coloring, and Timing Tips
A quick note on color: gel food colors give you bold hues without watering down your frosting. For deep tones like galaxy navy or superhero sky, start with a small amount and let it sit 10 minutes—colors intensify as they rest.
For schedule sanity, bake cakes one day ahead and wrap tightly once cooled. Frost the morning of the party or the night before and chill. Add toy toppers and delicate candies just before serving so colors stay bright and textures crisp.
Allergy and Sensitivity Swaps
- Dairy-free: Use plant-based butter and milk; swap ganache with coconut cream and dairy-free chips.
- Egg-free: Opt for reliable egg replacers or applesauce/soy yogurt in simple vanilla cakes.
- Gluten-free: Choose a 1:1 gluten-free flour blend and check that cookies/candies are GF-certified.
Don’t stress perfection—kids care way more about themes, colors, and the fun of it all than razor-sharp edges. A few playful toppers and a strong concept carry the day.
Party-Ready Finishing Touches
- Personalize with name and age on a small fondant banner or a paper flag.
- Use a contrasting cake board color to frame the design: black for galaxy, green for dinos, silver for racing.
- Set out matching cupcakes as “pit crew” snacks if you’re feeding a crowd.
There you have it: five bold, kid-approved cakes that deliver big smiles without taking over your week. Pick a theme, grab a few toy toppers, and you’re halfway there already. Now go claim your home-bakery superhero status—and save me a slice of that checkerboard, okay?
Printable Recipe Card
Want just the essential recipe details without scrolling through the article? Get our printable recipe card with just the ingredients and instructions.