5 Kids Birthday Cakes for Boys That Are Fun and Easy—guaranteed Crowd-pleasers
Planning a birthday cake for a kiddo who wants dinosaurs, spaceships, or superhero everything? You’re in the right kitchen. These five cakes are big on fun, low on stress, and totally doable—even if your decorating kit is just a butter knife and a zip-top bag.
We’re keeping the flavors classic, the designs bold, and the steps simple. Think bright colors, clever shortcuts, and tricks that make you look like a pro without spending all night covered in frosting. Ready to level up the party table?
Disclosure: As Amazon Associates, we earn from qualifying purchases at no extra cost to you.
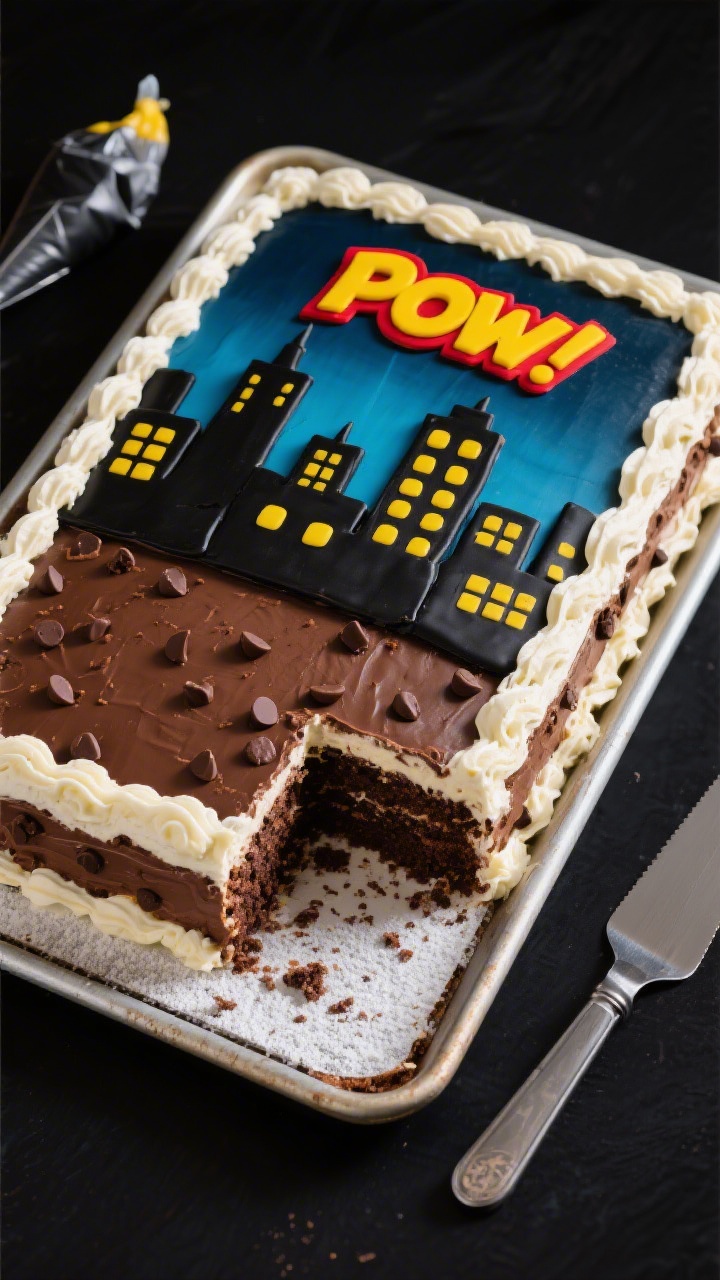
1. Superhero City Skyline Sheet Cake (No-Fuss, Big Wow)
⭐ My secret tip – Ever since we started using this kids baking set, my toddler loves helping in the kitchen and is much more willing to try new foods. ✨ This is the blender we use for protein smoothies with yogurt, peanut butter, and fruit.
This is the “instant hero” cake for busy parents. It’s a simple sheet cake topped with a bold night-sky frosting and an easy cut-out skyline. Add a toy action figure on top and boom—superpowers unlocked. Perfect when you want dramatic impact with minimal tools.
Ingredients:
- 1 box chocolate cake mix (15.25 oz) + ingredients on box (usually eggs, oil, water)
- 1 cup mini chocolate chips (optional, for extra fudgy texture)
- 1 1/2 cups unsalted butter, room temperature
- 4 cups powdered sugar
- 1/3 cup unsweetened cocoa powder
- 2–3 tablespoons milk
- 1 teaspoon vanilla extract
- Blue gel food coloring
- Black gel food coloring (or add cocoa to darken)
- Yellow fondant or yellow candy melts (for windows)
- 1 large rectangle sheet pan (9×13 or 10×15)
- Optional: small action figure topper and star sprinkles
Instructions:
- Preheat oven and bake the cake according to the box instructions. Stir in mini chocolate chips before baking if you want extra oomph. Cool completely in the pan.
- Make the frosting: Beat butter until fluffy. Add powdered sugar and cocoa powder, then vanilla and milk, beating until smooth. Tint most of the frosting deep blue. Reserve 1 cup and tint it black (or darken with extra cocoa).
- Frost the cooled cake with the blue frosting, smoothing into a night-sky vibe. You don’t need perfection—cloudy swirls look great.
- Create the skyline: Spread the black frosting about 1/4 inch thick on a piece of parchment. Chill 15 minutes, then cut building shapes with a knife. Alternatively, spread black frosting directly in blocky building silhouettes along the bottom third of the cake.
- Add windows: Cut tiny squares of yellow fondant or dot yellow candy melts onto the buildings. Scatter a few star sprinkles up top.
- Place the action figure on the “roofline” for dramatic effect.
Pro tip: Drag a small offset spatula through the blue frosting in swoops for a “windy night” texture. For flavors, swap chocolate cake for vanilla and use bright blue buttercream—it’s just as striking. Serve with milk or strawberry soda for a comic-book color combo.
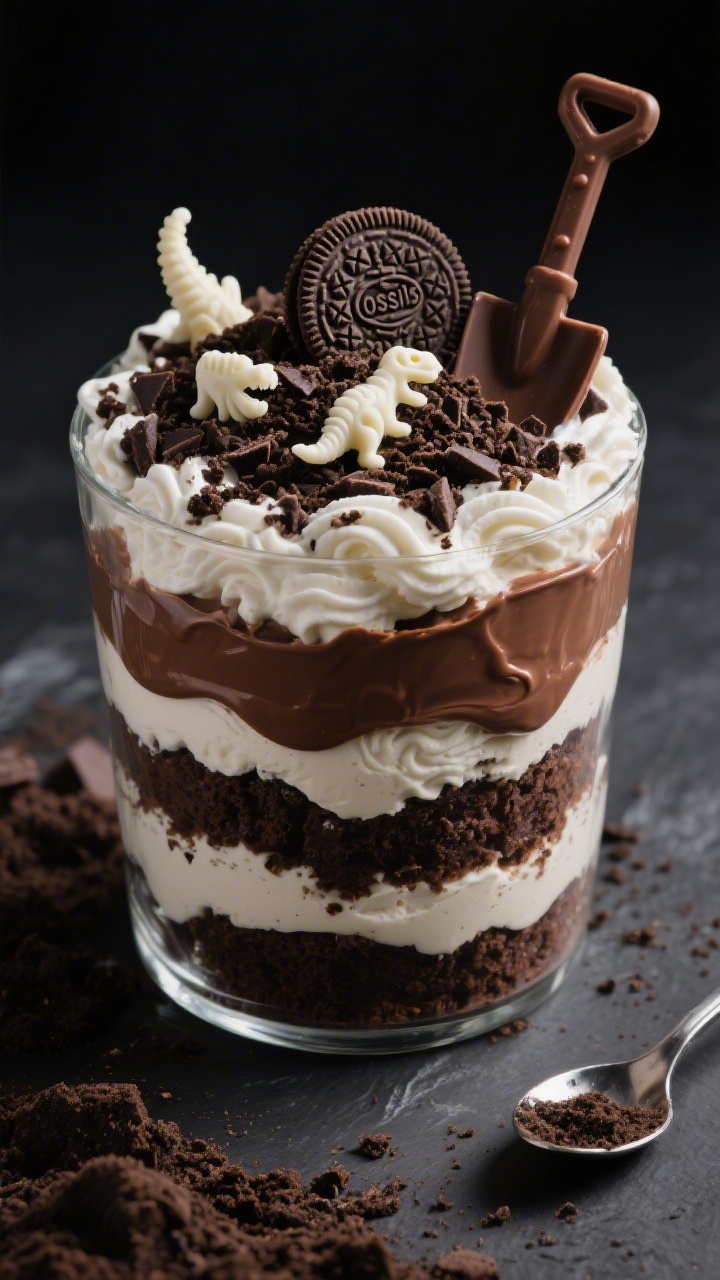
2. Dino Dig Chocolate Dirt Cake (Edible Excavation Zone)
⭐ My secret tip – Ever since we started using this kids baking set, my toddler loves helping in the kitchen and is much more willing to try new foods. ✨ This is the blender we use for protein smoothies with yogurt, peanut butter, and fruit.
If your birthday star loves fossils, this is the sweetest dig site ever. Crushed cookie “dirt,” pudding layers, and hidden candy “bones” make this an interactive cake everyone wants to excavate. It’s no-bake friendly if you use a store-bought base, but we’ll keep it simple and sturdy.
Ingredients:
- 1 box devil’s food cake mix + ingredients on box
- 20 chocolate sandwich cookies, crushed
- 2 cups cold milk
- 1 (3.9 oz) box instant chocolate pudding
- 1 (8 oz) tub whipped topping, thawed
- 1 cup chocolate frosting (store-bought is fine)
- 1 cup white candy melts or white chocolate chips (for “bones”)
- Gummy dinosaurs or small dinosaur toys (non-toxic/cleaned)
- Brown sugar (optional, for sandy areas)
- 9×13 baking dish or shallow rectangular pan
Instructions:
- Bake the cake in a 9×13 pan and cool completely. You can even do this the day before.
- Make the pudding layer: Whisk cold milk with instant pudding until thickened, about 2 minutes. Fold in whipped topping to make it extra creamy.
- Melt white candy melts and pipe simple bone shapes (lines with nubs at each end) onto parchment. Chill 10 minutes to set.
- Spread a thin layer of chocolate frosting over the cake to “seal” it. Top with the pudding mixture, spreading edge to edge.
- Sprinkle crushed cookies all over for dirt. Add a few pockets of brown sugar as sandy areas.
- Tuck the candy “bones” into the dirt layer so they peek out. Arrange gummy dinos or toys around like a dig site in action.
Serve it chilled for the best texture. For a peanut butter twist, drizzle warmed peanut butter over the cake before the cookie dirt. You can also add crushed pretzels for “rocks.” Want to go extra? Make chocolate “boulders” by rolling cereal treats in cocoa powder.
3. Race Track Chocolate-Orange Ring Cake (Zoom-Ready Bundt)

⭐ My secret tip – Ever since we started using this kids baking set, my toddler loves helping in the kitchen and is much more willing to try new foods. ✨ This is the blender we use for protein smoothies with yogurt, peanut butter, and fruit.
No carving, no stacking—this Bundt cake becomes a race track in minutes. A glossy chocolate glaze is your asphalt, white icing makes lane lines, and a couple of tiny cars turn it into the speedway of their dreams. It’s quick, clever, and photogenic.
Ingredients:
- 1 box chocolate cake mix + ingredients on box
- Zest of 1 orange
- 1 teaspoon orange extract (optional but amazing)
- 1/2 cup mini chocolate chips (optional)
- 1 cup semi-sweet chocolate chips (for glaze)
- 1/2 cup heavy cream (for glaze)
- 1/2 cup powdered sugar
- 1–2 tablespoons milk (for white icing lines)
- Tiny toy race cars (cleaned), check size to fit the ring
- Bundt pan, greased and floured
Instructions:
- Preheat oven and prepare cake batter as directed. Stir in orange zest, orange extract, and mini chips. Bake in a greased Bundt pan; cool 10 minutes, then invert onto a rack to cool fully.
- Make the glaze: Heat cream until steaming, pour over chocolate chips, let sit 2 minutes, then whisk smooth. Cool slightly so it thickens but still pours.
- Place the cake on a platter. Pour the chocolate glaze over the top, letting it coat evenly—this is your asphalt.
- Mix powdered sugar with milk to a thick but pipeable consistency. Pipe dashed white lane lines around the top ridge. A zip-top bag with a tiny corner snipped works perfectly.
- Position toy cars on the track. Add checkered flags made from paper and toothpicks if you like.
Make-ahead win: Bake the Bundt a day early, wrap tightly, and glaze the morning of the party. Not into orange? Swap with 1 teaspoon vanilla and a pinch of instant espresso powder for mocha vibes. Serve with orange slices or vanilla ice cream to balance the chocolate richness.
4. Galaxy Swirl Space Cake (Stars, Planets, And Zero Stress)
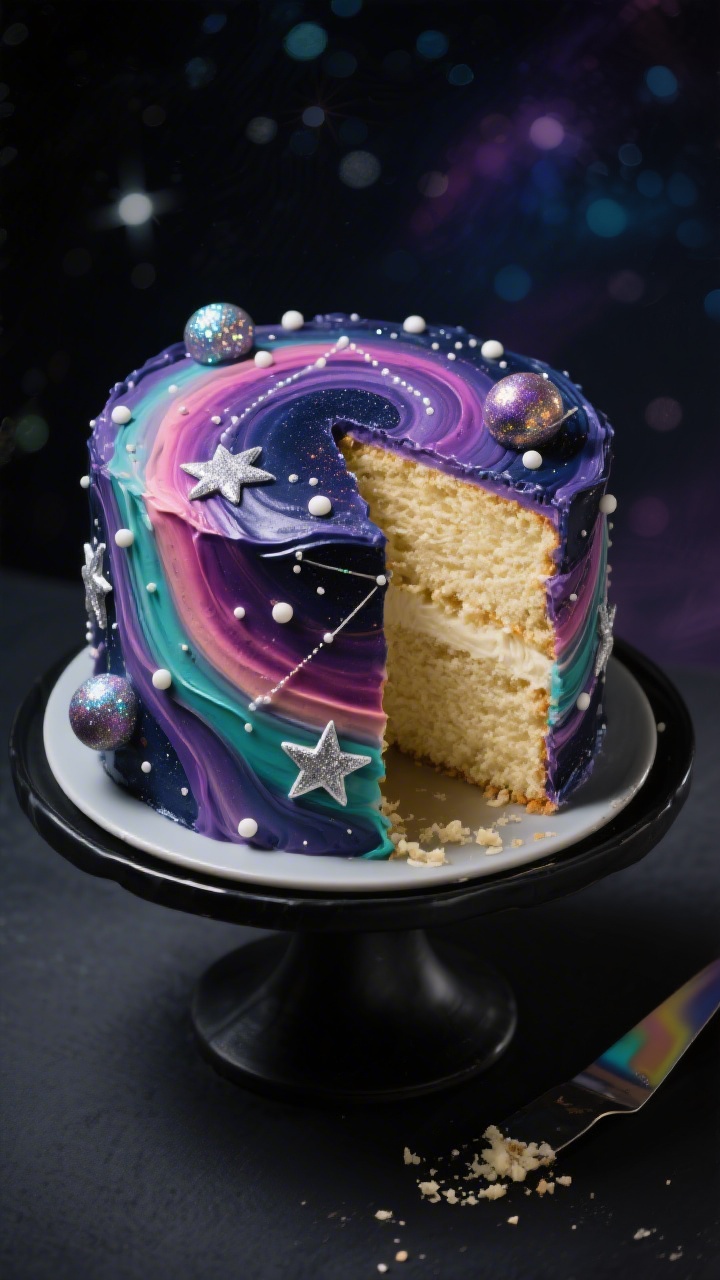
⭐ My secret tip – Ever since we started using this kids baking set, my toddler loves helping in the kitchen and is much more willing to try new foods. ✨ This is the blender we use for protein smoothies with yogurt, peanut butter, and fruit.
For the kid who knows their planets better than their veggies, this galaxy cake is pure magic. You’ll swirl vibrant buttercream, splatter edible stars, and top with candy planets. It looks like it took all day—but you’ll be done before blastoff.
Ingredients:
- 2 boxes vanilla cake mix + ingredients on box (for two 8-inch layers)
- 1 1/2 cups unsalted butter, room temperature
- 5 cups powdered sugar
- 1 tablespoon vanilla extract
- 3–4 tablespoons milk
- Gel food coloring: navy, purple, black, teal, and hot pink
- Edible silver stars or white nonpareils
- Assorted round candies (gumballs, malt balls, chocolate truffles) for planets
- Edible glitter or luster dust (optional but stunning)
- Two 8-inch round cake pans, parchment-lined
Instructions:
- Bake two 8-inch vanilla cakes and let them cool completely. Level the tops if needed.
- Make the buttercream: Beat butter until creamy. Add powdered sugar, vanilla, and milk until fluffy. Divide into 4 bowls and tint navy, purple, teal, and leave one white. Add a dab of black to the navy for depth.
- Stack the cakes with a thin layer of white buttercream in between. Do a light crumb coat around the outside and chill 15 minutes.
- Dollop spoonfuls of the colored buttercreams all over the cake. Use a spatula to swirl gently—one or two smooth passes is enough to create a galaxy effect. Don’t overwork it.
- Flick a few drops of white-tinted buttercream or edible paint for star splatters. Press on edible silver stars.
- Attach “planets” using a dab of buttercream: one big gumball, a few smaller candies, maybe a ring made from a sour belt candy wrapped around a truffle for Saturn. Dust with luster for shine.
Decorator’s secret: Keep your spatula hot (dip in warm water, wipe dry) for silky swirls. Flavor swaps: almond or lemon extract in the buttercream adds a bright lift. Serve with rocket-red punch or sparkling lemonade to match the spacey theme.
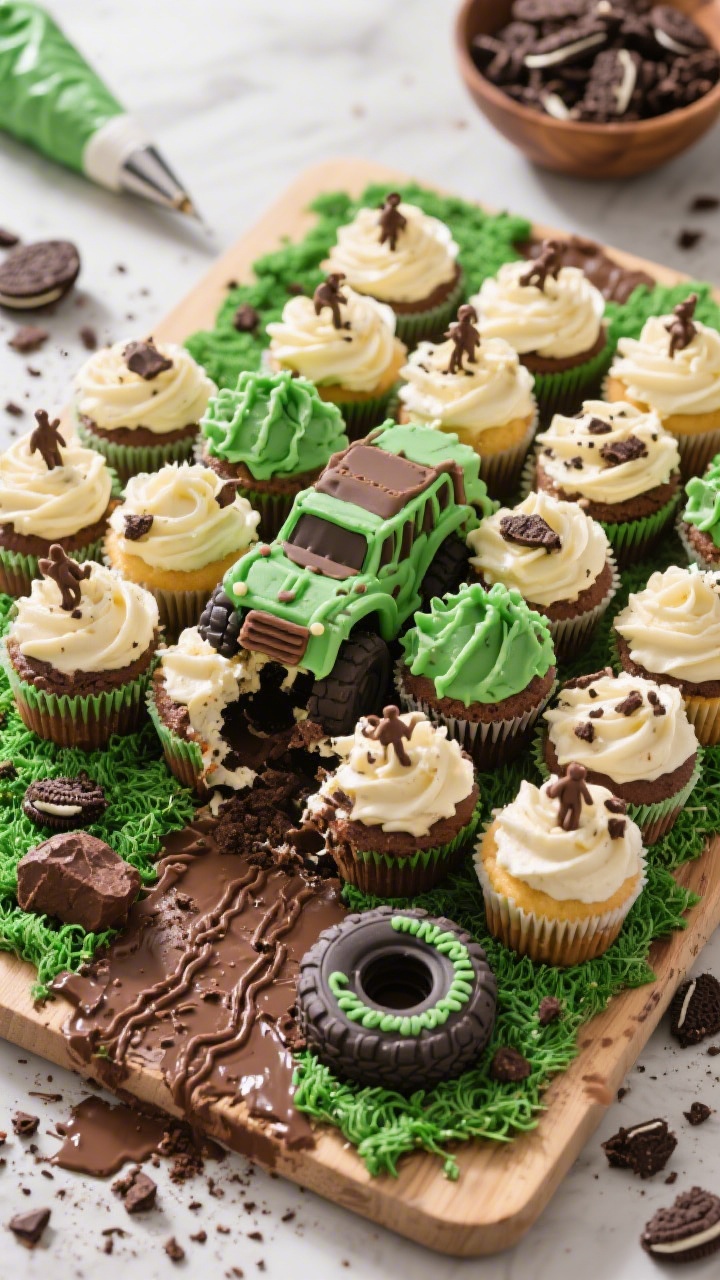
5. Monster Truck Smash Cupcake-Cake (Pull-Apart, No Slices Needed)
⭐ My secret tip – Ever since we started using this kids baking set, my toddler loves helping in the kitchen and is much more willing to try new foods. ✨ This is the blender we use for protein smoothies with yogurt, peanut butter, and fruit.
Kids love trucks. Parents love not washing 18 forks. This pull-apart cupcake-cake builds a ramp and arena where a toy monster truck can “smash” through. It’s super portable, easy to serve, and wildly fun to decorate with candy rubble.
Ingredients:
- 24 chocolate or vanilla cupcakes (from box mix or bakery)
- 2 1/2 cups vanilla buttercream (store-bought or homemade)
- 1 cup chocolate frosting
- Brown and green gel food coloring
- Crushed chocolate cookies (for dirt)
- Gummy worms, mini marshmallows, and chocolate rocks or M&M’s (for debris)
- 1 toy monster truck (cleaned)
- Large cake board or sheet of cardboard covered in foil
- Piping bags or zip-top bags
Instructions:
- Arrange the cupcakes on the board in a rough rectangle: 4 rows of 6. At one short end, angle 4 cupcakes into a sloped “ramp.” Scoot them close so the frosting will connect them.
- Tint half the vanilla buttercream light brown and the other half green. Keep the chocolate frosting as-is.
- Pipe or spread a thin layer of brown buttercream over the ramp and center area—this is your dirt track. Frost the edges and corners with green for “grass.”
- Add ruts by dragging a spoon through the brown frosting. Sprinkle crushed cookies down the middle for realistic dirt. Pipe small chocolate frosting mounds as dirt piles.
- Decorate the arena: press in gummy worms, marshmallow “barriers,” and chocolate rocks. Add a few M&M’s as “spare tires.”
- Place the monster truck on the ramp like it’s mid-jump. If transporting, add it at the party to avoid tire tracks everywhere—unless you want that look!
Serving is a snap: Guests just grab a cupcake. For extra flavor, add a layer of jam under the brown frosting on a few cupcakes—surprise “fuel packs.” Want it bigger? Do 36 cupcakes and widen the track for twin trucks.
Final Tips For Stress-Free Party Baking
- Chill strategically: A quick chill between frosting layers keeps crumbs in check and details crisp.
- Use toys as toppers: Clean, food-safe figurines add instant theme without complicated piping.
- Stick to 2–3 core colors: Bold, simple palettes look cleaner (and photograph better).
- Batch your work: Bake the night before, decorate the morning of. You’ll actually enjoy the party—trust me.
There you have it—five fun, easy cakes that light up a birthday table without lighting up your stress levels. Pick your kid’s favorite theme, grab a few pantry staples, and get decorating. The smiles (and frosting mustaches) will be totally worth it.
Printable Recipe Card
Want just the essential recipe details without scrolling through the article? Get our printable recipe card with just the ingredients and instructions.