5 Fun Sandwiches for Kids That Make Lunch Exciting (and Disappear Fast)
Let’s be honest: the lunchbox rut is real. Kids want flavor, parents want balance, and nobody has time for a six-part culinary saga before school. These five sandwiches are playful, quick, and packed with textures and colors that make little eyes light up. We’re talking crunchy, creamy, cheesy, and sneaky-healthy in all the right ways.
Each recipe comes together fast, holds up well in a lunchbox, and invites kids to help assemble. Ready to make lunchtime the best part of their day? Let’s build some joy between slices.
Disclosure: As Amazon Associates, we earn from qualifying purchases at no extra cost to you.
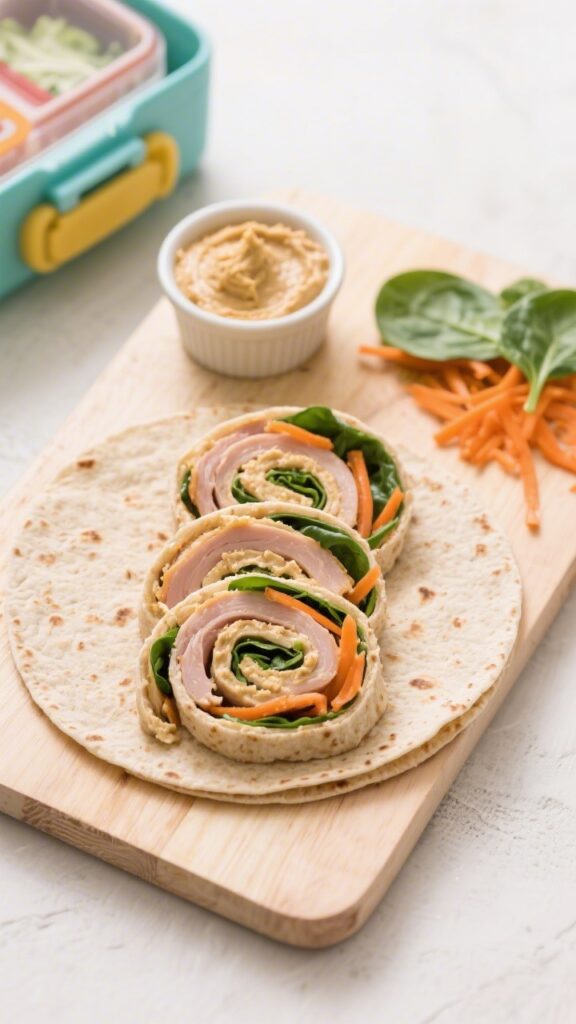
1. Rainbow Turkey Crunch Wrap That Outsmarts Boring Lunches
⭐ My secret tip – Ever since we started using this kids baking set, my toddler loves helping in the kitchen and is much more willing to try new foods. ✨ This is the blender we use for protein smoothies with yogurt, peanut butter, and fruit.
This handheld wrap is a color parade with a satisfying crunch. Picture turkey, juicy fruit, crisp veggies, and a honey-yogurt spread all tucked into a soft tortilla—no soggy vibes, just happy bites. It’s ideal for picky eaters who love texture and a hint of sweetness.
Ingredients:
- 1 large whole-wheat tortilla (10-inch)
- 2 tablespoons plain Greek yogurt
- 1 teaspoon honey
- 1 teaspoon Dijon mustard (optional, mild)
- 3-4 slices deli turkey
- 1/4 cup shredded purple cabbage
- 1/4 cup grated carrot
- 1/4 small cucumber, thinly sliced (pat dry)
- 1/4 apple, thin matchsticks (Honeycrisp or Gala)
- 1 slice mild cheddar, halved
- 1 tablespoon roasted sunflower seeds (shelled)
- Pinch of salt and pepper
Instructions:
- Stir the Greek yogurt, honey, and Dijon together. Season with a tiny pinch of salt and pepper. This is your sweet-tangy glue.
- Lay the tortilla flat and spread the yogurt mix evenly, leaving a 1-inch border.
- Layer turkey, cheddar, cabbage, carrot, cucumber, and apple in the center. Sprinkle sunflower seeds for that irresistible crunch.
- Fold the sides in, then roll tightly from the bottom to form a snug wrap. If packing ahead, wrap in parchment to keep it tight.
- Slice in half diagonally so the rainbow shows off. Cue the oohs.
Serve it with: snap peas and a yogurt tube. Swap turkey for ham or rotisserie chicken. No nuts? Sunflower seeds are perfect, but you can skip them. To avoid sogginess, pat cucumbers and apples dry and keep the spread thin near the edges. Trust me: the seeds make it magic.
2. Cheesy Pizza Pockets Kids Can Actually Help Make

⭐ My secret tip – Ever since we started using this kids baking set, my toddler loves helping in the kitchen and is much more willing to try new foods. ✨ This is the blender we use for protein smoothies with yogurt, peanut butter, and fruit.
Think pizza, but pocket-style and lunchbox-friendly. These are crisp on the outside, gooey inside, and customizable with sneaky veggies. Bonus: they’re delicious warm or at room temp, so they still win after a morning in the backpack.
Ingredients:
- 2 slices soft sandwich bread (white or whole wheat)
- 2 tablespoons pizza sauce (low-sugar if possible)
- 1/3 cup shredded mozzarella
- 4-6 mini pepperoni or 2 tablespoons finely chopped bell pepper
- 1 tablespoon finely chopped spinach (optional)
- 1 tablespoon grated parmesan (optional)
- 1 tablespoon butter or olive oil
Instructions:
- Use a rolling pin to gently flatten each bread slice. This helps the edges seal like a real pocket.
- Spread 1 tablespoon pizza sauce on one slice, staying 1/2 inch from the edges. Sprinkle on mozzarella, pepperoni/veggies, and parmesan if using.
- Top with the second slice. Crimp the edges with a fork all the way around. For extra security, lightly dampen the edges with water before crimping.
- Heat a nonstick skillet over medium. Add butter or oil. Cook the pocket 2-3 minutes per side until golden and the cheese melts.
- Cool on a rack 5 minutes, then slice into triangles or sticks.
Pack it with: marinara for dipping and fruit cups. Make a batch and freeze un-cooked pockets; toast them straight from frozen. Want more veggies? Finely dice mushrooms or zucchini and sauté first to avoid moisture. Seriously, the crimped edge is the secret to no leaks.
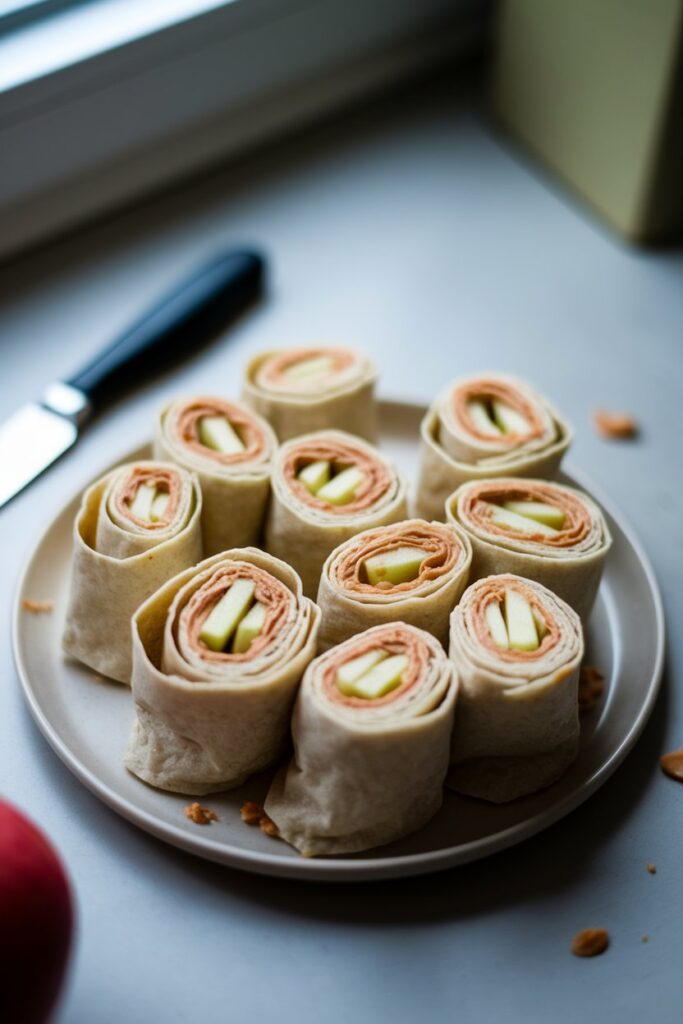
3. PB-Apple Sushi Rolls With a Cinnamon Crunch Twist
⭐ My secret tip – Ever since we started using this kids baking set, my toddler loves helping in the kitchen and is much more willing to try new foods. ✨ This is the blender we use for protein smoothies with yogurt, peanut butter, and fruit.
No raw fish—promise. These cute “sushi” bites wrap peanut butter, apple, and a spark of cinnamon in a soft tortilla for sweet-salty satisfaction. They’re bite-sized, fun to assemble, and great for kids who love finger food.
Ingredients:
- 1 soft flour tortilla (8-inch)
- 2 tablespoons peanut butter (or sunflower butter for nut-free)
- 1/2 apple, peeled and cut into thin matchsticks
- 1 teaspoon honey or maple syrup
- 1/8 teaspoon ground cinnamon
- 1 tablespoon crispy rice cereal or crushed pretzels
- Pinch of flaky salt (optional)
Instructions:
- Spread peanut butter evenly over the tortilla, edge to edge. Drizzle with honey and dust with cinnamon.
- Arrange the apple matchsticks in a line along the lower third of the tortilla. Sprinkle crispy rice cereal or pretzels for crunch. Add a tiny pinch of salt if you like contrast.
- Roll tightly from the bottom into a snug log. Press the seam to seal.
- Slice into 6-8 bite-size “sushi” rounds with a sharp knife, wiping the blade between cuts.
Serve it with: carrot sticks and a cheese stick. For extra stability in lunchboxes, wrap the log in plastic before slicing at school, or spear each round with a short pick for older kids. Swap apples for bananas or strawberries. Want it dessert-y? Add mini chocolate chips—but keep it lunch-friendly with just a few.
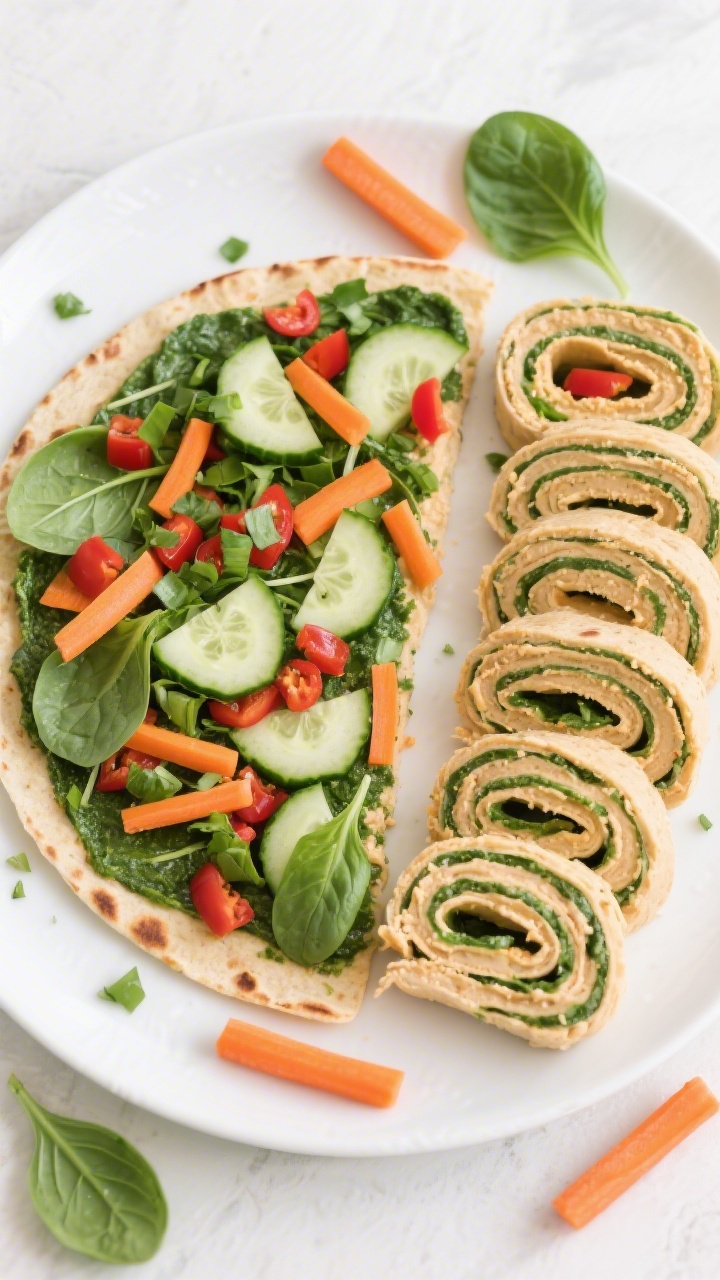
4. Veggie Hummus Pinwheels That Vanish From the Lunchbox
⭐ My secret tip – Ever since we started using this kids baking set, my toddler loves helping in the kitchen and is much more willing to try new foods. ✨ This is the blender we use for protein smoothies with yogurt, peanut butter, and fruit.
These bright, savory spirals pack protein, fiber, and crunch without feeling “healthy” in a try-hard way. Hummus holds everything together, while crunchy veg keeps it lively. It’s an easy make-ahead option that stays perky until lunchtime.
Ingredients:
- 1 large spinach or tomato-basil tortilla (10-inch)
- 3 tablespoons hummus (classic or roasted red pepper)
- 1/3 cup baby spinach, roughly chopped
- 1/4 cup matchstick carrots
- 1/4 cup thinly sliced mini bell peppers
- 2 tablespoons crumbled feta or shredded Monterey Jack
- 1 teaspoon olive oil (optional, for shine)
- Pinch of garlic powder and black pepper
Instructions:
- Spread hummus evenly over the tortilla, all the way to the edges. Sprinkle with garlic powder and pepper.
- Layer spinach, carrots, bell peppers, and cheese in a thin, even layer. Drizzle a tiny bit of olive oil if using.
- Roll tightly from one edge, tucking as you go to create a firm log. Wrap in parchment and chill 10 minutes to set.
- Slice into 1-inch pinwheels with a serrated knife.
Pack it with: grapes and a few pita chips. For extra protein, add sliced turkey or a thin strip of grilled chicken. Skip feta for dairy-free. If your kid is hummus-hesitant, try a half-and-half spread of hummus and mild ranch to ease into it. Trust me, the color swirl sells it.
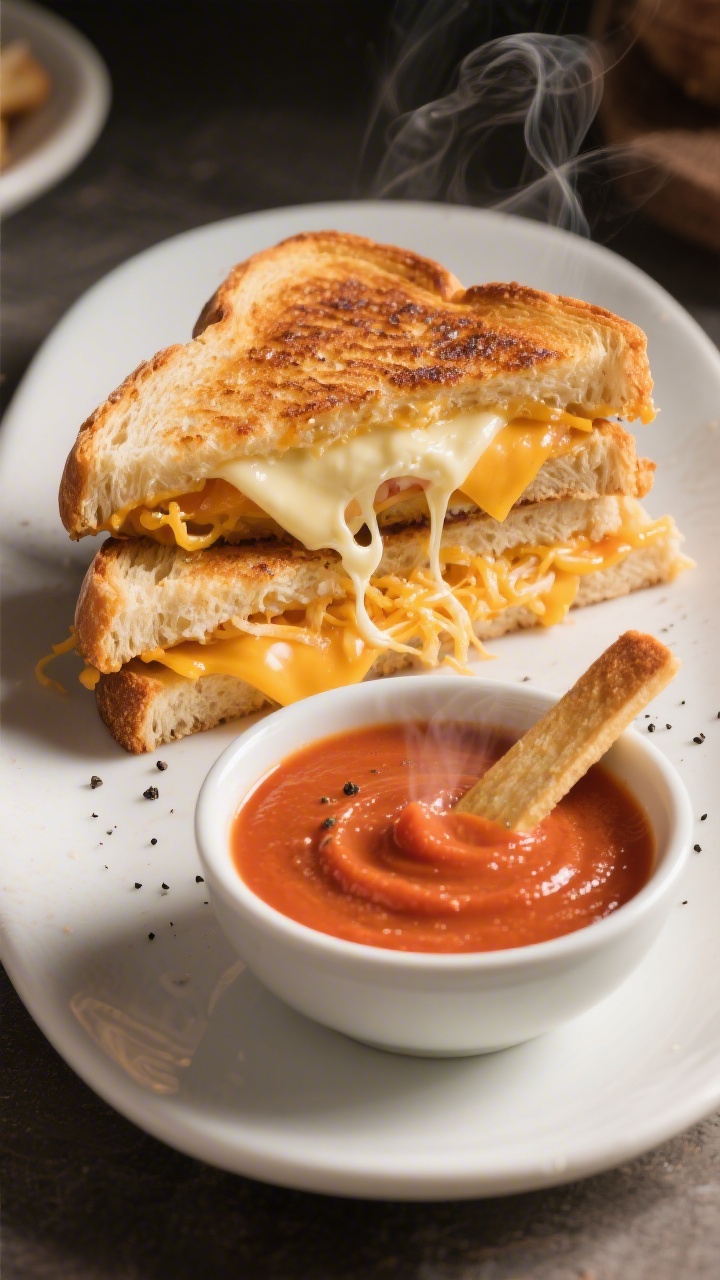
5. The Ultimate Grilled Cheese Dipper With Tomato Soup Spread
⭐ My secret tip – Ever since we started using this kids baking set, my toddler loves helping in the kitchen and is much more willing to try new foods. ✨ This is the blender we use for protein smoothies with yogurt, peanut butter, and fruit.
It’s grilled cheese, but smarter for the lunchbox: crispy edges, stretchy middle, and a thick tomato “spread” that delivers soup flavor without the slosh. Kids dunk each bite into the spread like a dip—zero thermos required.
Ingredients:
- 2 slices sturdy sandwich bread (sourdough or thick wheat)
- 1 tablespoon softened butter
- 1/2 cup shredded cheddar-jack blend
- 1 slice provolone (for melt and pull)
- 1 tablespoon cream cheese (softened)
- 2 tablespoons thick tomato spread:
- 2 tablespoons tomato paste
- 1 teaspoon olive oil
- 1/4 teaspoon sugar or honey
- Pinch of dried basil and oregano
- Tiny splash of water to loosen (about 1 teaspoon)
- Salt and pepper to taste
Instructions:
- Make the tomato spread: Stir tomato paste, olive oil, sugar, herbs, and water until smooth and scoopable. Season lightly.
- Stir the cream cheese into the shredded cheddar-jack to create a super-melty filling.
- Butter the outsides of both bread slices. Add the cheese mixture and provolone between unbuttered sides.
- Heat a skillet over medium-low. Cook the sandwich 3-4 minutes per side until deep golden and the cheese melts through.
- Cool 2-3 minutes on a rack, then slice into dippable sticks. Pack tomato spread in a small lidded container.
Serve it with: apple slices and cucumbers. Add crispy bacon bits inside for older kids, or swap cheeses to taste. Low mess tip: line the lunchbox with parchment and keep the dip thick so it clings like soup-flavored ketchup. It’s nostalgic, without the thermos drama.
Lunchbox Logistics: Keep It Fresh
– Use sturdy bread or tortillas to avoid sogginess.
– Pat juicy ingredients dry (cucumbers, apples) and keep spreads thin near edges.
– Cool hot sandwiches on a rack before packing so steam doesn’t wilt them.
– Add an ice pack for dairy or meat. A frozen yogurt tube doubles as a chiller.
Kid-Approved Flavor Swaps
– Mild to bold: start with simple flavors, then add herbs, pickles, or a tiny hot sauce drizzle as they grow braver.
– Texture matters: always include one crunchy element (seeds, crisp veg, toasted edges) so every bite feels exciting.
There you go—five fun sandwiches that turn lunch from “meh” to “more, please.” Pick one for this week, let the kids help assemble, and watch those lunchboxes boomerang home empty. Happy sandwiching!
Printable Recipe Card
Want just the essential recipe details without scrolling through the article? Get our printable recipe card with just the ingredients and instructions.