5 Easy Easter Treats for Kids to Make at Home That Wow
Ready to turn your kitchen into a kid-powered candy workshop? These five easy Easter treats are bright, bite-sized, and totally doable—even with tiny helpers and short attention spans. Each recipe is no-bake or low-bake, low-mess, and big on color and fun. Think crunchy, gooey, swirly, and chocolatey in all the best ways.
We’re talking treats you can whip up in under 30 minutes (mostly), decorate like a pro, and actually enjoy eating. Grab the sprinkles, roll up the sleeves, and let’s make some sweet memories.
Disclosure: As Amazon Associates, we earn from qualifying purchases at no extra cost to you.
1. No-Bake Bunny Trail Snack Mix That Disappears in Minutes
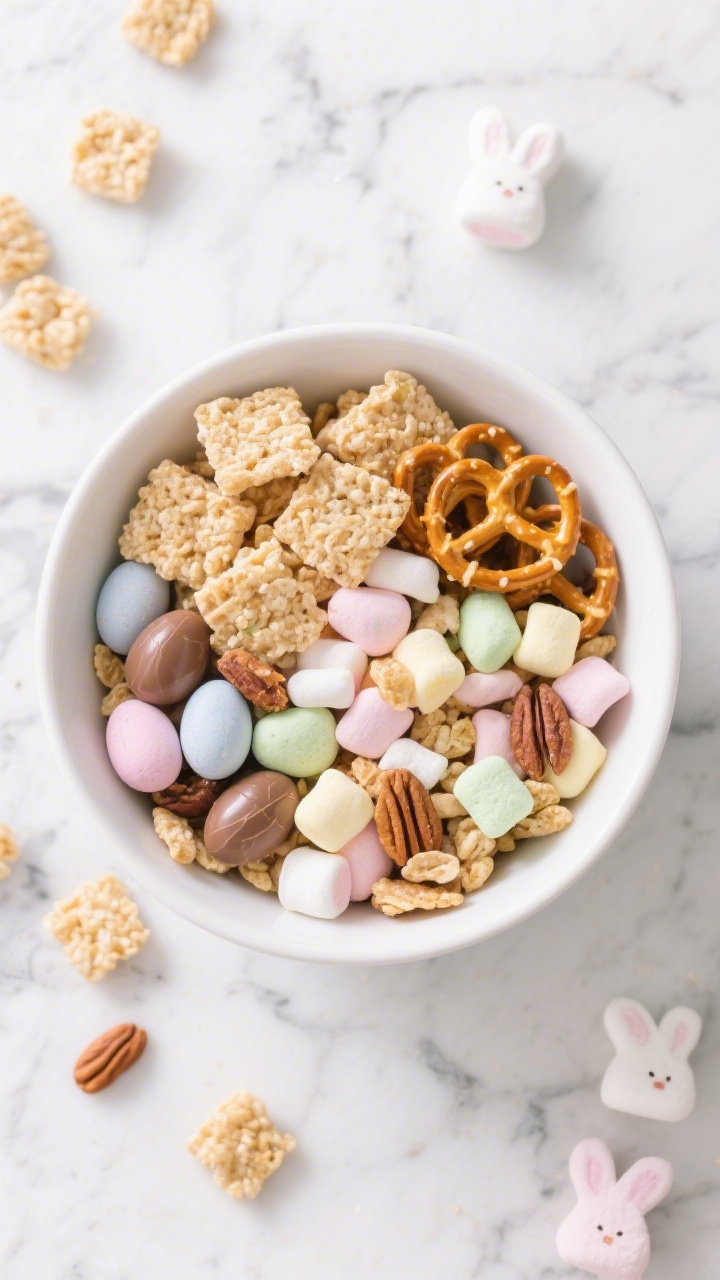
This is the ultimate “dump, stir, and snack” situation. It’s crunchy, sweet-salty, and perfect for little hands to mix and scatter into bowls or treat bags. Make it for an Easter egg hunt, a class party, or just because everyone’s asking for something fun.
⭐ These are the Easter cookie cutters we use every year to make simple cookies look festive and fun. These are the silicone candy molds I use for homemade Easter chocolates and yogurt bites. These bunny molds are what I use to make adorable homemade chocolate treats. This silicone bunny cake mold turns a simple cake into a festive Easter dessert.
Ingredients:
- 4 cups crispy rice cereal squares (like Rice Chex)
- 2 cups mini pretzel twists
- 1 1/2 cups pastel candy-coated chocolate eggs (like mini eggs or M&M’s)
- 1 cup mini marshmallows
- 1/2 cup roasted peanuts or almonds (optional; skip for nut-free)
- 12 oz white chocolate chips or melting wafers
- 1 tablespoon coconut oil or neutral oil (optional, for smoother melting)
- 1/4 cup pastel sprinkles
- Pinch of flaky sea salt (optional, but highly recommended)
Instructions:
- Line a baking sheet with parchment paper. In a large bowl, combine cereal, pretzels, candy eggs, marshmallows, and nuts (if using).
- Melt the white chocolate with the oil in the microwave in 20–30 second bursts, stirring between each until smooth. Don’t overheat—it can seize up fast.
- Pour the melted chocolate over the mix. Use a spatula to gently fold until everything is lightly coated.
- Spread the mixture onto the prepared baking sheet. Sprinkle with pastel sprinkles and a pinch of sea salt.
- Let it set at room temp for 20–30 minutes, or pop into the fridge for 10 minutes. Break into clusters and serve.
Serve in little cups or tuck into cellophane bags for a cute take-home treat. Swap white chocolate for milk or dark if that’s your vibe. For a color blast, add freeze-dried strawberry pieces or rainbow chips. Pro tip: Store leftovers in an airtight container for up to 4 days—if they last that long.
2. Sprinkle-Freckled Easter Sugar Cookie Bars With Cloudy Frosting
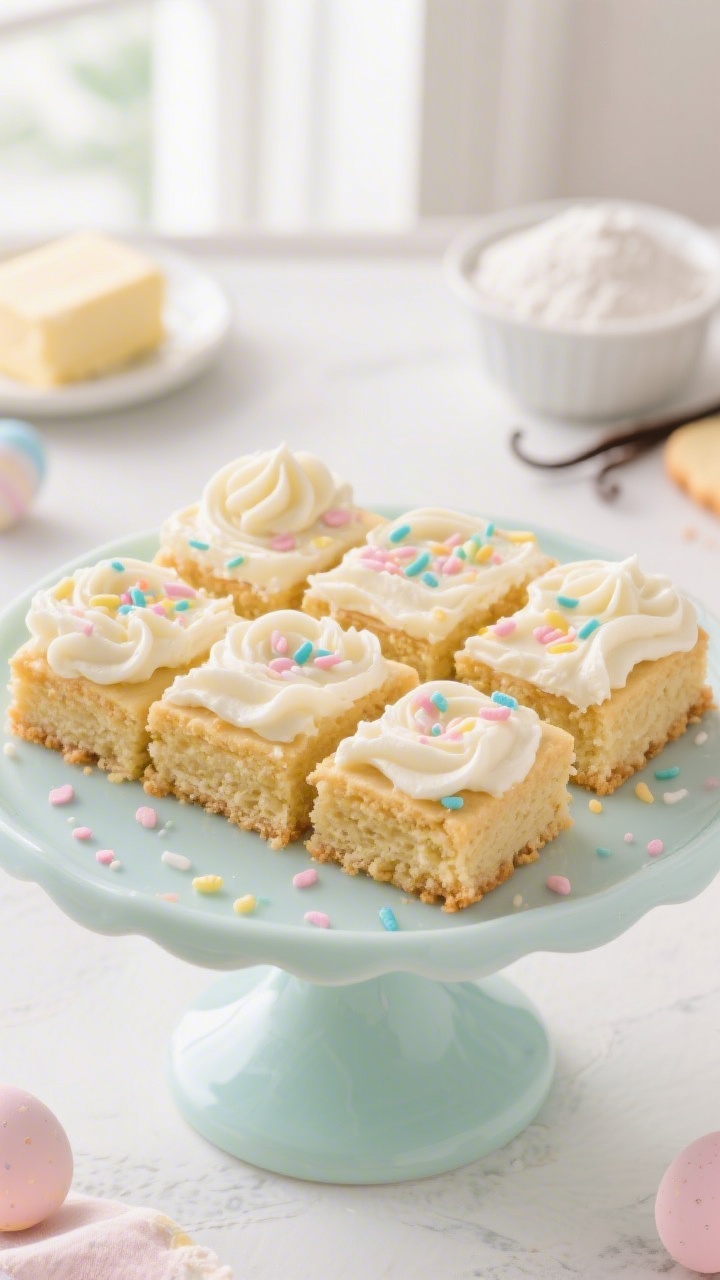
Bars beat cookies when kids are helping—no chilling, no rolling, no stress. These are soft, buttery, and covered in a fluffy, pastel-tinted frosting that begs for sprinkles. Great for feeding a crowd or a last-minute family movie night.
⭐ These are the Easter cookie cutters we use every year to make simple cookies look festive and fun. These are the silicone candy molds I use for homemade Easter chocolates and yogurt bites. These bunny molds are what I use to make adorable homemade chocolate treats. This silicone bunny cake mold turns a simple cake into a festive Easter dessert.
Ingredients:
- 1 cup (2 sticks) unsalted butter, softened
- 1 cup granulated sugar
- 1 large egg + 1 large egg yolk
- 2 teaspoons vanilla extract
- 2 1/2 cups all-purpose flour
- 1/2 teaspoon baking powder
- 1/2 teaspoon baking soda
- 1/2 teaspoon fine salt
- 1/3 cup rainbow or pastel sprinkles (jimmies work best in batter)
Frosting:
- 1/2 cup (1 stick) unsalted butter, softened
- 2 cups powdered sugar
- 2–3 tablespoons milk or cream
- 1 teaspoon vanilla extract or almond extract
- 1–2 drops pastel gel food coloring (optional)
- Extra sprinkles for topping
Instructions:
- Preheat the oven to 350°F (175°C). Line a 9×13-inch pan with parchment, leaving overhang for easy lifting.
- Beat the butter and sugar together until fluffy, 2–3 minutes. Add the egg, egg yolk, and vanilla; mix until smooth.
- In a separate bowl, whisk flour, baking powder, baking soda, and salt. Add dry ingredients to wet and mix just until combined. Fold in sprinkles.
- Press dough evenly into the prepared pan. Bake 14–18 minutes, until the top is set and edges are lightly golden. Don’t overbake—soft is the goal.
- Cool completely. For the frosting, beat butter until creamy; add powdered sugar, milk, and vanilla. Beat until fluffy, 2–3 minutes. Tint with a drop or two of coloring if you like.
- Spread frosting over cooled bars. Shower with sprinkles. Chill 10–15 minutes for cleaner slices, then cut into squares.
Serve these with milk or hot cocoa and watch them vanish. For a lemony twist, add 1 tablespoon lemon zest to the dough and 1 teaspoon to the frosting. Gluten-free? Use a 1:1 GF baking mix and watch your bake time—edges brown faster.
3. Chocolate-Dipped Strawberry Carrots Kids Can “Plant” in Crumb Dirt

Okay, these are ridiculously cute. Juicy strawberries get a white-chocolate “carrot” coat and sit in cookie-crumb “soil.” It’s a fun activity and a great centerpiece for your dessert table. Also: no one says no to chocolate strawberries.
⭐ These are the Easter cookie cutters we use every year to make simple cookies look festive and fun. These are the silicone candy molds I use for homemade Easter chocolates and yogurt bites. These bunny molds are what I use to make adorable homemade chocolate treats. This silicone bunny cake mold turns a simple cake into a festive Easter dessert.
Ingredients:
- 1 pound fresh strawberries with green tops, rinsed and thoroughly dried
- 12 oz white chocolate chips or orange candy melts
- 1–2 teaspoons coconut oil (if using white chocolate, for smoother dipping)
- Orange gel food coloring (skip if using candy melts)
- 12 chocolate sandwich cookies (like Oreos), crushed into fine crumbs
- Optional: 1/2 teaspoon vanilla extract for the chocolate
Instructions:
- Line a sheet pan with parchment. Pour the cookie crumbs into a shallow dish or small cups to create the “dirt.”
- Melt white chocolate with coconut oil in the microwave in short bursts, stirring between each. Tint with orange coloring a drop at a time until carrot orange.
- Hold each strawberry by the green top and dip into the orange chocolate, letting excess drip off. Place on the parchment to set for 3–5 minutes.
- For “carrot ridges,” drizzle leftover chocolate in thin lines over the set strawberries.
- To serve, spoon the cookie “dirt” into a shallow dish or line small cups. Nestle the strawberries in, green tops pointing up like little garden carrots.
Add a dollop of whipped cream or vanilla yogurt under the dirt for a parfait vibe. Want to sneak in more fruit? Mix in blueberries or banana slices and dip those, too. Pro tip: Dry strawberries completely before dipping—any water will make chocolate seize, and we don’t want clumpy carrots.
4. Peeps S’mores Skillet Dip That Melts Into Ooey-Gooey Bliss
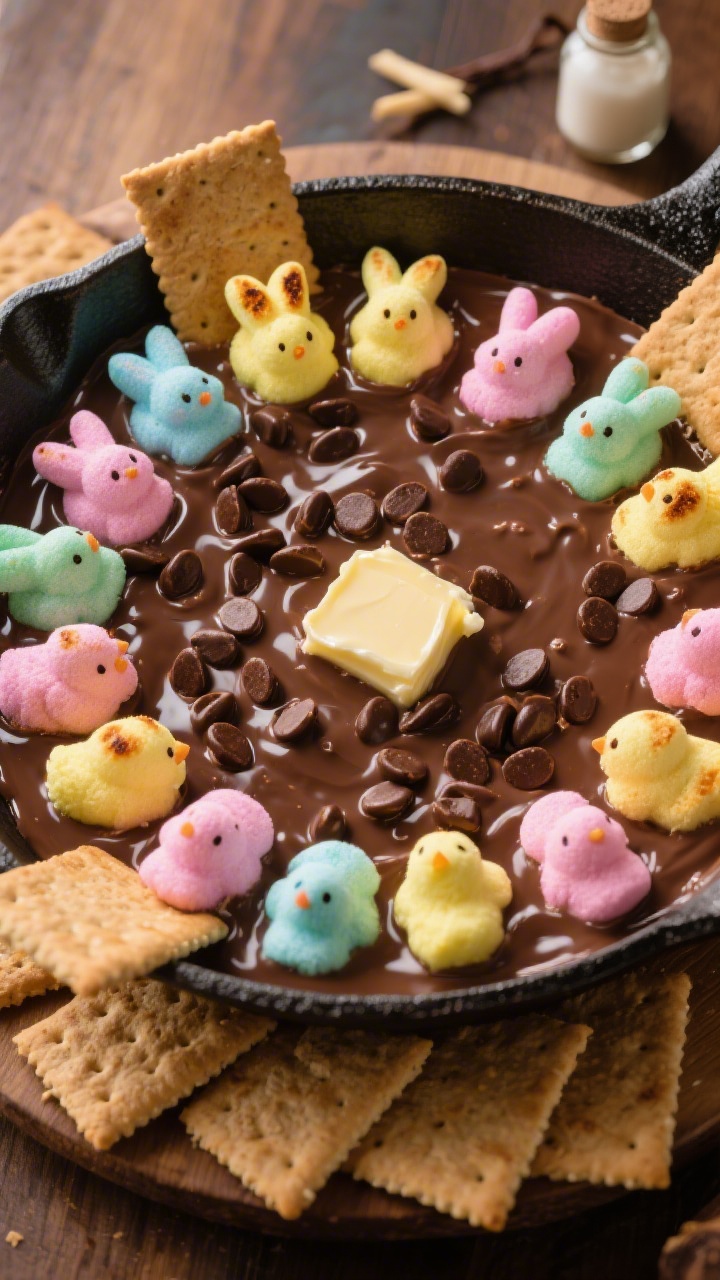
It’s campfire energy with a candy twist. This warm dip is a layer of melted chocolate and marshmallow chicks baked into a bubbly skillet. Kids love arranging the Peeps and scooping the molten mess with graham crackers.
⭐ These are the Easter cookie cutters we use every year to make simple cookies look festive and fun. These are the silicone candy molds I use for homemade Easter chocolates and yogurt bites. These bunny molds are what I use to make adorable homemade chocolate treats. This silicone bunny cake mold turns a simple cake into a festive Easter dessert.
Ingredients:
- 2 cups chocolate chips (milk or semi-sweet)
- 1 tablespoon butter (for the skillet)
- 20–24 Peeps marshmallow chicks or bunnies (mix colors for fun)
- 1 teaspoon vanilla extract (optional)
- Graham crackers, pretzels, or sturdy cookies for dipping
Instructions:
- Preheat the oven to 400°F (205°C). Butter a 9-inch oven-safe skillet or baking dish.
- Sprinkle chocolate chips evenly into the skillet. Add vanilla if using. Top with a snug layer of Peeps—pack them edge to edge.
- Bake 7–10 minutes, until the Peeps puff and the tops get toasty golden at the edges. Keep an eye on it; sugar goes from golden to smoky quick.
- Let it cool 2–3 minutes so it’s scoopable, not lava. Serve warm with graham crackers, pretzels, or fruit slices.
Feeling extra? Add a layer of peanut butter cups under the chocolate or swirl in caramel before baking. Make it outdoors on the grill over indirect heat, lid closed, for 8–12 minutes. Leftovers reheat well in the microwave—10-second bursts and a good stir.
5. Mini Nest Krispie Treats With Candy Egg “Hatchlings”
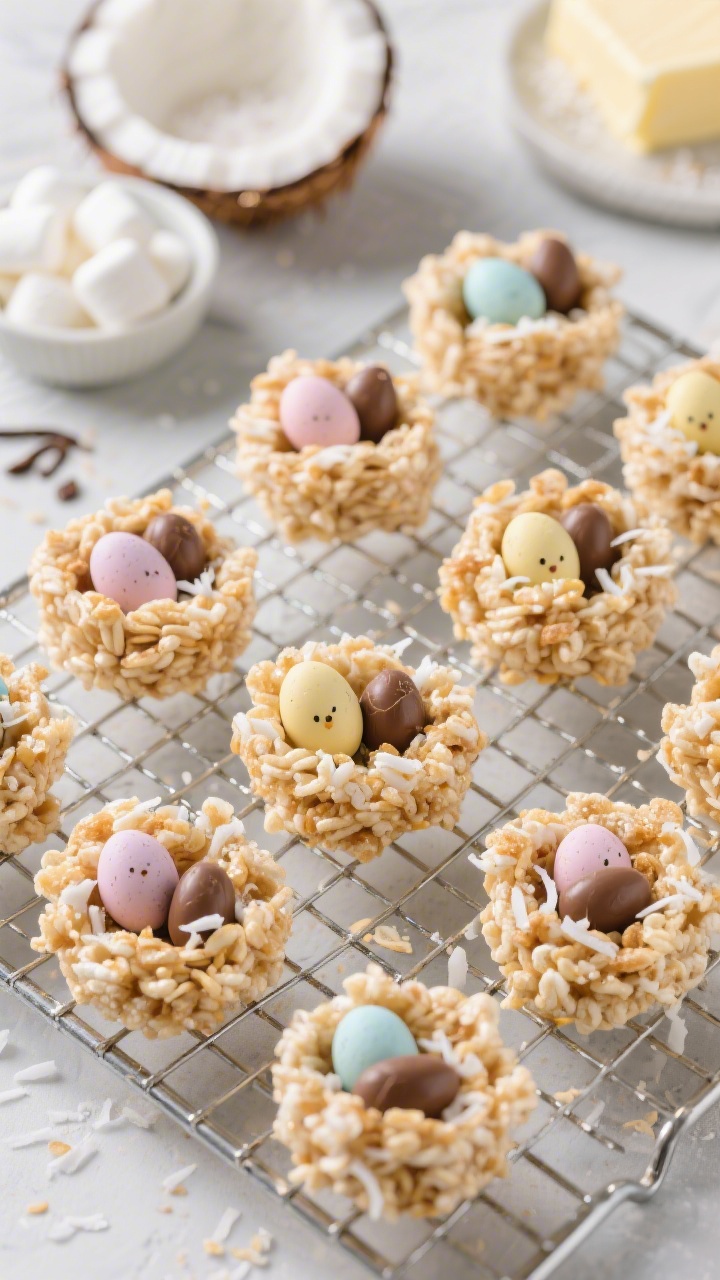
These cute little nests are spring in a bite: crisp, chewy, and packed with mini eggs. They come together in a single pot and use a muffin tin for easy shaping. Kids love scooping the “nests” and dropping in their candy “eggs.”
⭐ These are the Easter cookie cutters we use every year to make simple cookies look festive and fun. These are the silicone candy molds I use for homemade Easter chocolates and yogurt bites. These bunny molds are what I use to make adorable homemade chocolate treats. This silicone bunny cake mold turns a simple cake into a festive Easter dessert.
Ingredients:
- 3 tablespoons unsalted butter
- 1 (10 oz) bag mini marshmallows (about 6 cups)
- 1 teaspoon vanilla extract
- Pinch of salt
- 4 1/2 cups crispy rice cereal
- 1 cup shredded sweetened coconut (optional, for “grass” texture)
- Cooking spray or extra butter (for the pan and hands)
- 1 1/2 cups candy-coated chocolate eggs or jelly beans
Instructions:
- Lightly grease a 12-cup muffin tin with cooking spray or butter. If using coconut, toast it in a dry skillet over medium heat for 3–4 minutes until lightly golden and fragrant.
- In a large pot over low heat, melt butter. Add marshmallows, stirring constantly until smooth. Remove from heat; stir in vanilla and salt.
- Quickly fold in the rice cereal and toasted coconut (if using) until evenly coated.
- Working fast, divide the mixture among the muffin cups. With greased fingers or the back of a greased spoon, press down and create a small well in the center to form a nest.
- Let cool 10–15 minutes. Pop nests out and fill with candy eggs or jelly beans.
Drizzle with melted chocolate for extra flair, or tint the coconut green with a drop or two of food coloring before toasting for grassy nests. Need a dairy-free option? Use vegan butter and marshmallows. Store at room temperature in an airtight container for up to 2 days.
Kid Kitchen Tips: Keep It Fun (And Mostly Mess-Free)
- Prep station: Measure everything before inviting the kiddos over. Less waiting = fewer “when can we eat?” questions.
- Color magic: Pastel gel food coloring gives brighter hues with fewer drops.
- Sticky control: Lightly oil hands and tools when working with marshmallow or cereal mixtures.
- Cooling hacks: Fridge time speeds up setting for chocolate and bars. Just don’t overchill cookie bars or they’ll get crumbly.
- Allergy-aware: Make a nut-free version of the snack mix and clearly label batches if you’re sharing.
Make-Ahead And Storage Notes
- No-Bake Snack Mix: Best within 3–4 days in an airtight container.
- Sugar Cookie Bars: Frost and refrigerate up to 3 days; bring to room temp before serving.
- Strawberry Carrots: Best same day; store uncovered in the fridge for a few hours max to avoid condensation.
- Peeps S’mores Dip: Make fresh. Reheat leftovers in short microwave bursts.
- Krispie Nests: Store at room temp up to 48 hours; add candies just before serving if it’s humid.
There you go—five cheerful, kid-approved treats that spark joy without turning your kitchen upside down. Pick one for a quick win, or make a little parade of all five for a sweet Easter spread. Grab the sprinkles and dive in—your tiny sous-chefs are about to crush it, and you’ll have the cutest dessert table on the block, trust me.
Printable Recipe Card
Want just the essential recipe details without scrolling through the article? Get our printable recipe card with just the ingredients and instructions.