5 Cookie Recipes for Kids That Are Easy and Fun to Bake Together
Looking for sweet wins that won’t torch your patience (or your kitchen)? These kid-approved cookies are simple, playful, and built for little hands. We’re talking one-bowl shortcuts, no-chill doughs, and decorating moments that double as arts-and-crafts. Pull up a stool, preheat the oven, and let’s make memories—plus warm, melty cookies you’ll absolutely “taste test” first. For quality control, obviously.
1. Rainbow Sprinkle Sugar Cookies That Practically Decorate Themselves
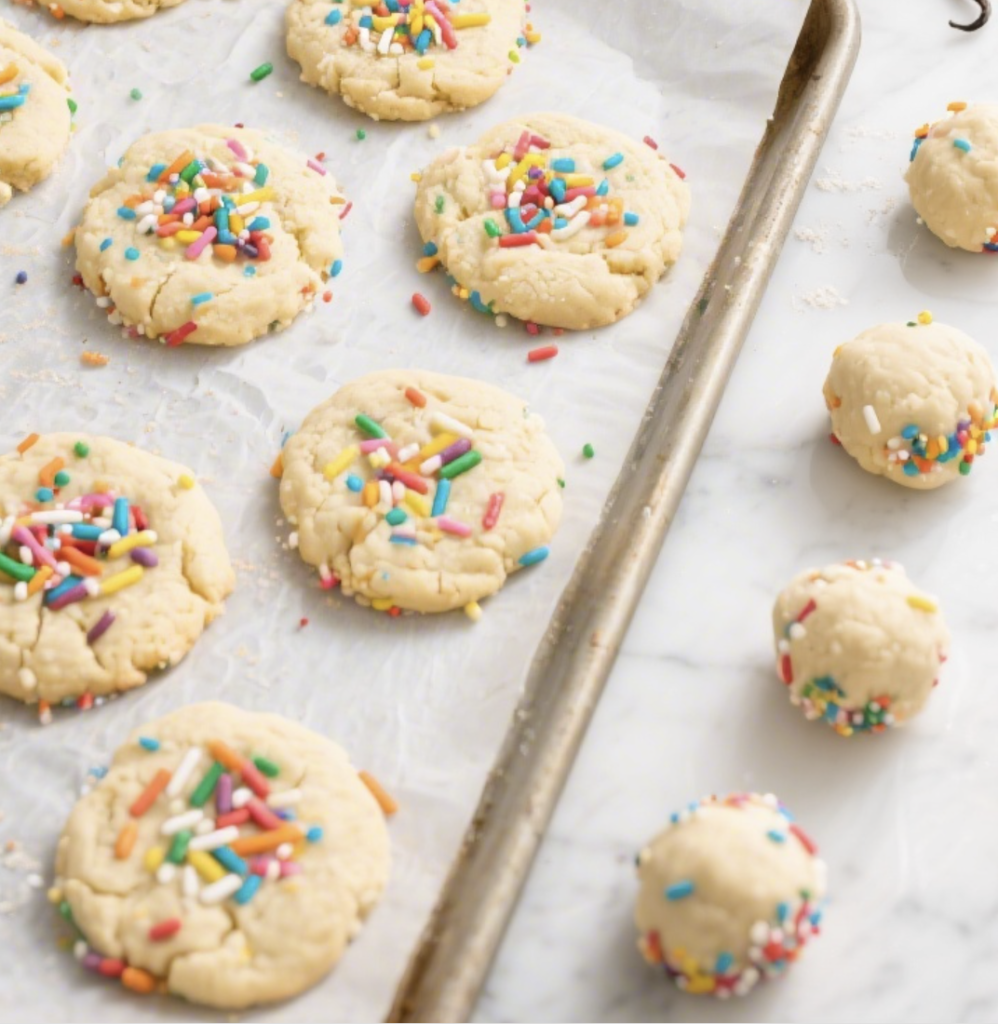
These are the crowd-pleasers that scream celebration. The soft, buttery centers and crisp edges are classic sugar cookie vibes, but the fun is in the sprinkle roll—kids can dunk, press, and swirl to their hearts’ content. It’s a five-ingredient base with bright, crunchy confetti on top.
Disclosure: As Amazon Associates, we earn from qualifying purchases at no extra cost to you.
Ingredients:
- 1/2 cup (115 g) unsalted butter, softened
- 3/4 cup (150 g) granulated sugar
- 1 large egg, room temperature
- 1 1/2 teaspoons vanilla extract
- 1 1/2 cups (190 g) all-purpose flour
- 1/2 teaspoon baking powder
- 1/4 teaspoon baking soda
- 1/4 teaspoon fine salt
- 3/4 cup rainbow sprinkles (jimmies work best), for rolling
Instructions:
- Preheat oven to 350°F (175°C). Line two baking sheets with parchment.
- In a large bowl, beat butter and sugar until light and fluffy, about 2 minutes.
- Beat in the egg and vanilla until smooth.
- Whisk flour, baking powder, baking soda, and salt in a separate bowl. Add to wet ingredients and mix just until combined. Dough will be soft but not sticky.
- Use a tablespoon or cookie scoop to portion dough into balls (about 1 tablespoon each). Roll each ball in sprinkles to coat.
- Place on prepared sheets, spacing 2 inches apart. Gently flatten to about 1/2-inch thick with your palm.
- Bake 9–11 minutes, until edges are set and centers look slightly pale. Do not overbake.
- Cool on the sheet 5 minutes, then transfer to a rack to finish cooling.
Pro tip: Chill the dough for 10 minutes if it’s extra warm—helps keep those edges neat. Swap vanilla for almond extract if you want bakery-style flavor. Serve with cold milk or crumble over vanilla ice cream for instant sundae energy.
2. Gooey Chocolate Chunk Skillet Cookies You Can Slice Like Pizza
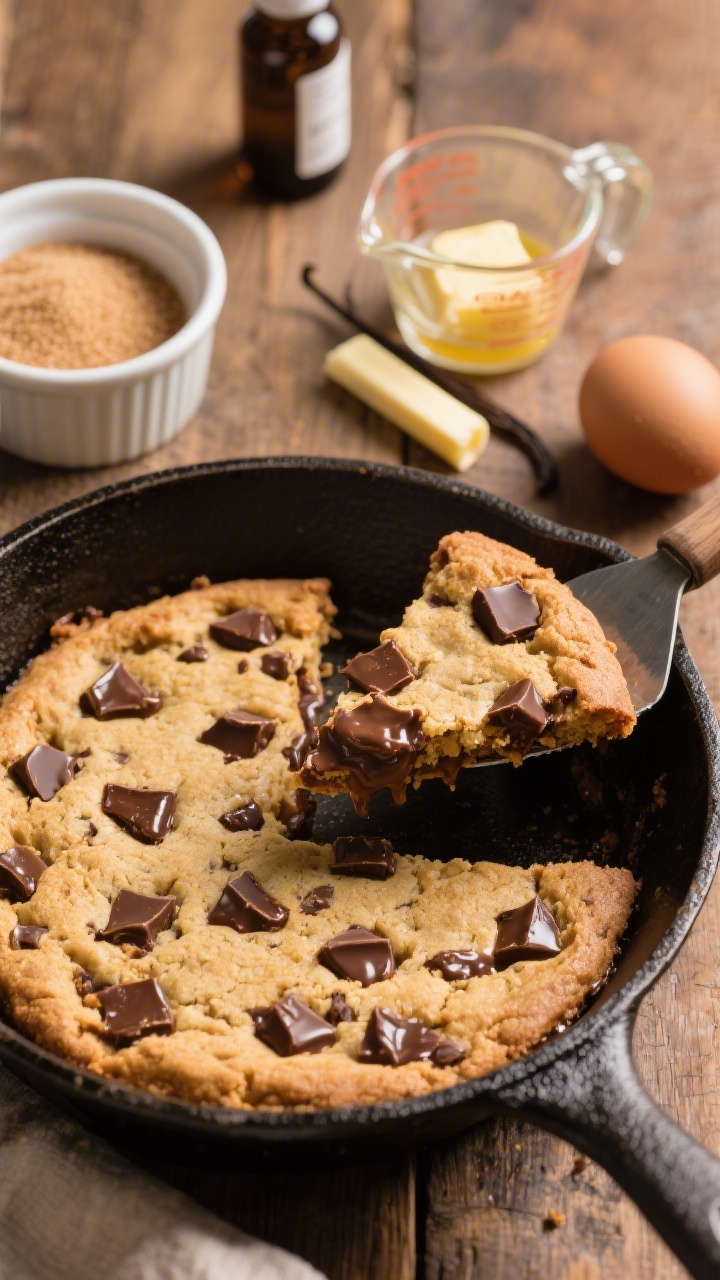
Big cookie energy! This one-pan wonder delivers a golden crust with a chewy, melty middle, and you can bake it in a 9-inch skillet or cake pan. Zero scooping, minimal mess, and perfect for family night—slice it warm and top with ice cream. Trust me, it disappears fast.
Ingredients:
- 1/2 cup (115 g) unsalted butter, melted and slightly cooled
- 1/2 cup (100 g) light brown sugar, packed
- 1/4 cup (50 g) granulated sugar
- 1 large egg
- 2 teaspoons vanilla extract
- 1 1/4 cups (160 g) all-purpose flour
- 1/2 teaspoon baking soda
- 1/4 teaspoon fine salt
- 1 cup (170 g) chocolate chunks or chips (mix milk and dark for fun)
- Optional: 1/2 cup mini marshmallows or chopped walnuts
Instructions:
- Preheat oven to 350°F (175°C). Grease a 9-inch oven-safe skillet or line a 9-inch cake pan with parchment, leaving overhang for easy lift.
- In a bowl, whisk melted butter, brown sugar, and granulated sugar until glossy.
- Whisk in egg and vanilla until smooth.
- Fold in flour, baking soda, and salt just until combined. Stir in chocolate (and marshmallows or nuts, if using).
- Spread dough evenly in the pan. Sprinkle a few extra chocolate chunks on top.
- Bake 18–22 minutes, until edges are golden and the center looks slightly underbaked—carryover heat will finish it.
- Cool 10 minutes. Slice into wedges and serve warm.
Serving ideas: Add a scoop of vanilla or strawberry ice cream, a drizzle of chocolate sauce, and a rain of sprinkles. For a s’mores vibe, press a few graham cracker pieces on top before baking—seriously good.
3. No-Bake Monster Bites For When The Oven’s “On Break”

When attention spans are short and snack time can’t wait, these no-bake, chewy peanut butter oat bites save the day. They come together in one bowl and roll up in minutes. Kids get to mix, scoop, and load them with colorful chocolate candies—no hot pans, no stress.
Ingredients:
- 1 1/2 cups quick oats (or pulse rolled oats a few times)
- 3/4 cup creamy peanut butter (or sunflower seed butter for nut-free)
- 1/3 cup honey or maple syrup
- 1 teaspoon vanilla extract
- 1/4 teaspoon fine salt
- 1/2 cup mini chocolate chips
- 1/2 cup mini candy-coated chocolates (M&M-style)
Instructions:
- In a large bowl, stir peanut butter, honey, vanilla, and salt until smooth.
- Fold in oats, mini chips, and candies until evenly distributed.
- Scoop into 1-tablespoon portions and roll into balls. If sticky, chill mixture 10 minutes first.
- Refrigerate 20 minutes to set. Store chilled in an airtight container for up to 1 week.
Make it yours: Add crushed pretzels for crunch, dried cherries for tang, or chia seeds for a little nutrition boost. Press them slightly flat for “cookie coins” that are lunchbox-friendly.
4. Soft Snickerdoodle Clouds With Cinnamon-Sugar Magic
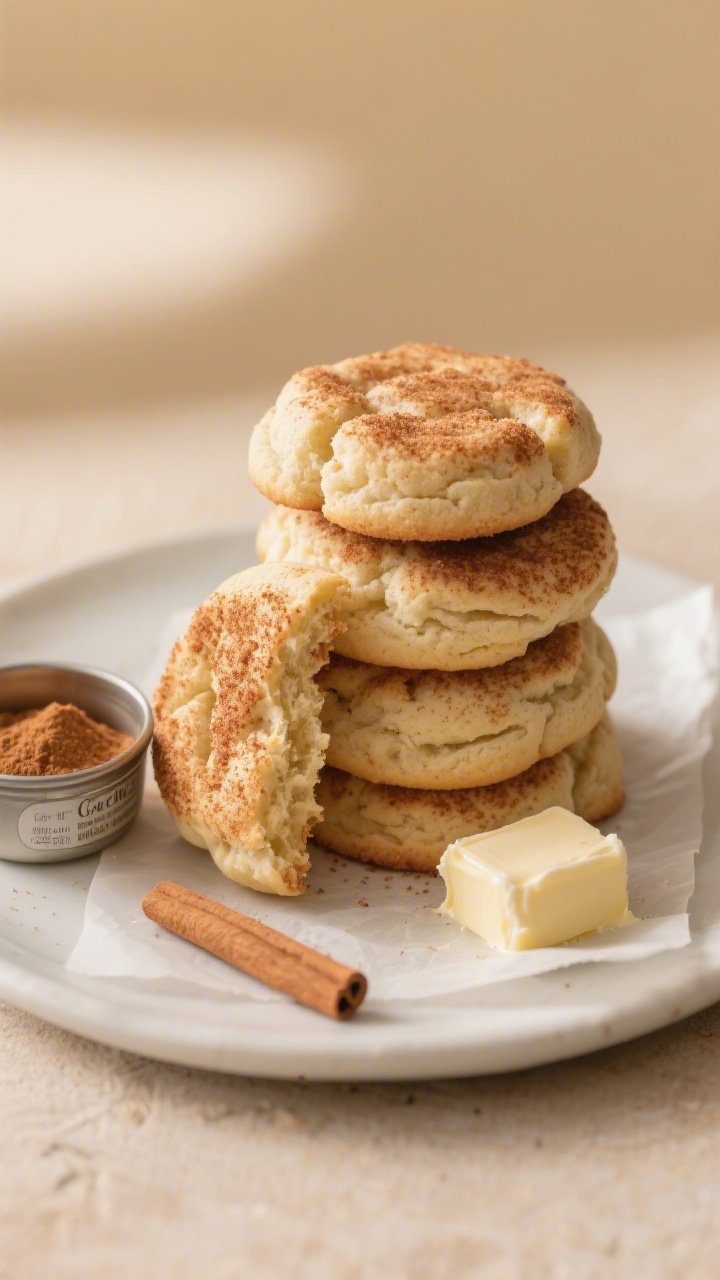
Classic snickerdoodles are the soft pillows of the cookie universe. The secret is cream of tartar—it gives that signature tang and tender chew. Kids love the rolling step: tossing dough balls in cinnamon sugar is messy in the best way.
Ingredients:
- 1/2 cup (115 g) unsalted butter, softened
- 3/4 cup (150 g) granulated sugar
- 1 large egg
- 1 teaspoon vanilla extract
- 1 1/3 cups (175 g) all-purpose flour
- 1 teaspoon cream of tartar
- 1/2 teaspoon baking soda
- 1/4 teaspoon fine salt
For Rolling:
- 2 tablespoons granulated sugar
- 1 teaspoon ground cinnamon
Instructions:
- Preheat oven to 350°F (175°C). Line two baking sheets with parchment.
- Cream butter and sugar until fluffy, 2 minutes. Beat in egg and vanilla until smooth.
- Whisk flour, cream of tartar, baking soda, and salt. Add to wet ingredients and mix just to combine.
- In a small bowl, mix 2 tbsp sugar and cinnamon. Scoop dough into 1-tablespoon balls and roll in cinnamon sugar.
- Arrange on sheets 2 inches apart. Bake 8–10 minutes, until puffy with set edges but soft centers.
- Cool 5 minutes on the sheet, then transfer to a rack.
Pro tip: For extra crinkles, chill dough balls 15 minutes before baking. Want a twist? Add a tiny stuffed center: press a mini caramel into the dough ball and seal before rolling—instant gooey core.
5. Paint-Your-Own Shortbread Cut-Outs That Double As Edible Art

Think sugar cookies’ fancy cousin with fewer ingredients and a buttery snap. These shortbread cut-outs hold shape beautifully, making them perfect for cookie painting. Kids get to brush on edible “paint” made from milk and food coloring—hello, rainy day project that ends in dessert.
Ingredients:
- 1 cup (230 g) unsalted butter, softened
- 1/2 cup (60 g) powdered sugar
- 1/4 cup (50 g) granulated sugar
- 1 teaspoon vanilla extract
- 2 cups (260 g) all-purpose flour
- 1/4 teaspoon fine salt
Edible “Paint” & Decoration:
- 3 tablespoons milk (or dairy-free milk)
- Gel or liquid food coloring (assorted)
- Optional: sprinkles, sanding sugar, mini chocolate chips
Instructions:
- In a bowl, beat butter, powdered sugar, and granulated sugar until creamy, 1–2 minutes. Mix in vanilla.
- Stir in flour and salt just until a dough forms. Divide in half, flatten into discs, and chill 20–30 minutes.
- Preheat oven to 325°F (165°C). Line baking sheets with parchment.
- On a lightly floured surface, roll dough to 1/4-inch thickness. Cut into shapes with cookie cutters and transfer to sheets.
- Bake 12–15 minutes, until edges are just lightly golden. Cool completely.
- Make “paint”: divide milk into small cups and tint each with a drop or two of food coloring. Using clean brushes, paint cooled cookies. Add sprinkles while paint is wet so they stick.
- Let cookies dry 20–30 minutes before stacking.
Tips: Keep brushes just damp, not soaked, so cookies don’t get soggy. For a glossy finish, whisk a teaspoon of light corn syrup into each paint cup. Shapes to try: stars, hearts, dinosaurs—then label them with edible marker once dry.
Kid Baking Success Cheatsheet
Want smoother sessions and fewer “Is it ready yet?” moments? These quick pointers help.
- Set up a mise en place tray: pre-measure ingredients into small bowls so kids can pour and mix without hunting.
- Use a cookie scoop for consistent sizes and less sticky hands.
- Line pans with parchment to prevent sticking and make cleanup easier.
- Cool cookies on a rack to keep bottoms crisp and avoid steam-sog.
- Teach a gentle fold: big circle with the spatula, quarter-turn the bowl—kids love the “secret technique.”
Allergy & Swap Notes
- Dairy-free: swap butter for a good plant-based stick and milk for non-dairy in Recipe 5.
- Egg-free: in the sugar cookies and skillet cookie, 3 tablespoons applesauce can replace 1 egg; bake an extra 1–2 minutes if needed.
- Nut-free: use sunflower seed butter for Monster Bites and check candy labels.
- Gluten-free: use a 1:1 gluten-free flour blend with xanthan gum for the baked recipes; texture stays close.
Mini Lesson Moments For Kids
- Math: Have them level flour with a knife and count scoops aloud.
- Science: Show how baking soda makes cookies rise and spread—spot the bubbles!
- Safety: “Cool-down dance” time while pans rest—no touching until you finish the dance.
There you go—five kid-friendly cookie adventures that are light on fuss and heavy on fun. Whether you’re rolling in sprinkles, painting buttery shortbread, or slicing a giant skillet cookie like it’s dessert pizza, you’ll end up with something warm and sweet to share. Tie on those tiny aprons and press start on the oven… your new favorite family tradition is about to smell amazing.
Printable Recipe Card
Want just the essential recipe details without scrolling through the article? Get our printable recipe card with just the ingredients and instructions.