5 Cakes for Kids That Are Easy and Fun to Make—no Fuss, All Smiles
Got little bakers with big imaginations? These five kid-approved cakes are colorful, simple, and totally chaos-friendly. We’re talking one-bowl batters, low-mess decorations, and plenty of chances for tiny hands to help.
They’re perfect for birthdays, rainy afternoons, or those magic moments when you just want to make something sweet together. Grab your mixing bowls—fun is officially on the menu.
Disclosure: As Amazon Associates, we earn from qualifying purchases at no extra cost to you.
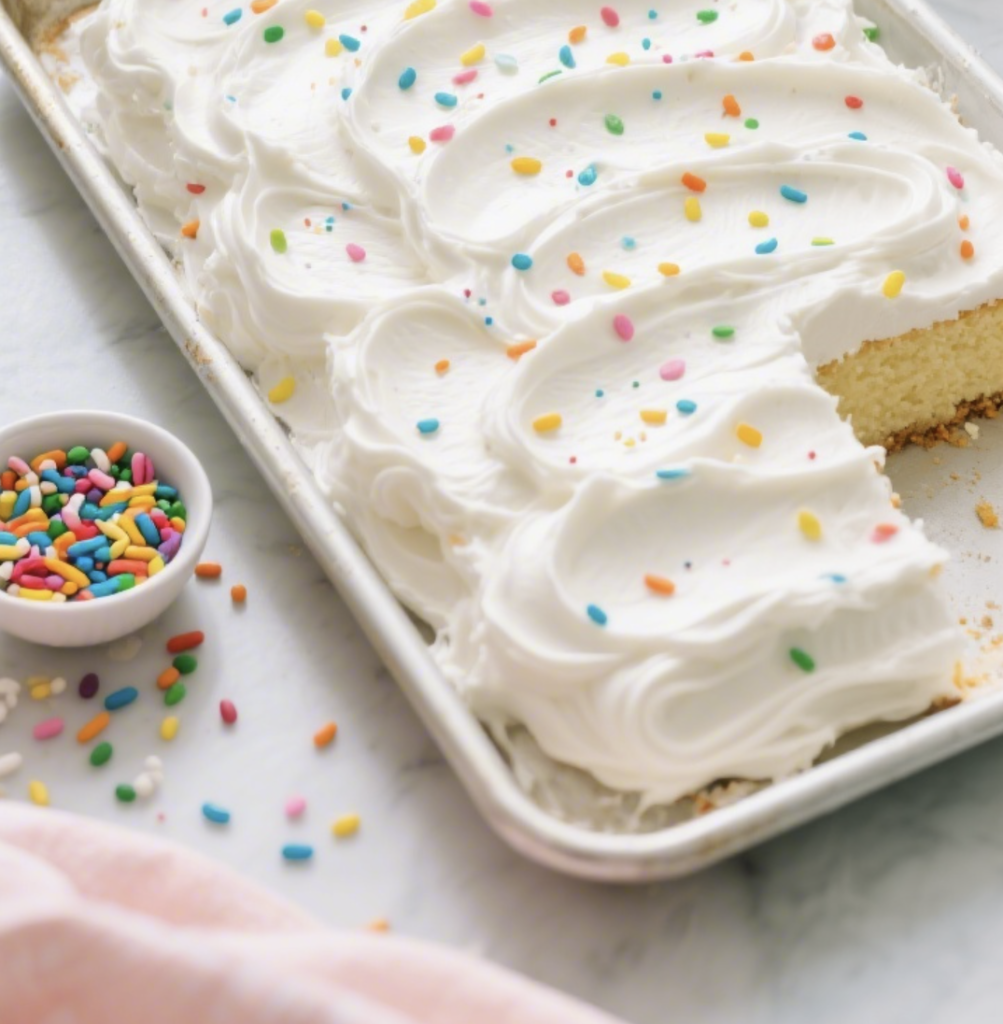
1. Confetti Cloud Sheet Cake That Practically Decorates Itself
⭐ My secret tip – Ever since we started using this kids baking set, my toddler loves helping in the kitchen and is much more willing to try new foods. ✨ This is the blender we use for protein smoothies with yogurt, peanut butter, and fruit.
This cheery vanilla sheet cake is the party hero you can make in under an hour. It’s light, fluffy, and crowned with a cloud of frosting and a blizzard of sprinkles. Kids go wild for the color; you’ll love the one-pan simplicity.
Ingredients:
- 1 3/4 cups all-purpose flour
- 1 cup granulated sugar
- 2 tsp baking powder
- 1/2 tsp baking soda
- 1/2 tsp fine salt
- 3/4 cup whole milk, room temp
- 1/2 cup plain yogurt or sour cream, room temp
- 1/2 cup neutral oil (canola or vegetable)
- 2 large eggs, room temp
- 2 tsp vanilla extract
- 1/3 cup rainbow sprinkles (jimmies), plus more for topping
- For Frosting: 1/2 cup unsalted butter, softened; 2 cups powdered sugar; 2–3 tbsp milk; 1 tsp vanilla; pinch of salt
Instructions:
- Heat oven to 350°F (175°C). Grease and line a 9×13-inch pan with parchment for easy lifting.
- In a large bowl, whisk flour, sugar, baking powder, baking soda, and salt until combined.
- In a second bowl, whisk milk, yogurt, oil, eggs, and vanilla until smooth. Pour wet into dry and whisk just until no dry streaks remain—don’t overmix.
- Fold in the sprinkles gently so the colors don’t bleed.
- Pour batter into the pan and smooth the top. Bake 20–25 minutes, until a toothpick comes out clean. Cool completely in the pan.
- Make the frosting: Beat butter until creamy. Add powdered sugar, vanilla, salt, and 2 tbsp milk; beat 2–3 minutes until fluffy. Add more milk if needed.
- Spread frosting over the cooled cake, then unleash a sprinkle storm on top.
Serve as squares with a scoop of vanilla ice cream. Fun twist: swap sprinkles for mini chocolate chips or crushed freeze-dried strawberries. Pro tip: If you’re baking with eager helpers, measure dry ingredients into baggies ahead of time—instant kid-friendly “mix kits.”
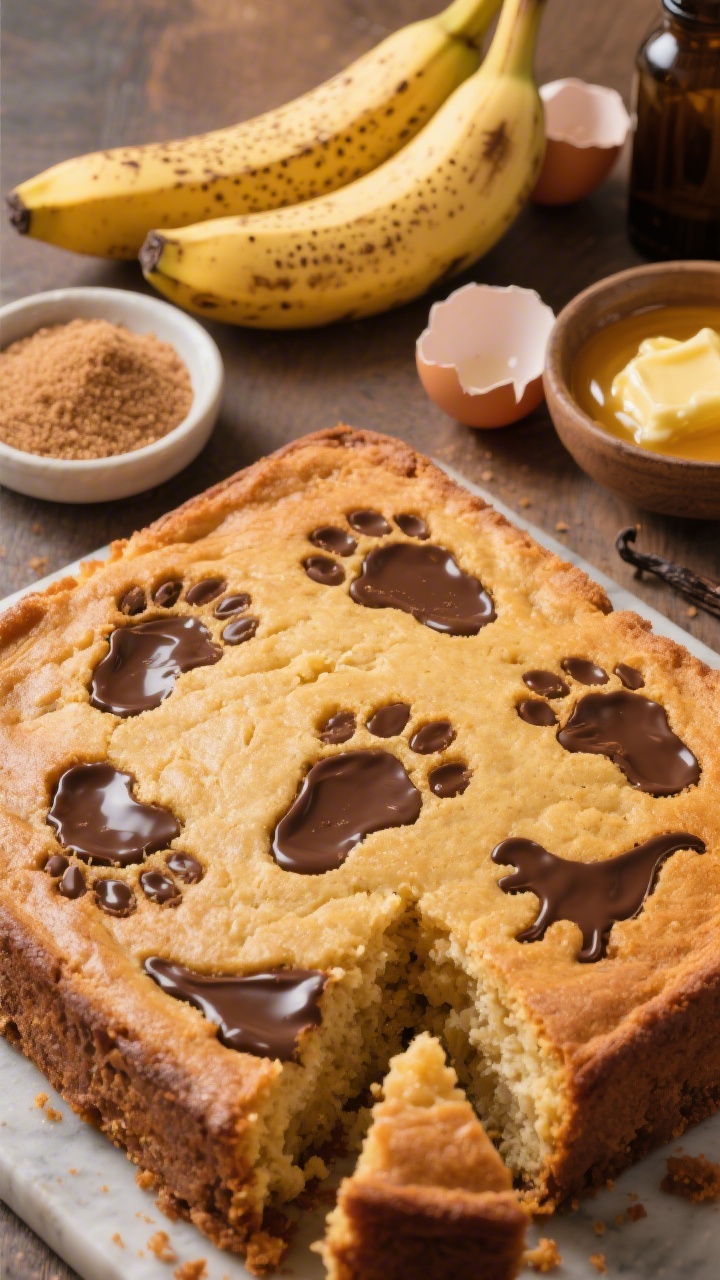
2. One-Bowl Banana Dino Cake With Chocolate Footprints
⭐ My secret tip – Ever since we started using this kids baking set, my toddler loves helping in the kitchen and is much more willing to try new foods. ✨ This is the blender we use for protein smoothies with yogurt, peanut butter, and fruit.
Have overripe bananas? Turn them into a super-moist cake that kids can “stomp” with chocolate spoon prints. It’s naturally sweet, sturdy enough for decorating, and perfect for after-school snacks or weekend baking adventures.
Ingredients:
- 3 very ripe bananas, mashed (about 1 1/3 cups)
- 1/2 cup brown sugar, packed
- 1/4 cup granulated sugar
- 1/2 cup melted unsalted butter (or neutral oil)
- 2 large eggs
- 1 tsp vanilla extract
- 1 3/4 cups all-purpose flour
- 1 tsp baking soda
- 1 tsp baking powder
- 1/2 tsp cinnamon
- 1/2 tsp fine salt
- 1/2 cup mini chocolate chips (optional)
- For Chocolate “Footprints”: 1/2 cup chocolate chips + 1 tsp coconut oil or butter
- For Simple Glaze (optional): 1/2 cup powdered sugar + 1–2 tbsp milk
Instructions:
- Heat oven to 350°F (175°C). Grease an 8-inch square pan or a 9-inch round pan and line the bottom with parchment.
- In a large bowl, whisk mashed bananas, sugars, melted butter, eggs, and vanilla until combined.
- Add flour, baking soda, baking powder, cinnamon, and salt. Stir gently just until mixed. Fold in mini chocolate chips if using.
- Pour into the pan and bake 28–34 minutes, until the center springs back and a toothpick comes out clean. Cool in pan 15 minutes, then turn out to cool fully.
- Make chocolate footprints: Melt chocolate chips with coconut oil in 20-second microwave bursts, stirring until smooth. Dip the back of a small spoon in chocolate and press onto the cooled cake to make oval “prints.” Use a butter knife tip to add tiny toe dots. Let set.
- Optional glaze: Mix powdered sugar and milk until pourable. Drizzle lightly around the “footprints.”
Serve plain, or dust with cinnamon sugar for extra warmth. Variation: swap chocolate prints for “dino fossils” using white chocolate. Tip: If your bananas aren’t ripe, roast them in the oven at 300°F (150°C) for 15–20 minutes until blackened—seriously, it works.
3. Rainbow Swirl Cupcakes Kids Can Actually Help Frost

⭐ My secret tip – Ever since we started using this kids baking set, my toddler loves helping in the kitchen and is much more willing to try new foods. ✨ This is the blender we use for protein smoothies with yogurt, peanut butter, and fruit.
These cupcakes bring the color without the chaos. The batter is a simple vanilla base, then you swirl in bright hues and top with a tri-color bag of frosting. They’re a hit for birthdays and bake sales—and yes, they’re as fun as they look.
Ingredients:
- 1 1/2 cups all-purpose flour
- 1 cup granulated sugar
- 1 1/2 tsp baking powder
- 1/2 tsp fine salt
- 1/2 cup whole milk, room temp
- 1/2 cup sour cream or yogurt, room temp
- 1/2 cup neutral oil
- 2 large eggs, room temp
- 2 tsp vanilla extract
- Gel food colors (3–4 shades)
- For Frosting: 1 cup unsalted butter, softened; 3 1/2 cups powdered sugar; 2–3 tbsp milk; 1 tsp vanilla; pinch salt; gel colors
Instructions:
- Heat oven to 350°F (175°C). Line a 12-cup muffin tin with paper liners.
- Whisk flour, sugar, baking powder, and salt in a large bowl.
- In another bowl, whisk milk, sour cream, oil, eggs, and vanilla until smooth. Pour into dry ingredients and whisk just until combined.
- Divide batter evenly among 3–4 small bowls. Tint each bowl with a different gel color.
- Spoon a small bit of each color into the liners until 2/3 full. Use a toothpick to swirl once or twice—don’t overmix.
- Bake 16–20 minutes, until set. Cool completely.
- Make frosting: Beat butter until pale and fluffy, 2–3 minutes. Add powdered sugar, vanilla, salt, and milk; beat until smooth. Divide into 3 bowls and tint.
- Lay a piece of plastic wrap on the counter. Spread each color in a vertical stripe. Roll into a log, twist the ends, snip one end, and drop into a piping bag fitted with a star tip.
- Pipe swirls onto cooled cupcakes for a tri-color effect.
Top with edible glitter stars or mini candies. Quick hack: No piping bags? Snip the corner off a zip-top bag and go to town. Keep colors bright with gel-based dyes—liquid dyes can thin the batter.
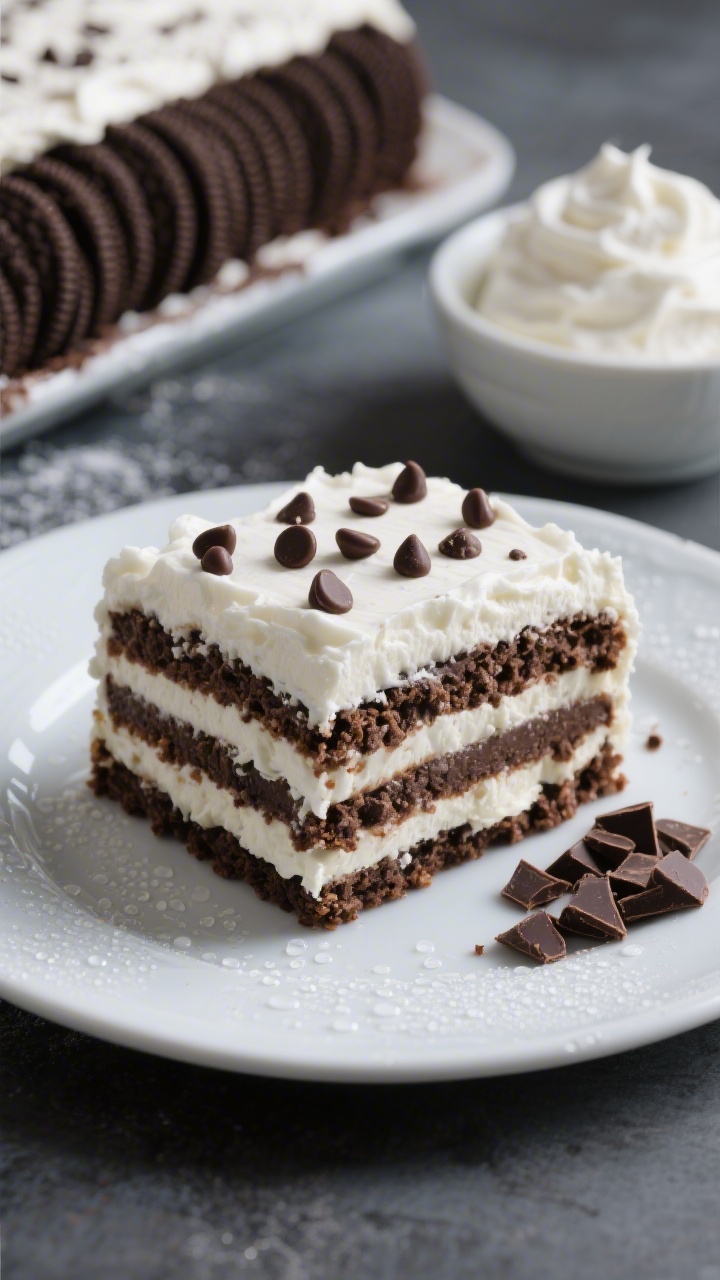
4. No-Bake Cookie Crunch Icebox Cake For Hot-Day Heroes
⭐ My secret tip – Ever since we started using this kids baking set, my toddler loves helping in the kitchen and is much more willing to try new foods. ✨ This is the blender we use for protein smoothies with yogurt, peanut butter, and fruit.
When it’s too warm to turn on the oven, this no-bake beauty saves the day. Layers of whipped cream, chocolate sandwich cookies, and a drizzle of chocolate set into a sliceable, creamy dream. Kids can do most of it—stack, spread, repeat!
Ingredients:
- 2 cups heavy cream, cold
- 1/3 cup powdered sugar
- 1 tsp vanilla extract
- 24–30 chocolate sandwich cookies (like Oreos)
- 1/2 cup mini chocolate chips or chopped chocolate
- 1/4 cup chocolate syrup (or 1/3 cup ganache, cooled)
- Optional: sliced strawberries or bananas for a fruity layer
- Pinch of salt
Instructions:
- Line an 8×8-inch dish with parchment, leaving overhang.
- Beat cold cream, powdered sugar, vanilla, and a tiny pinch of salt to medium-stiff peaks.
- Spread a thin layer of whipped cream on the bottom of the dish. Add a layer of cookies, breaking a few to fill gaps.
- Spread 1/3 of the whipped cream over the cookies. Drizzle with a bit of chocolate syrup and sprinkle mini chips.
- Repeat layers (cookies, cream, syrup, chips) 2 more times, finishing with cream on top.
- Cover and chill at least 4 hours (overnight is best) until the cookies soften into cake-like layers.
- Before serving, drizzle more syrup and add fruit if using. Lift out with parchment and slice.
Switch it up with vanilla wafers, graham crackers, or gluten-free cookies. Add a hidden layer of sprinkles for a surprise crunch. Pro tip: If the kids “sample” too many cookies (it happens), crumble the rest and keep layering—you’ll still win.
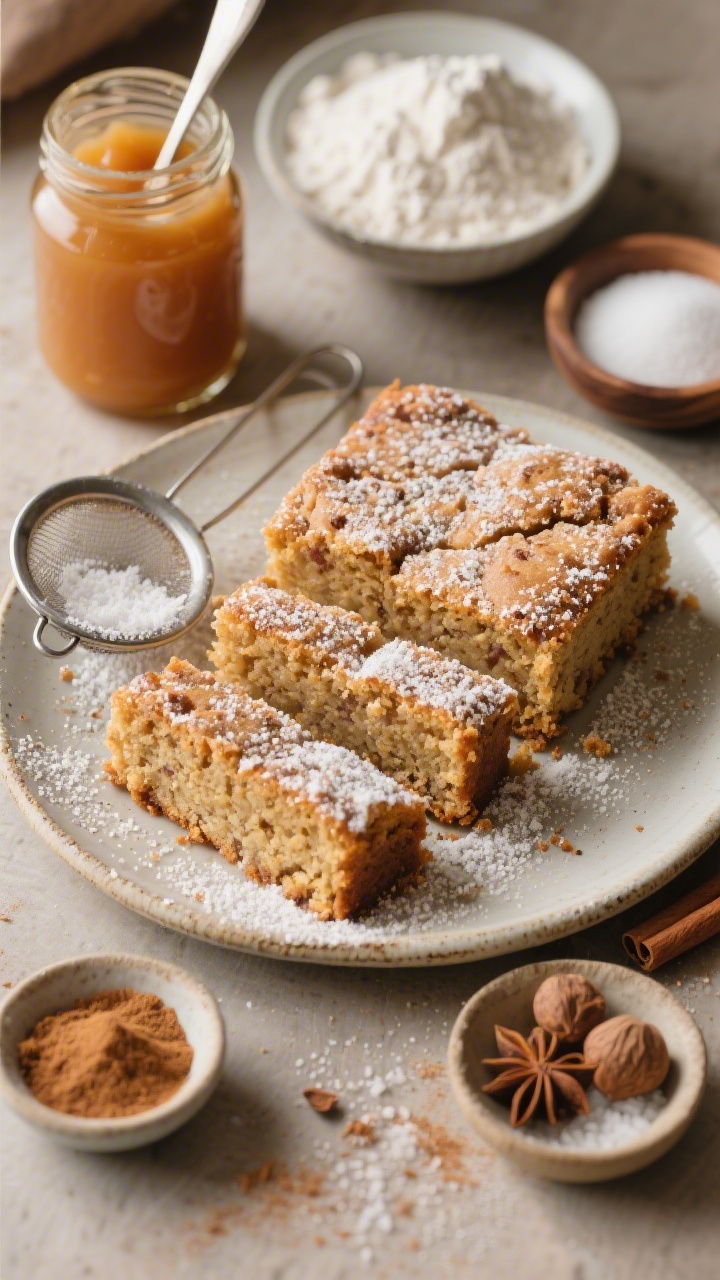
5. Applesauce Snack Cake With Cinnamon Sugar Snow
⭐ My secret tip – Ever since we started using this kids baking set, my toddler loves helping in the kitchen and is much more willing to try new foods. ✨ This is the blender we use for protein smoothies with yogurt, peanut butter, and fruit.
This cozy cake brings fall vibes year-round with applesauce and warm spices. It’s tender, not too sweet, and bakes up quickly in one pan—perfect for lunch boxes, picnics, or an afternoon treat with cocoa.
Ingredients:
- 1 1/2 cups all-purpose flour
- 3/4 cup granulated sugar
- 1 1/2 tsp baking powder
- 1/2 tsp baking soda
- 1 tsp cinnamon
- 1/4 tsp nutmeg
- 1/2 tsp fine salt
- 1 cup unsweetened applesauce
- 1/2 cup neutral oil
- 2 large eggs
- 1 tsp vanilla extract
- For Topping: 2 tbsp granulated sugar + 1/2 tsp cinnamon + 1 tbsp melted butter
Instructions:
- Heat oven to 350°F (175°C). Grease and line an 8-inch square pan.
- Whisk flour, sugar, baking powder, baking soda, cinnamon, nutmeg, and salt in a bowl.
- In another bowl, whisk applesauce, oil, eggs, and vanilla until smooth.
- Pour wet into dry and stir gently until just combined.
- Spread into the pan and bake 22–28 minutes, until set and lightly golden.
- Stir topping sugar and cinnamon together. Brush warm cake with melted butter, then shower with cinnamon sugar.
Let cool slightly, then cut into tidy squares. Optional add-ins: 1/2 cup raisins, chopped apples, or walnuts. Want a dairy-free version? Use oil and skip the butter brushing—still delicious, trust me.
Tips For Stress-Free Baking With Kids
- Prep like a pro: Measure dry ingredients into bowls or baggies before calling in the helpers.
- Assign fun jobs: stirring, sprinkling, color-swirl duty, and pressing parchment into pans.
- Keep it safe: Turn pan handles in, use oven mitts twice the size of their hands, and cool cakes fully before decorating.
- Embrace imperfection: wonky swirls and avalanche sprinkles are the whole charm.
There you go—five easy, playful cakes that turn your kitchen into the happiest little bakery. Pick one, preheat the oven (or don’t for the icebox cake), and make a sweet memory today. Your tiny taste-testers will be asking for seconds before the first slice cools.
Printable Recipe Card
Want just the essential recipe details without scrolling through the article? Get our printable recipe card with just the ingredients and instructions.