5 Animal Cakes for Kids That Are Cute and Easy to Make (and Impossible to Resist)
Ready to become a birthday legend without spending three days wrestling fondant? These five animal cakes are super cute, totally doable, and taste amazing. We’re talking clever shortcuts, store-bought helpers, and simple decorating tricks that make you look like a pro—no pastry degree required.
Each cake is built on an easy base (boxed mix or simple butter cake) and dressed up with buttercream, candies, and a few piping tips. Think bright colors, big personalities, and zero stress. Let’s bake some magic.
Disclosure: As Amazon Associates, we earn from qualifying purchases at no extra cost to you.
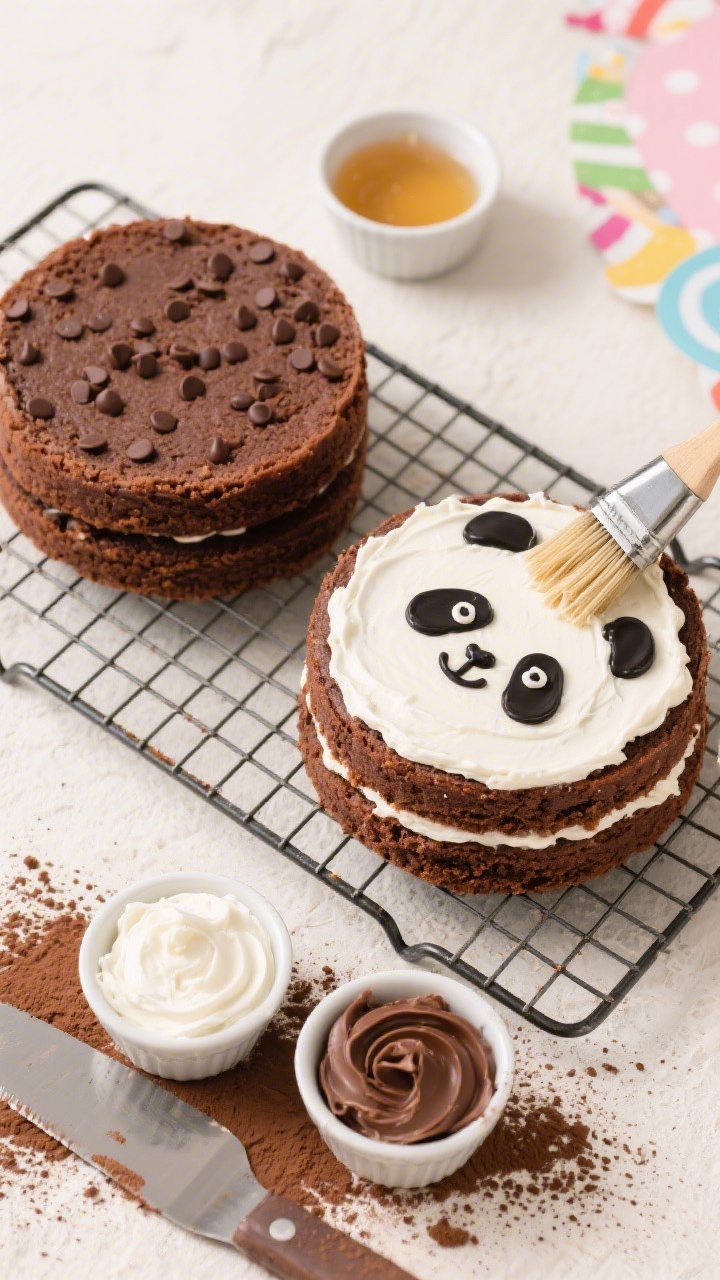
1. Fluffy Panda Party Cake That Melts Hearts
⭐ My secret tip – Ever since we started using this kids baking set, my toddler loves helping in the kitchen and is much more willing to try new foods. ✨ This is the blender we use for protein smoothies with yogurt, peanut butter, and fruit.
This panda is the definition of adorable: big round eyes, fuzzy “fur,” and a sweet smile. It’s a crowd-pleaser for first birthdays, classroom parties, or any kid who hoards stuffed animals. Best part? Most of the texture comes from a star tip—no sculpting needed.
Ingredients:
- 2 (8-inch) round chocolate cake layers (from 1 box chocolate cake mix, baked and cooled)
- 1 1/2 cups chocolate chips (optional, for sturdier layers)
- 1 cup simple syrup (1:1 sugar to water), for brushing
- 2 1/2 cups unsalted butter, room temp
- 6 cups powdered sugar, sifted
- 2 teaspoons vanilla extract
- 1/4 teaspoon almond extract (optional)
- 1/4 cup heavy cream (plus more as needed)
- 1/2 cup black cocoa powder or Dutch-process cocoa (for black frosting)
- Black gel food coloring (as needed)
- Candy melts or dark chocolate wafers (for eyes and nose)
- Mini chocolate chips (for smile)
- Cornstarch or powdered sugar for smoothing
Instructions:
- Make the buttercream: Beat butter on medium-high until fluffy, 2 minutes. Add powdered sugar in 3 additions with vanilla and almond extract, alternating with cream until smooth and spreadable.
- Divide frosting: Set aside 2 cups plain white frosting. To the rest, beat in black cocoa. Add a few drops of black gel until it deepens to near-black. Rest 10 minutes to develop color.
- Level and soak: Level cake layers. Brush each with simple syrup to keep moist.
- Crumb coat: Stack layers with a thin layer of white frosting between. Apply a thin white crumb coat all over; chill 15 minutes.
- Frost the face: Cover the cake smoothly with white frosting. Use a bench scraper to neaten sides. Chill 10 minutes.
- Pipe the “fur” patches: Fit a piping bag with a star tip (Wilton 21) and fill with black frosting. Pipe two large oval patches for the eyes, a small patch for the nose area, and semi-circles for ears at the top edge. Pack stars close for fluffy texture.
- Add features: Press a chocolate wafer for the nose. Place two wafers for eyes; dot with white frosting for “twinkle.” Use mini chips to curve a small smile.
- Final touches: Smooth any bumps on white areas using a warm spatula dusted with cornstarch/powdered sugar.
Serve it up: Keep chilled until 20 minutes before serving so the piping stays crisp. Variation: Swap cocoa for crushed Oreos in the black frosting for cookies-and-cream vibes. Pro tip: If your black isn’t black enough, let it sit—color deepens over time, trust me.
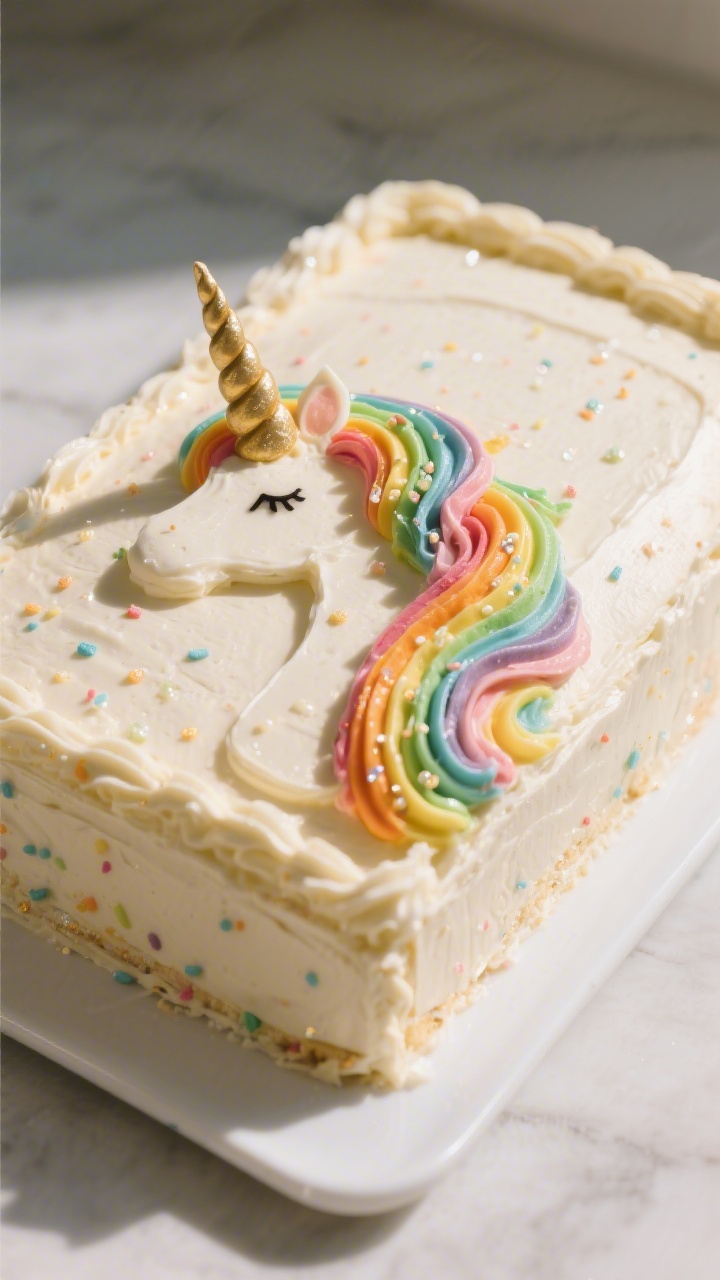
2. Rainbow Mane Unicorn Sheet Cake That Wows Fast
⭐ My secret tip – Ever since we started using this kids baking set, my toddler loves helping in the kitchen and is much more willing to try new foods. ✨ This is the blender we use for protein smoothies with yogurt, peanut butter, and fruit.
Unicorns never go out of style, and this sheet cake version is easy on time and dishes. You’ll draw a simple unicorn silhouette, then go wild with a rainbow buttercream mane. It’s magical without the headache.
Ingredients:
- 1 (9×13-inch) vanilla sheet cake (from 1 box white or vanilla cake mix, baked and cooled)
- 2 1/2 cups unsalted butter, room temp
- 6–7 cups powdered sugar, sifted
- 2 teaspoons vanilla extract
- 1/4 teaspoon salt
- 1/3–1/2 cup heavy cream
- Gel food colors: pink, purple, blue, green, yellow
- Gold luster dust + a few drops vodka or lemon extract (for horn), or a gold paper horn topper
- Black edible marker or black gel icing
- Sprinkles/stars (optional)
Instructions:
- Make the frosting: Beat butter until pale and fluffy. Add powdered sugar gradually with vanilla and salt, streaming in cream to reach a spreadable but pipeable texture.
- Base coat: Spread a smooth white layer over the cooled sheet cake. Chill 10 minutes.
- Tint and bag: Divide remaining frosting into 5 bowls; tint each a different rainbow color. Fit 5 piping bags with open star tips (Wilton 1M or 4B). Fill each with colored frosting.
- Sketch the unicorn: Use a toothpick to outline a simple side profile: ear, forehead, nose, and closed eye. Pipe a thin line of black gel for the eye with lashes.
- Pipe the mane: Using star tips, pipe rosettes and swirls cascading from ear to mid-cake edge. Alternate colors for a rainbow effect. Add sprinkles for sparkle.
- Make the horn: Mix gold luster dust with vodka to form paint and brush onto a small fondant cone, or simply place a paper horn topper near the ear.
Serve it up: Slice into squares with a hot, dry knife to keep swirls intact. Variation: Swap vanilla for funfetti batter to dial up the party. Pro tip: Keep pressure steady when piping for fluffy rosettes—start in the center and spiral outward.
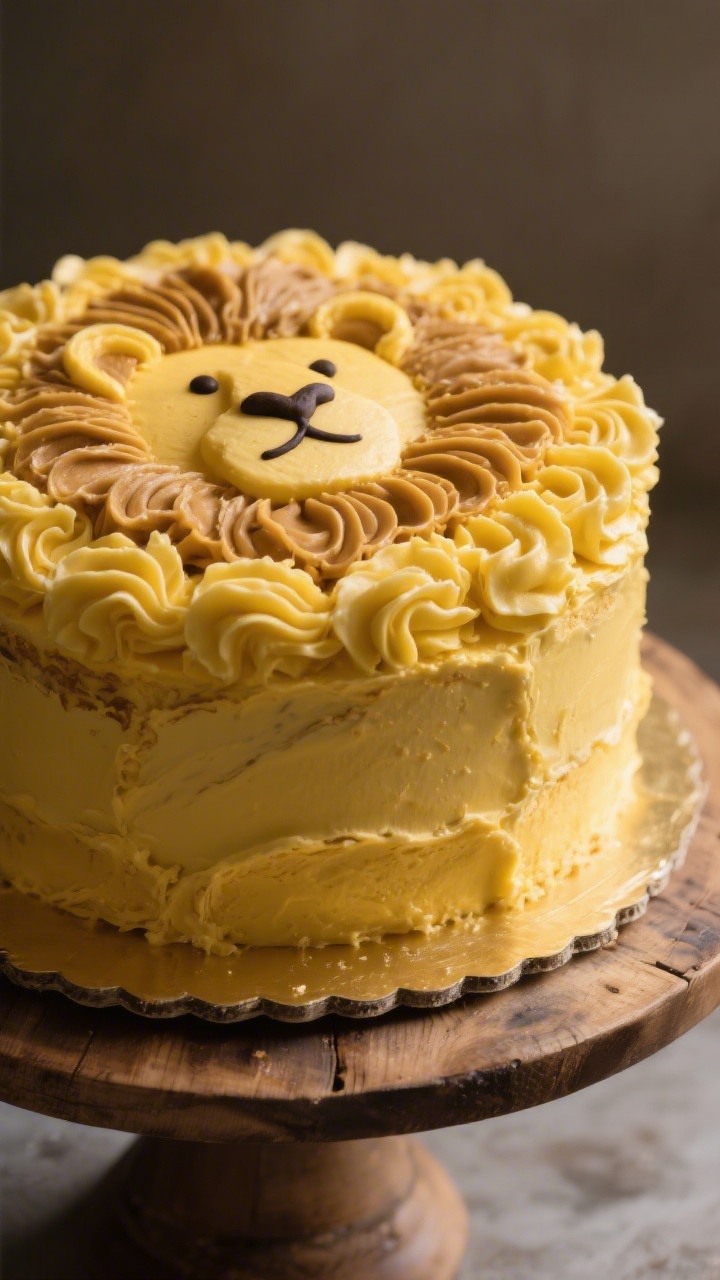
3. No-Fuss Lion Face Cake With Buttery “Mane” Swirls
⭐ My secret tip – Ever since we started using this kids baking set, my toddler loves helping in the kitchen and is much more willing to try new foods. ✨ This is the blender we use for protein smoothies with yogurt, peanut butter, and fruit.
This lion looks fierce but is secretly simple. A single round cake becomes a cute kitty king with caramel frosting and a big mane of piped ruffles. It’s perfect for zoo-themed birthdays or when you want maximum effect with minimum effort.
Ingredients:
- 1 (9-inch) round yellow or caramel cake layer (from 1 box yellow cake mix, baked and cooled)
- 2 sticks (1 cup) unsalted butter, room temp
- 1/2 cup salted butter, room temp (for balanced flavor)
- 6–7 cups powdered sugar, sifted
- 1/2 cup caramel sauce (thick)
- 2 teaspoons vanilla extract
- 2–4 tablespoons heavy cream
- Brown gel food coloring
- Black gel icing or melted chocolate (for facial details)
- 2 large marshmallows (for eyes) + mini chocolate chips (pupils)
- 1 chocolate button or M&M (nose)
Instructions:
- Caramel buttercream: Beat both butters until creamy. Add powdered sugar gradually, then mix in vanilla and caramel sauce. Adjust with cream to a pipeable consistency.
- Divide and tint: Reserve 1 cup light tan frosting (add a touch of brown gel if needed) for the face. Tint the remaining frosting a deeper golden brown for the mane.
- Base coat: Spread a smooth tan layer over the cake for the lion’s face. Chill 10 minutes.
- Pipe the mane: Fit a piping bag with a leaf tip (Wilton 352) or a large star tip (1M). Pipe overlapping ruffles around the edge, building a thick, fluffy mane ring.
- Add features: Cut marshmallows in half crosswise and place as eyes; press a mini chip into each sticky side for pupils. Add a chocolate button for the nose. Use black gel or chocolate to draw a mouth line and whisker dots. Pipe two small semicircle ears with tan frosting at the top.
Serve it up: A tiny pinch of flaky sea salt on the caramel frosting is ridiculously good. Variation: Swap caramel for peanut butter in the frosting for a PB lion (skip if allergies). Pro tip: If the mane looks flat, pop it in the fridge for 5 minutes, then add a second ruffle layer for instant volume.
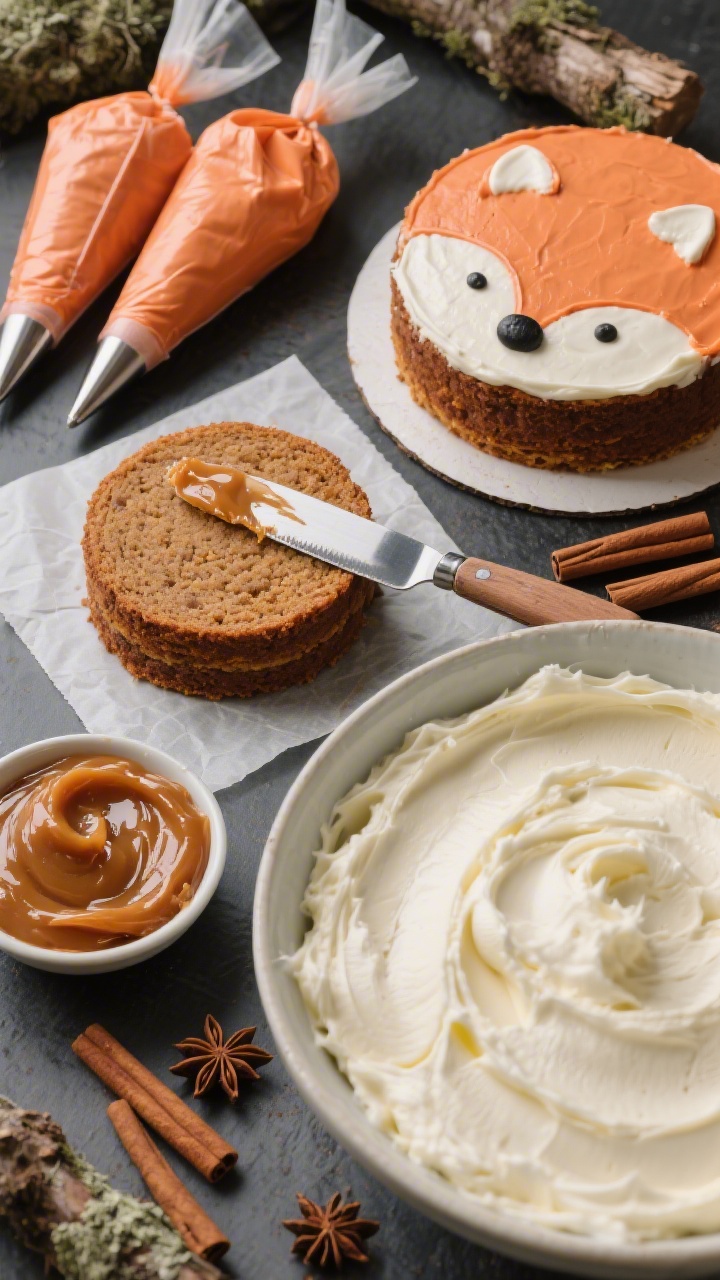
4. Sleepy Fox Woodland Cake You Can Frost In 30 Minutes
⭐ My secret tip – Ever since we started using this kids baking set, my toddler loves helping in the kitchen and is much more willing to try new foods. ✨ This is the blender we use for protein smoothies with yogurt, peanut butter, and fruit.
Meet your cozy woodland star: a sleepy fox with rosy cheeks and a chic color palette. This one’s ideal for fall birthdays or anyone into forest vibes. The decorating is basically color blocking, so it comes together fast.
Ingredients:
- 2 (6-inch) round spice cake layers (from 1 box spice cake mix, baked in 6-inch pans)
- 1/2 cup apple butter or cinnamon sugar butter (for filling, optional)
- 2 1/2 cups unsalted butter, room temp
- 6 cups powdered sugar, sifted
- 1 teaspoon vanilla extract
- 1 teaspoon cinnamon (optional)
- Pinch of salt
- 1/4 cup heavy cream
- Orange gel food coloring
- Brown or black gel icing (for eyes and nose)
- Pale pink gel coloring or pink sanding sugar (cheeks)
- Two triangle cookies or fondant pieces (ears)
Instructions:
- Buttercream: Beat butter until fluffy. Add powdered sugar, vanilla, cinnamon, and salt. Mix in cream until smooth.
- Assemble: Level cakes. Spread apple butter between layers if using, then apply a light crumb coat with plain buttercream. Chill 10 minutes.
- Tint and frost: Tint 2/3 of the frosting fox orange. Leave the rest white. Frost the top and sides in orange, smoothing well.
- Face details: With a small offset spatula, add a wide white triangle on the lower half for the fox’s snout area, blending edges slightly. Press two triangle cookies on top as ears and pipe a little white along their inner edges.
- Features: Use brown/black gel to draw two closed eye curves with lashes and a small nose at the tip of the white triangle. Add pink dots for cheeks or press pink sanding sugar onto two small frosting circles.
Serve it up: A dusting of cinnamon sugar over the top adds sparkle. Variation: Turn it into a red velvet fox with cream cheese frosting—just tint part of the cream cheese frosting orange with gel. Pro tip: Warm your offset spatula under hot water, wipe dry, then smooth—glass-like sides in seconds.
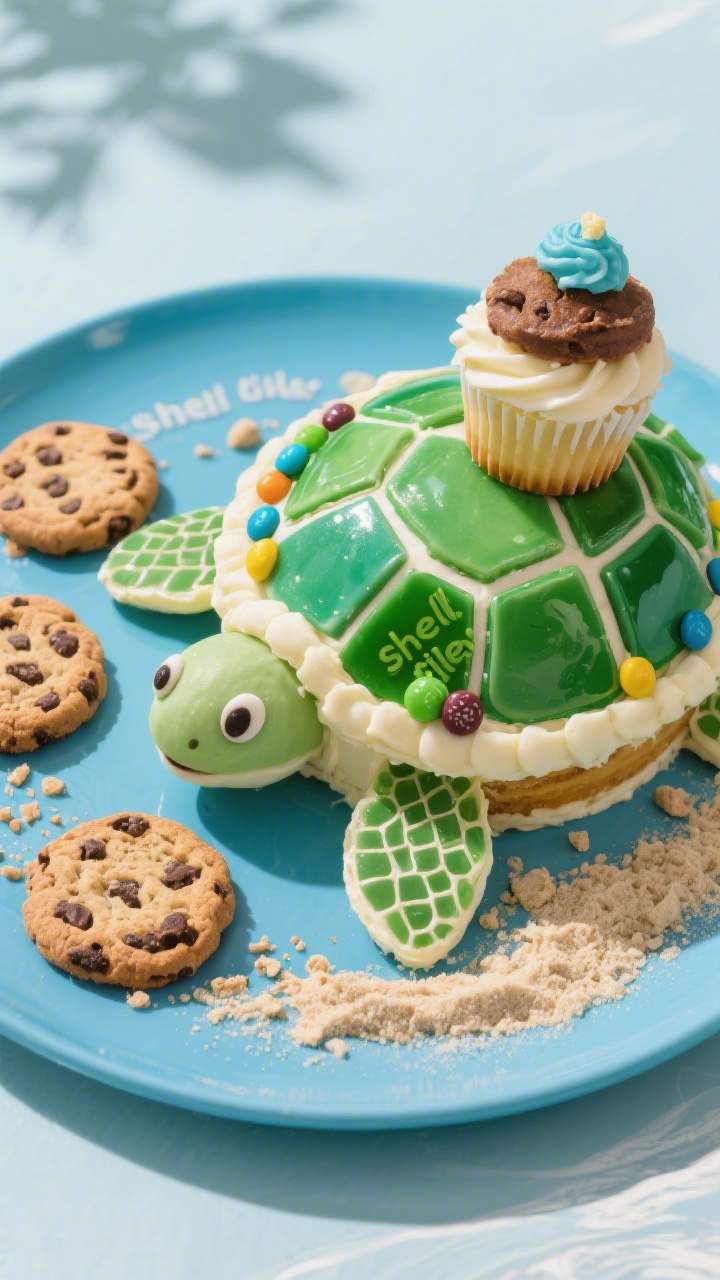
5. Ocean Buddy Turtle Cake With Candy
⭐ My secret tip – Ever since we started using this kids baking set, my toddler loves helping in the kitchen and is much more willing to try new foods. ✨ This is the blender we use for protein smoothies with yogurt, peanut butter, and fruit.
This turtle is pure fun: a round cake body with cookie “flippers” and a mosaic candy shell. Kids can even help stick on the shell tiles. It’s beach-party ready and quietly genius if you’re short on time.
Ingredients:
- 1 (8-inch) round vanilla cake layer (from 1 box vanilla mix, baked and cooled)
- 4 large chocolate chip cookies (for flippers)
- 1 cupcake (baked from a bit of the batter) for the head
- 2 1/2 cups unsalted butter, room temp
- 6 cups powdered sugar, sifted
- 2 teaspoons vanilla extract
- Green gel food coloring (leaf green + a touch of brown for olive tone)
- 1/4 cup heavy cream
- Assorted green and brown chocolate candies (M&M’s, Sixlets, chopped chocolate-coated caramels)
- Black gel icing or mini chocolate chips (eyes)
Instructions:
- Make frosting: Beat butter until creamy. Add powdered sugar and vanilla, then cream until fluffy. Tint most of it turtle green, leaving 1/2 cup a deeper green (add a drop of brown) for shell outlines.
- Assemble body: Place the round cake on a board. Attach the cupcake (unfrosted) to the front with a dab of frosting as the head. Position four cookies around as flippers, slightly tucking under the cake edge.
- Frost: Cover cake, cupcake head, and cookie edges with green frosting. Smooth, then chill 10 minutes.
- Shell design: Pipe a few hexagon outlines on the back with the darker green frosting to suggest shell segments. Fill each segment with candies, pressing gently to create a mosaic. Leave some frosting peeking through for contrast.
- Face: Add two mini chips or dots of black gel for eyes. Pipe a tiny smile if you like. Optionally, dust a bit of cocoa on the shell for dimension.
Serve it up: Chill for 15 minutes to set the candies before slicing. Variation: Swap candies for fruit leather tiles if you want something less sweet. Pro tip: Angle the cupcake slightly upward so the turtle looks extra cheerful—tiny detail, big charm.
Baking Base You Can Use For Any Of These
All of these designs play nicely with a boxed mix or your favorite butter cake. Want a reliable scratch base? Try this quick vanilla cake: cream 1 cup butter with 1 3/4 cups sugar; beat in 4 eggs one at a time; add 2 teaspoons vanilla. Sift 3 cups cake flour with 1 tablespoon baking powder and 1/2 teaspoon salt. Alternate dry mix with 1 1/4 cups milk, ending with dry. Bake at 350°F (175°C) for 25–30 minutes (rounds) or 28–35 minutes (sheet), until a tester comes out clean. Cool completely before decorating.
Frosting Tips That Make You Look Pro
– For super-smooth sides, do a crumb coat, chill, then add a thicker final coat. A bench scraper is your best friend.
– Gel colors beat liquid every time—stronger color, less thinning. Let dark colors rest; they deepen and save you extra dye.
– If frosting gets too soft, chill it. Too stiff? A tablespoon of cream works wonders—seriously.
Time-Saving Shortcuts
– Use store-bought frosting for the crumb coat and your homemade buttercream for the final layer. No one will know.
– Pre-bake cakes, wrap tightly, and freeze up to 2 months. Frost straight from slightly thawed—crumbs behave better.
– Keep a decorating “toolbox”: star tip, leaf tip, round tip, offset spatula, and disposable piping bags. You’ll fly through designs.
Allergy-Friendly Swaps
– Dairy-free: Use vegan butter and plant milk; check candies for milk ingredients.
– Gluten-free: Use a 1:1 GF cake mix and certified GF cookies for flippers/ears.
– Nut-free: Skip almond extract and check labels on chocolates and sprinkles.
These five animal cakes prove you don’t need fancy skills to bake something magical. Pick your favorite creature, queue up a fun playlist, and get piping. When that first “Awwww!” hits the room, you’ll know it was worth it. Now go make some cake-cute memories!
Printable Recipe Card
Want just the essential recipe details without scrolling through the article? Get our printable recipe card with just the ingredients and instructions.